Your product is photographed, the light is decent, and the listing still looks homemade. The culprit is almost always the background: a beige wall, the edge of a table, a shadow drifting into grey. When you remove the background from a product photo, you keep the object and drop the setting, leaving it on clean white. It is the most ordinary retouch in ecommerce, and it decides the first impression.
The task looks trivial. It stops being trivial the moment your object has hair, glass, a metallic reflection or a lace edge. That is where automatic cutouts leave a grey halo, a jagged outline or a chewed sleeve. This article takes the question in order: what your platform actually requires, the two available methods, the instruction that produces clean white, and the final check. If your problem starts earlier, at the shoot itself, our guide to product photography from a phone shot covers that stage.
The short answer
Two roads lead to a white background. The first one cuts out the object and replaces the setting with white: instant, and visible on difficult edges. The second one rewrites the image: you drop your photo in as a reference inside an image generator, ask for the same product isolated on pure white, and the model rebuilds the scene around the object. The second road gives clean edges on tricky materials and a believable shadow. In exchange it demands a strict check, because the product on screen must stay exactly the one the customer will receive.
Cutout, white background and transparency are three different requests
These three words get used interchangeably, and the confusion wastes time. Cutting out means separating the subject from its setting. Placing on white means flattening the result onto a plain surface. Making transparent means keeping an alpha channel, the invisible layer that tells every pixel whether it is opaque.
The distinction decides your output format, so settle it before generating anything. A JPEG file has no transparency channel, unlike PNG and WebP: a so called transparent JPEG is always a JPEG on white. Note as well that image models return a flattened picture. You get a real white background, not an alpha channel. For a product listing that is exactly right. For a visual meant to sit on a coloured banner, you will need a PNG cut out by a dedicated tool.
What marketplaces actually require
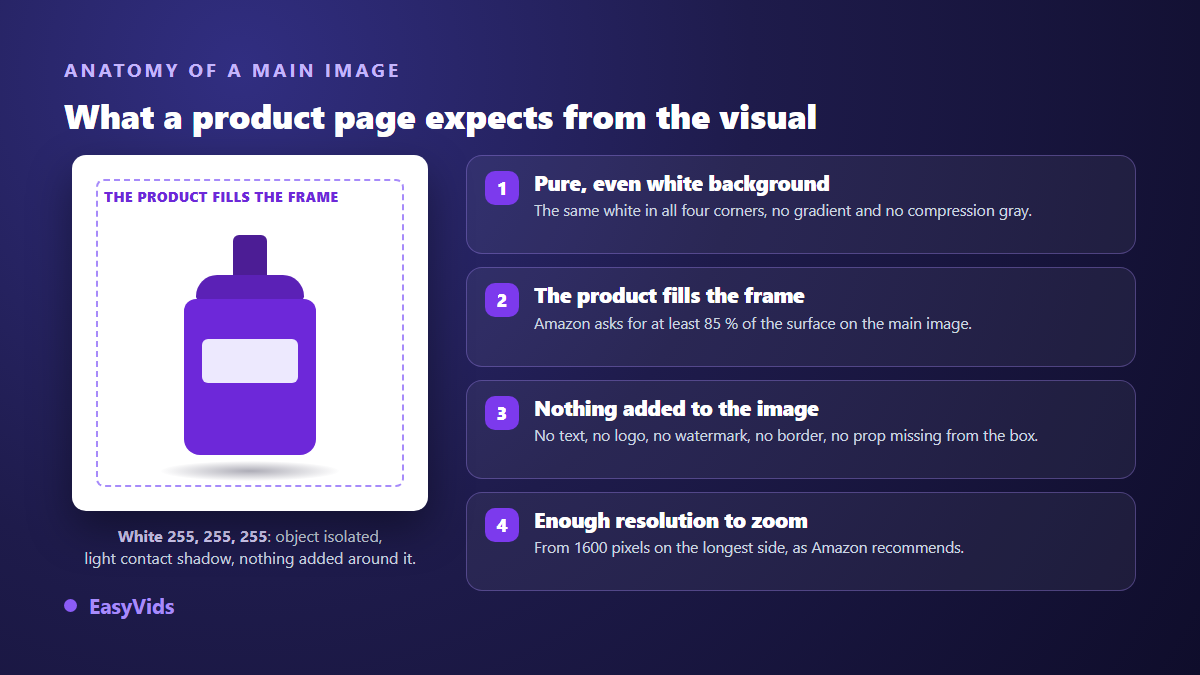
Look at the constraint before you pick a method. According to the image requirements Amazon publishes in Seller Central, the main image of a listing must show the product on a pure white background, the one retouching software reports as 255, 255, 255, with no added text, no logo, no watermark and no border. The product must fill at least 85 % of the frame. Amazon also recommends at least 1600 pixels on the longest side so the zoom function activates on the listing.
On the advertising side, the image rules of Google Merchant Center forbid promotional overlays and watermarks added onto the product visual. Other platforms are looser on secondary images and much stricter on the first one. One habit saves repeated work: produce your main images against the strictest rule among your channels, then adapt freely for social feeds and your own storefront.
Automatic cutout or AI rewrite
A cutout tool analyses your image and separates subject from background. It keeps your original pixels, which guarantees perfect fidelity to the product, and it can export a transparent PNG. Its limit is well known: it cannot invent information it never had. On a soft edge, a stray hair or a glass that shows the room behind it, it cuts the simplest way and leaves a mark.
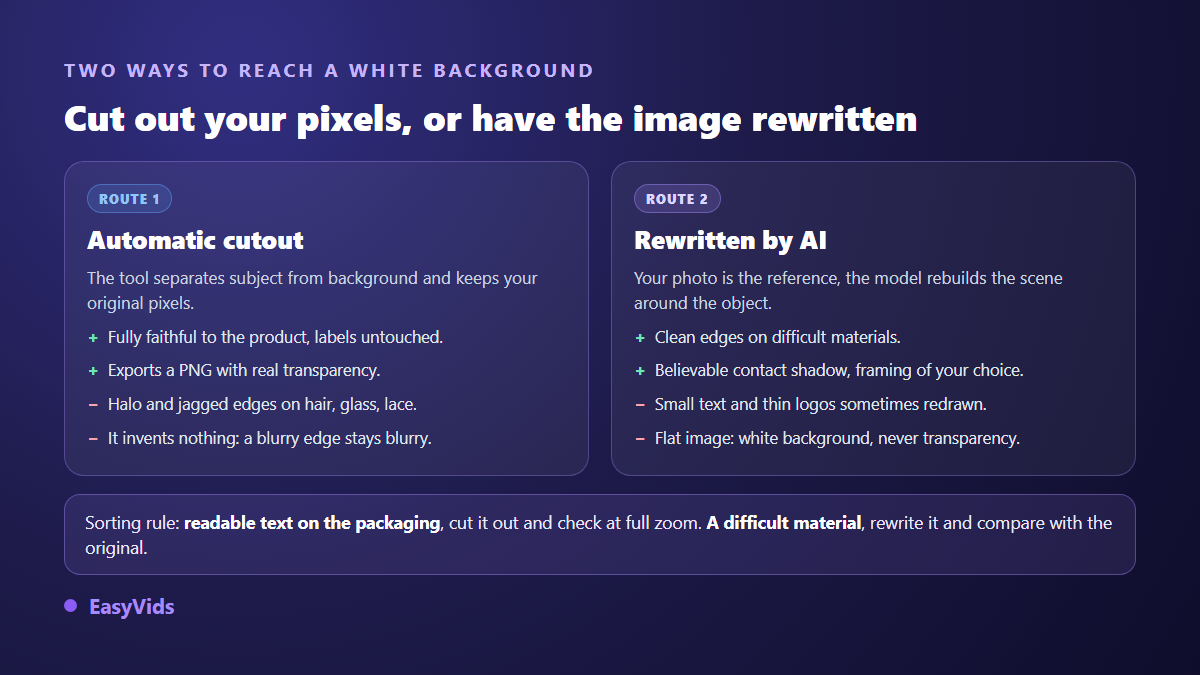
An image generator works differently. It reads your photo as a reference, understands the object, then produces a new image where that same object sits on white with a coherent shadow. Difficult outlines stop mattering, because nothing is being cut. In exchange the model may reinterpret what it reads poorly: an unreadable label gets redrawn approximately, a logo can distort, a shade can drift. That is why the verification below is not optional.
The method, step by step
The full chain takes a few minutes once you have run it twice. Inside EasyVids it happens in the AI images workspace, the studio tab dedicated to generating and editing images.
- Shoot the product against a plain surface that contrasts with it: a white object on a white table is the worst possible start, whichever method follows.
- Open the Images tab and pick a model able to read reference images. The upload area only appears for models that can, so you never pay for a generation that would ignore your photo.
- Drop your photo in as a reference. With a reference attached, the run returns a single image at a time, so you compare attempts one by one.
- Write the background instruction, detailed in the next section.
- Pick the aspect ratio before launching: square suits most listings, vertical suits social feeds, landscape suits storefront banners.
- Generate, compare against the original, then download the file you keep.
Expect two or three attempts on an awkward product, often one on a simple one. How many generations you have depends on your plan, laid out on the pricing page, and a free account is enough to test the method on one item before committing a whole catalogue.
The instruction that produces clean white
A background instruction is not a scene description. It forbids more than it asks. Five bricks are enough: fidelity, background, shadow, framing, then the list of what must not appear. Copy the formula below and change only the product name.
The same product as in the reference image, strictly identical, same colour, same label, isolated on a pure and uniform white background, soft contact shadow under the object, centred square framing, no hands, no text, no props, no added setting.
The three words doing the work are strictly identical, uniform and no. Without them the model fills the gaps: a green leaf beside a skincare bottle, a marble worktop under a mug, a hand holding the item. None of that belongs on a main image. When you do want a staged shot for social feeds, write a different instruction rather than stretching this one, using our prompt formulas by product type.
The materials that ruin edges
Products are not equally easy to isolate. Five families account for most failures, and each has an antidote. Spotting them in advance saves you from blaming the tool for a shooting problem.
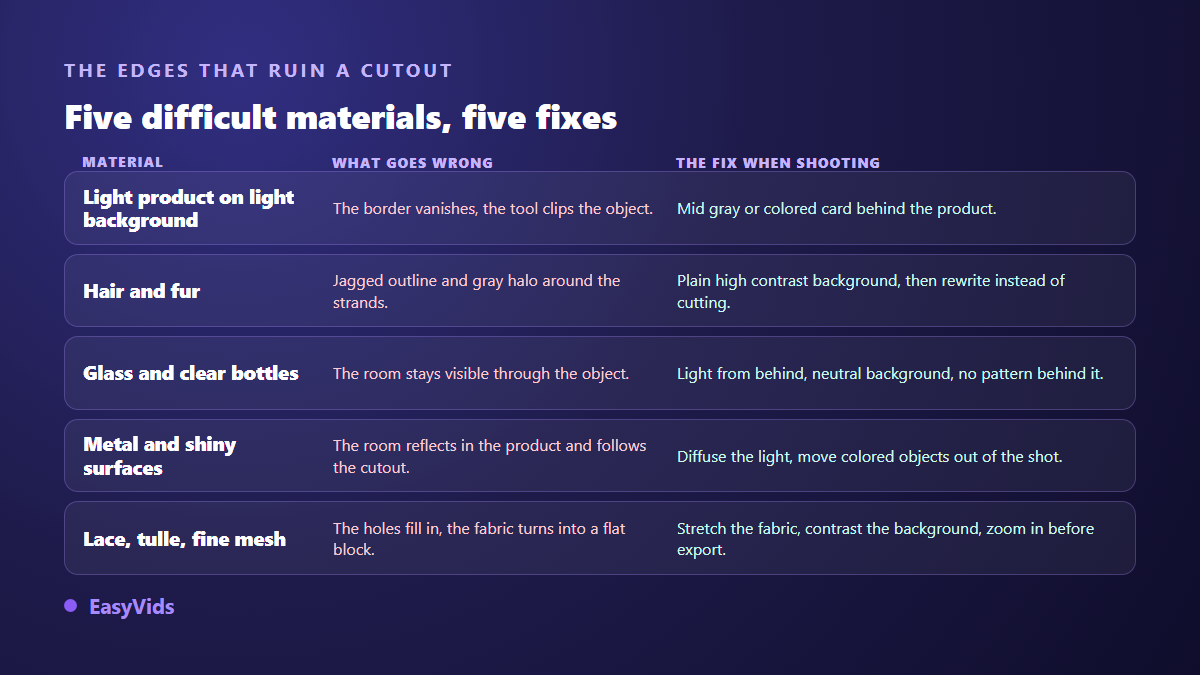
The commonest case is a pale product on a pale background. The border vanishes, and no tool can guess where the object ends. A mid grey backdrop or a coloured card behind the item settles it in ten seconds of preparation. The second case is glass: place the bottle against a plain backdrop, light it from behind, and accept that a rewrite will beat a cutout.
The shadow: keep it, rebuild it, or drop it
An object cut out perfectly onto white looks like it is floating. Viewers notice without knowing why, and the listing reads as less careful than an ordinary photo. A contact shadow, that short dark zone right under the object, is enough to set it down. Keep it discreet: a wide shadow greys the backdrop and pushes you out of the pure white required on a main image.
When you rewrite the image, ask for that soft shadow explicitly. When you cut out, keep the original shadow if it is clean, or remove it entirely rather than leaving a halo. Check your platform help page before deciding: the constraint applies to the background, and the background must stay white from edge to edge.
PNG, JPEG or WebP
Format follows use. PNG preserves transparency and never degrades an outline, but it weighs a lot on a photo full of gradients. JPEG remains the natural format for a white background listing image, as long as you do not over compress: aggressive compression scatters grey debris around sharp edges, exactly where the white has to be perfect. WebP combines both advantages and is understood almost everywhere, though not every marketplace accepts it for listing uploads.
Two precautions apply to all three. Stay in the sRGB colour profile, otherwise your white can drift blue or cream depending on the screen. And export at final size instead of upscaling a small file: enlarging creates no detail, it only spreads the detail already there.
The check before you publish
This check takes a minute per image and saves a listing. Run it on the final file, on screen, not on the generation preview.
- The background is uniform: an eyedropper should report the same white in all four corners.
- The edge is clean, with no grey halo and no jagged outline, including on fine areas.
- The product colour matches the original: put both images side by side rather than trusting memory.
- Label, brand and wording stay readable and accurate, with no invented characters.
- Nothing has been added compared with the source photo: no text, logo, frame or watermark.
- Framing and scale are identical across the series, which is what makes a storefront look consistent.
The fourth point deserves extra care. Image models remain weak on small type, and a label redrawn with approximate letters shows up under zoom. If text matters on your packaging, prefer a cutout, or inspect every image at full size.
From the clean pack shot to product video
Once the white background visual is approved, it becomes the base for everything else. It works as a reference to generate the secondary images of the same product, which keeps the object identical from one visual to the next. It feeds your social formats, where the same object appears square and vertical. And it is the simplest starting point for animation: an isolated product turns cleanly against a neutral backdrop, while a cluttered photo gives a confusing clip. Our product video guide covers that next stage, from still visual to publishable sequence.
Frequently asked questions
Can an image generator return a transparent PNG?
No. Models return a flattened image, so a real white background rather than an alpha channel. That is enough for a product listing and for most publishing. If you genuinely need transparency, to sit the product on a coloured banner for instance, use a cutout tool that exports PNG with alpha.
Does AI background removal alter my product?
It can, and that is the only real risk of the method. The model redraws whatever it reads poorly: small type, thin logos, complex reflections. The rule is simple, compare the generated image against the source photo every time before publishing, and regenerate rather than patching a doubtful detail.
Should I shoot on white in the first place?
Not necessarily, and it is not always desirable. A plain backdrop that contrasts with the product beats a badly lit white one, which produces uneven greys. Aim for a clear separation between object and background, since the final white gets rebuilt afterwards.
What resolution should a listing image have?
Aim for at least 1600 pixels on the longest side, the value Amazon recommends in its image requirements to activate zoom on a listing. A square at that size fits nearly every marketplace and stays comfortable to crop for social formats.
Can several photos be processed at once?
Not within the same run: with a reference image attached, the output covers one image at a time. Across a catalogue, the sound practice is to freeze one instruction and reuse it product by product. Identical wording from one run to the next is what produces a consistent series.
A clean white background is not a designer's whim: it is what makes a listing trustworthy and a catalogue look professionally run. Take one product, the one whose photo bothers you most, and push it through the whole method. One generation will tell you whether the rest of your catalogue deserves the same treatment. Creating an account opens the studio and its image workspace, and the EasyVids studio then brings visuals, video and editing together in one place.