You have three hundred photos from a wedding, a birthday or a trip, and nobody ever looks at them. They sit on a phone, in a folder, on a drive you never plug back in. A slideshow maker with music changes that in one evening: the same images, put in the right order and carried by a soundtrack, become a four minute film your family watches in silence to the last second.
The hard part is almost never technical. Every tool can stack images. What separates a parade of photos from a real keepsake comes down to four decisions: which ones you keep, in what order, how long each one stays on screen, and what plays underneath. This guide takes those four in order, then the mechanics, which take far less time than the selection.
The short answer
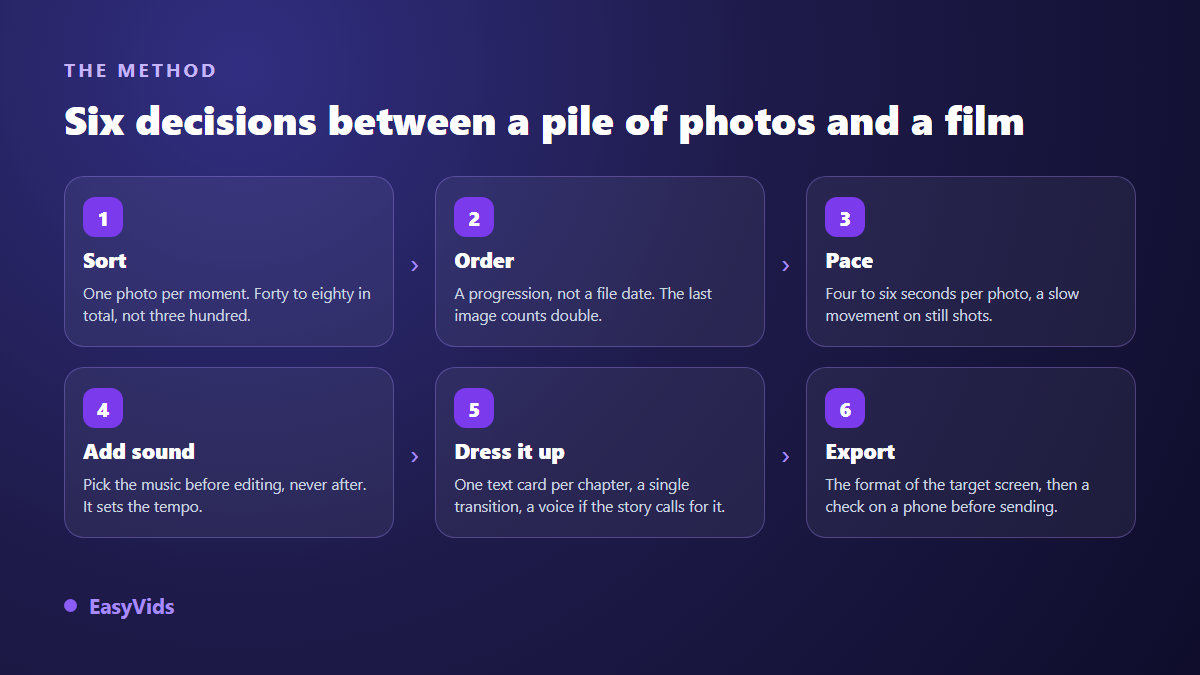
A good photo slideshow with music follows five rules. Keep forty to eighty photos, not three hundred. Order them by progression, not by file date. Hold each image four to six seconds, slightly longer for close portraits, slightly less for wide shots. Pick the music before you time the edit, never after. And keep transitions plain: a simple crossfade works nine times out of ten. Everything else is execution.
Select fewer photos to tell more
The instinct is to include everything, and it kills more slideshows than any other mistake. Past eighty images attention slips, and viewers stop seeing memories and start seeing a queue. A tight selection always lands harder than a generous one, because every image keeps its weight.
Do two passes. The first removes the obvious: blur, closed eyes, duplicates, frames where nobody is recognisable. The second is the real one, and it costs you something. Out of five shots of the same scene you keep one, the most expressive rather than the sharpest. A slideshow is judged on faces, not on focus.
- One photo per moment: five frames of the same speech means four too many.
- Alternate scale: a wide shot to set the place, a close shot for the emotion.
- Keep faces recognisable, especially in group photos taken from a distance.
- Drop any image that needs a spoken explanation to make sense.
- Check resolution: a photo pulled from a chat thread will look soft on a television.
- Select generously on the first pass, then cut the list in half. The second pass does the work.
The order is already a story
Chronological order is the default and it works for a trip or a wedding day, because time already supplies an arc. It falls flat for a ten year retrospective or a tribute, where a life does not reduce to a timeline. There, grouping by theme works better: places, people, habits, laughter.
Whatever the order, two images count double. The first decides whether people stay, so use a strong photo that reads in one second. The last is the one they remember, so set one aside during selection, the warmest or the funniest, and use it nowhere else. In between, work in blocks of five to eight photos that share a place or a moment. Those blocks give the viewer somewhere to breathe, and they mark the natural spot for a title card. If those cards multiply until they carry the story on their own, the project is really a written piece, and our guide to turning text into video covers that case.
Duration per photo, and pace tied to the music
Display time is the setting that transforms a slideshow, and the one most people leave untouched. The baseline is four to six seconds per photo. Under two seconds you get a nervous clip where nobody recognises anyone. Past eight seconds the eye has finished its work and attention drifts, unless a voice is narrating over the shot.
Then adjust by type. A close portrait earns an extra second. A crowded group photo does too, because everyone hunts for their own face. A run of images from the same place can move faster, since the viewer already knows where they are.
The real gain comes from tying cuts to the music. Play the track once and note where something changes: a drum entry, a silence, the start of a chorus. Land your photo changes on those points, and save your best images for the chorus. It reads as professional work when all you did was move three shots. One more detail decides a lot: a still image held for five seconds with no movement reads as dead air. A slow push in, or a very gentle pan, keeps it alive, and the studio applies that motion to every photo in a project at once.
Choosing music by occasion
Music sets the tone before the first photo lands. Three seconds of piano and the film is already tender. Four bars of percussion and the room expects laughter. That is why it comes first rather than last: it dictates total length, tempo, and often the order of your sequences. Some occasions leave no room for an approximate choice, starting with a montage made in memory of someone, and our guide to the tribute video sets out the tone that holds.
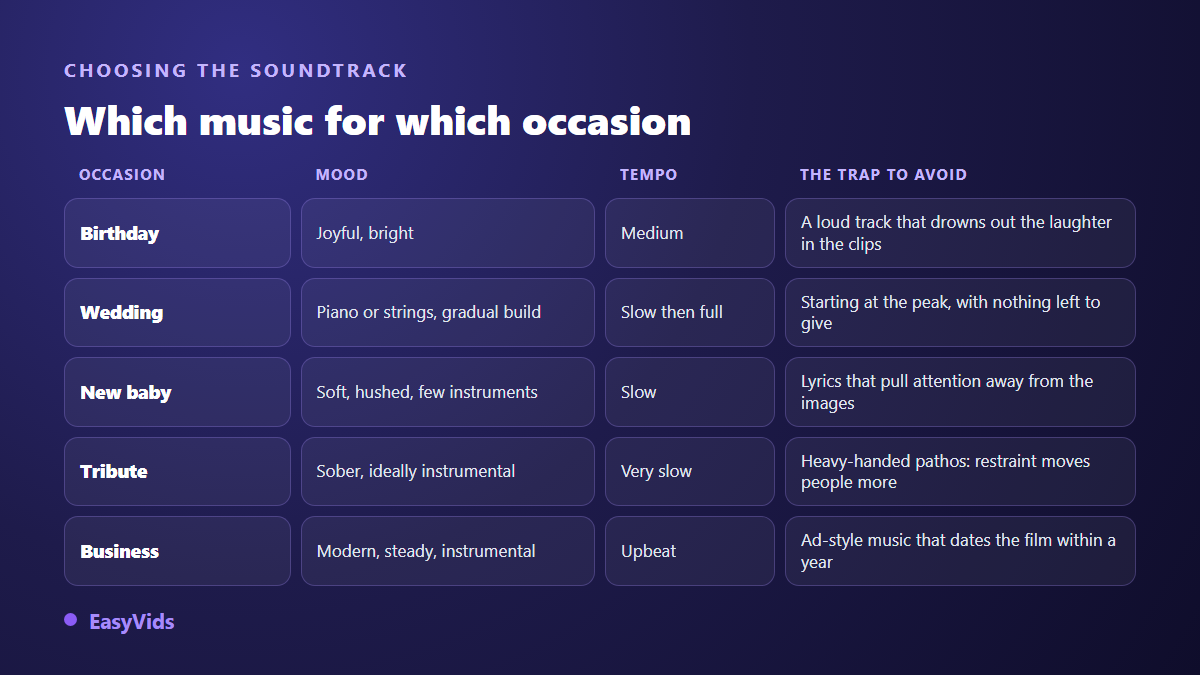
Two settings matter more than the track itself. Volume first: if a voice is narrating, keep the music well below it, around a fifth of its level. The ending next, because nothing exposes an amateur edit like music cut off mid bar. Fade it down across the last three seconds and let the final photo sit for a beat in the silence.
Then there is licensing, which stops more slideshows at publication than any technical issue. A commercial song under a wedding edit may pass in a private screening, but it gets flagged automatically the moment you upload. If the film is headed for a channel, our guide to AI music and Content ID explains what the platform actually detects and how to answer a claim. Generated music solves that: you describe the occasion, a style, a mood and a tempo, and you get an original track, sung or instrumental. For a birthday or a dedication, the lyrics are written from what you supply, a first name, the occasion, a short anecdote. Exact length is not something you can order, so plan to trim the track in the edit rather than stretching photos to fill it.
Transitions, used sparingly
Transitions are the classic trap, because editors offer dozens and trying them all is tempting. The rule is one sentence long: one transition for the whole slideshow, two at most if you mark a chapter change. A crossfade of about half a second remains the safest choice in nearly every register. The online editor carries a good fifteen effects, from wipes to travelling zooms, and they earn their place in a company retrospective or an upbeat party video. On a tribute or a newborn film they do the opposite of what you want, pulling the eye onto the effect instead of the person. Never stack a showy transition on top of a zoom either: one movement at a time.
Text, voice and captions
A title card beats live commentary during a screening. A date, a place, a first name, three words on a dark background between two blocks of photos, and the viewer never gets lost. Keep those cards short and rare, one per chapter, never one per photo. Long text does not get read on a phone screen.
Voice changes the nature of the film. A narrated slideshow becomes a story, and you can then hold certain photos far longer. When that commentary is written out in full, treat it as a proper script: our method for taking a finished script to an edited video explains how to split it into scenes before recording anything. Either record a relative on a phone in a room without echo and drop the audio file into the edit, or generate narration from your text by picking a voice and a reading style, which is faster for a company retrospective. As soon as a voice is present, add captions: a large share of views happens with the sound off, in a noisy living room as much as in a social feed. The studio builds them from the project audio and drops them in as a text track you can correct word by word.
Old photos: the work happens before the edit
One clarification, because the promise circulates widely: a slideshow tool does not repair a photo. EasyVids does not upscale damaged images and does not restore old prints. That work happens earlier, at the scanning stage, and it decides everything downstream.
Scan flat rather than photographing an open album. A flatbed scanner at a high setting gives you an image you can crop without it falling apart. With no scanner, lay the print flat under indirect light, no flash, avoiding reflections: an open frame beats one under glass. Two editing habits then save old photos. Avoid pushing in on a low resolution image, because a zoom reveals grain instead of hiding it, and pan slowly instead. And never stretch to match formats. A square or 4:3 photo placed in a horizontal edit sits centred as it is, over a plain or blurred background. A face that no longer quite looks like itself is always noticed, generated images included, which is the flaw we take apart in our guide to the AI character whose face keeps changing.
Aspect ratio follows the screen
The format is decided before the first photo, not at export. An edit built horizontally and cropped to vertical always loses an edge, and that edge nearly always contains someone.
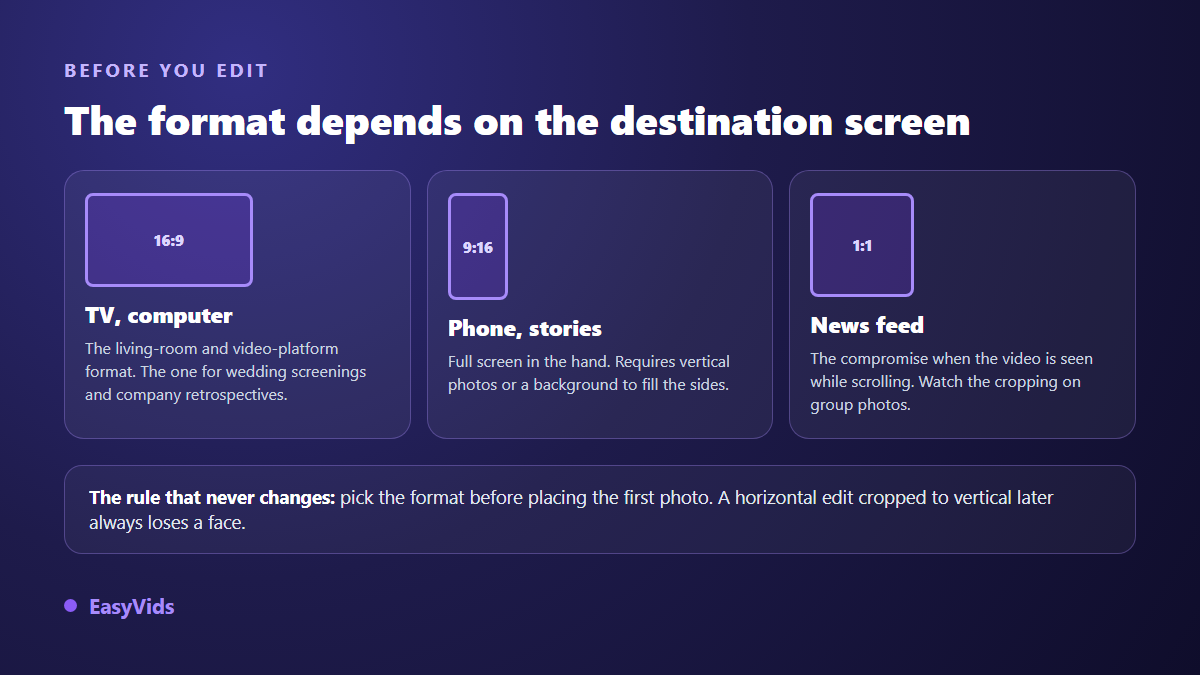
The studio outputs the three usual frames, horizontal, vertical and square, in standard, high or very high definition. Pick your main destination. A wedding screening or a retrospective shown on a television is built horizontally. A keepsake meant to travel through messaging apps or stories is built vertically, which means favouring vertical photos from the selection stage onward. If both really matter, build the horizontal version, then rework the edit for the vertical one instead of cropping blind.
Building it, step by step
Once the decisions are made, assembly takes about an hour the first time and much less after that.
- Drop your photos into the online editor by drag and drop or paste. They stay stored in your browser, which matters for family pictures.
- Place them on the timeline in the order you settled on. Each element arrives with a default duration of five seconds that you stretch with the mouse.
- Apply slow motion to the stills, then a single transition between shots.
- Add the music on its own audio track, generated in the studio or imported from your files, and align image changes with its accents.
- Add title cards at chapter breaks, then captions if a voice narrates.
- Export in the format of the screen you are targeting, then watch the whole film on a phone before sending it to anyone.
If an image is missing to open or close a chapter, a generated illustration fills the gap without breaking the tone: a map, a setting, a quiet backdrop for a title. The studio keeps those pieces in one place, and the plan details sit on the pricing page.
Frequently asked questions
How many photos does a good slideshow need?
Forty to eighty for a three to five minute film, which matches how long people watch without effort. Past a hundred photos, split it into two films, the ceremony and the party for example, rather than stretching one edit nobody finishes.
How long should each photo stay on screen?
Four to six seconds in most cases. Add a second for a close portrait or a crowded group shot, take one away for a run of images from the same place. When a voice over narrates, the length of the sentence sets the length of the shot, not the other way round.
Can I use any song in a slideshow?
For a strictly private screening it is common practice. For anything published online, no: commercial tracks are detected automatically and the video can be blocked or demonetised. An original track generated for the occasion removes the problem and usually fits the mood better than a chart song.
Can I make a slideshow with music on a phone?
Selection, title writing and music generation all work from a mobile browser. Fine editing and the final export need a computer with a recent browser, since your machine builds the file. Prepare on the phone, assemble on a computer.
Does EasyVids restore or enhance old photos?
No, and it is better to know that up front. The studio does not repair damaged prints and does not upscale low resolution images. Digitise carefully first, then use the edit to show them well: a clean crop, slow motion and the right soundtrack already do a great deal.
A photo slideshow with music needs no special gear and no editing background. It needs selection, a considered order, a steady pace and a soundtrack chosen before the edit. Give an hour to picking the photos and an hour to assembling them, and you will hand over a film people ask to see again. To start, creating an account opens the full studio, with music, voice and the editor in one place.