You have a face, a script and a voice. The only thing missing is the one that makes the shot believable: a mouth that moves exactly in time with the words. That is what lip sync AI does, matching lip movement to a speech track automatically. When it works, nobody questions it. When it misses by two tenths of a second, viewers feel it before they can explain it, and they leave.
The hard part is not finding a tool. It is understanding where the sync is actually decided, because it is almost never fixed afterwards: it is won at the moment the shot is built. This guide covers the two technical routes, the full method for a clean talking shot, and the fixes that rescue a mismatch. If your starting point is a still image rather than a script, our method for making a photo talk covers the neighbouring case.
The short answer
Lip sync AI means aligning the mouth movements of a face with a speech track. Two paths exist. Either the shot is generated already speaking, with the video model animating the face and delivering the line in the same computation, which makes the sync native. Or the voice is laid on afterwards over an existing video, in which case the original mouth does not follow. For any shot where someone addresses the camera, the first route is clearly cleaner, on two conditions: pass the script word for word, and calibrate its length against the duration of the clip.
What lip sync AI actually covers
The term is used for three operations that have little in common. The first is dubbing: a video exists, and you want it to speak another language while keeping the illusion. The second is building a talking shot from a face and a script, with nothing filmed. The third is fixing an offset between picture and sound, which belongs to editing rather than to artificial intelligence.
Mixing the three up leads straight to the wrong tool. A global audio offset is solved in seconds inside an editor by nudging the track a few frames. A mouth shaping syllables that differ from what you hear cannot be repaired in the edit: the shot has to be rebuilt. That is the first question to ask when a result disappoints you.
Two routes, two very different results
The useful distinction is not between brands of tools, it is between two ways of producing the picture. In one, speech is born with the image. In the other, it is glued on. Everything else follows from that: the quality you get, the time you spend, and the situations where the method holds up.
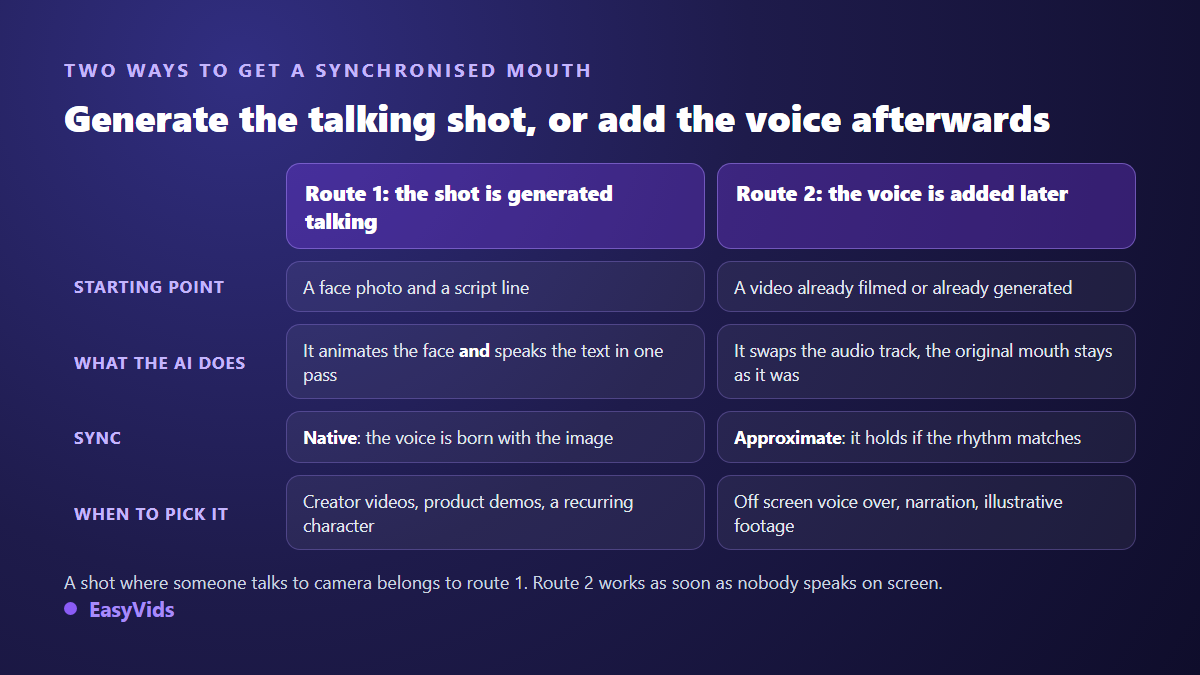
That grid settles almost every project. A shot where a person looks into the lens and speaks belongs to route 1. An illustration shot, a landscape, a close product shot, a hand handling an object: nobody speaks on screen, route 2 is enough, and it needs far less compute.
Route 1: generate a shot that already speaks
This is the path that gives the best results, because mouth and sound come out of the same computation. You supply a face photo, the model takes it as its reference, and the exact line is passed along with the instruction to say it word for word and add nothing. The clip comes back with the speech already inside and the articulation locked to it. That is the mechanism behind creator style videos shot to camera, and our guide to AI avatars and UGC videos covers the practical uses.
The constraint here is duration. Video models produce short shots, a few seconds long. A longer speech is therefore split into segments, each generated on its own and then joined end to end. In the EasyVids studio the creator workflow enforces a strict cut of six, eight or ten seconds per scene for exactly that reason: every segment has to fit whole inside one clip, otherwise the sentence is chopped mid way.
Route 2: laying a voice over an existing video
Here you start from footage already shot or already generated, and you swap the soundtrack. It is the classic editing move: cut the original audio, drop in a voice, nudge the offset by a few frames. An online editor handles it well, including on video filmed with a phone.
Be clear about what this route does not do: it never touches the lips. If the person on screen is speaking and you lay another voice on top, the articulation will not match, and viewers will spot it in three seconds. Route 2 belongs to shots where nobody speaks to camera: off screen narration, illustration footage, product shots, narrated screen demos. Used in its place, it is entirely convincing.
The step by step method
Here is the sequence that produces a clean talking shot on the first attempt, or close to it. It holds whatever tool you use, because the same decisions keep coming back.
- Pick the reference photo: face on, sharp, evenly lit, mouth visible and not covered by a hand or a microphone.
- Write the script the way it will be spoken, out loud. Text written for the eye produces false delivery.
- Split that script into segments that fit inside a short shot, cutting on punctuation rather than mid idea.
- Set the duration of each clip, then check that the word count matches that duration.
- Generate segment by segment, reusing the same reference photo every time.
- Listen to each clip on its own before assembly: one failed segment is regenerated alone, never the whole batch.
- Assemble, add captions, then watch the video once with the sound off to judge the mouth by itself.
That last check is the most revealing of all. With the sound off, your attention lands entirely on the articulation, and a mismatch you had grown used to becomes obvious. Plenty of creators publish shots they have never watched any other way than with the audio playing.
Calibrate the script against the clip
This is the most common mistake and the easiest to correct. Ask a video model to deliver thirty words in six seconds and it will not stretch the clip: it speeds up the delivery, or it cuts the sentence short. Either way the shot is unusable, and the generation is already spent.
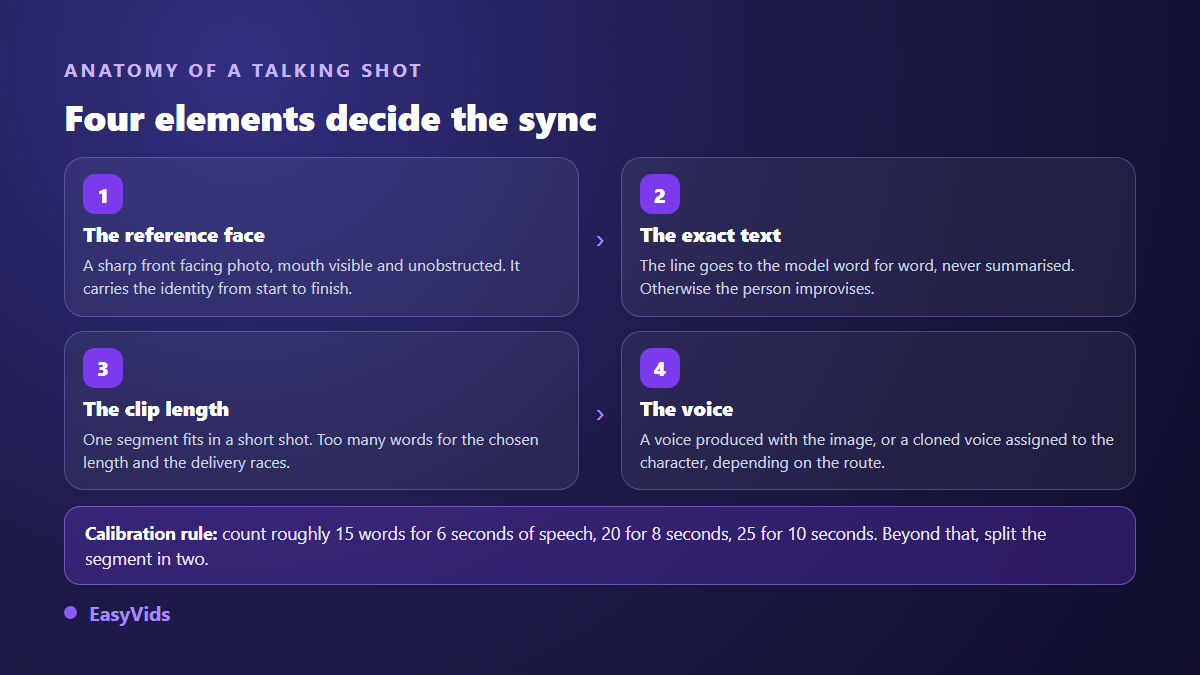
Calibration works down to the word. Natural delivery runs at roughly two and a half words per second, about one hundred and fifty words per minute. A six second clip therefore holds around fifteen words, a ten second clip around twenty five at most. When a segment runs past that, split it in two: rhythm is won by cutting, never by reading faster.
The voice: yours, cloned, or from a catalogue
On route 1 the voice comes out of the video model alongside the picture. You do not steer its timbre as finely as with a dedicated speech engine, and that is the price of native sync. When timbre matters more than anything else, the criteria that really separate speech engines by ear are worth running through before you build the shot. The prompt still controls tone, apparent age and pace.
On workflows where the voice is produced separately, you pick a catalogue voice, which you can assign to a specific character to keep one sonic identity across a whole series. If you want your own timbre, a cloning tool can reproduce it from an audio sample: a clean recording of a few dozen seconds is usually enough, and our note on how much audio voice cloning needs explains what really moves the result.
Every generated clip consumes credits, and a talking shot consumes more than a lightly animated still, since the model builds picture and sound together. The sensible habit is to validate your split on a single segment before launching the full batch. Plan details live on the pricing page.
Why a sync fails, and how to rescue it
The failures all look alike, and they are almost always corrected upstream, in the script or in the source photo, never in the delivered clip. These are the five symptoms we see most often, with the move that fixes each one.
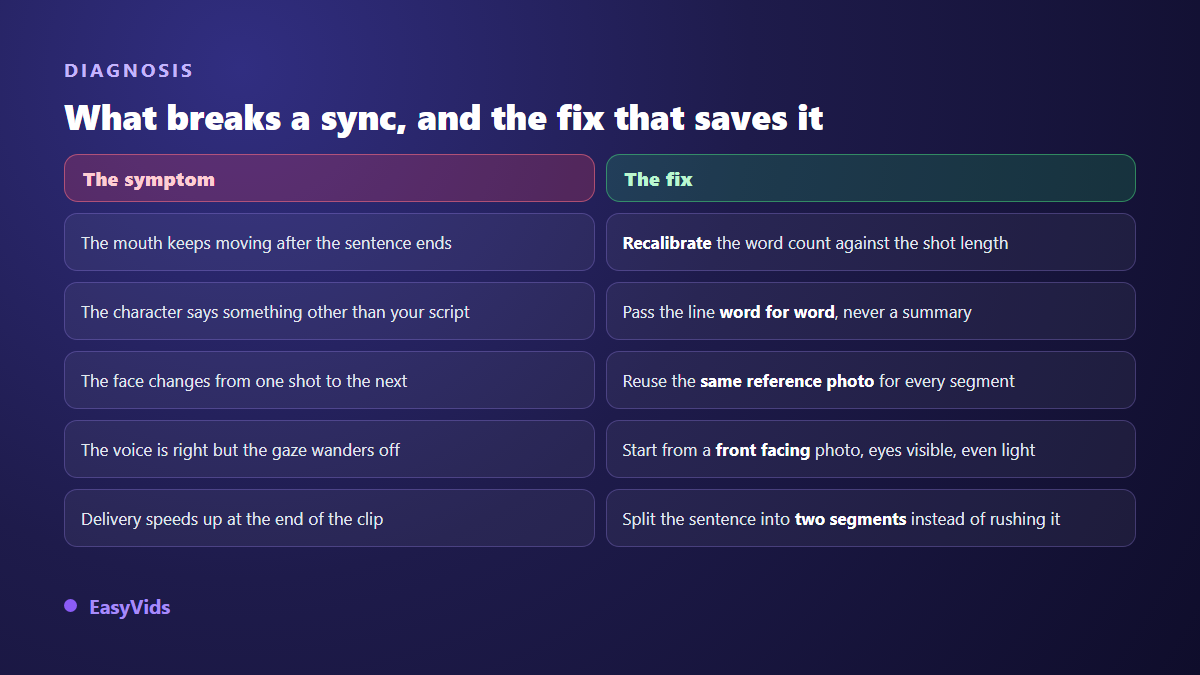
One flaw deserves an extra word: face drift. When each segment is generated separately, nothing guarantees the person keeps the same features from clip to clip unless the same reference image is reused on every call. It is the same problem as narrative continuity, handled in our method for keeping one character across scenes.
Dubbing: translating without breaking the mouth
Dubbing is the most requested case and the most demanding. Translating a sentence changes its length: the same idea can take noticeably more syllables in another language. Keep the original split and the translated voice overflows the shot, taking your sync with it.
The method that holds is to translate for duration, not for literal fidelity. You rewrite each segment so it lands on the same number of seconds, condensing where needed. Only then do you generate. On shots where the speaker is not visible, a translated voice laid in the edit is enough, since no mouth is on screen.
Consent, labels and platform rules
Making a face speak involves more than a technical choice. The base rule allows no exception: you need the agreement of the person whose face or voice you use, including a relative, and all the more so a public figure. A face is not raw material.
Platforms ask for disclosure in plain terms. According to the YouTube help centre, the creation studio asks authors to flag realistic altered or synthetic content, particularly when it shows someone saying things they never said, and a label is then displayed on the video. TikTok community guidelines likewise require realistic AI generated content to be identified. The open C2PA standard, backed by a coalition of imaging and technology organisations, defines a provenance metadata format that several tools now embed in their exports. On voice specifically, what voice cloning allows and forbids is worth reading before you start.
Frequently asked questions
Can I sync a new voice onto footage I already filmed?
You can swap the soundtrack in a few clicks inside an editor, but the lips of the filmed person will not change. As long as the face is speaking on screen, the substitution shows. The reliable fix is to regenerate the talking shot from a photo, or to keep the new voice for shots where nobody addresses the camera.
Which photo gives the best lip sync?
A face on portrait, evenly lit, with the mouth fully visible and the gaze towards the lens. Strong profiles, partly covered faces and very dark photos make the model work harder. A sharp head and shoulders image is plenty: very high resolution is not the deciding factor.
How long can a character speak in one clip?
A few seconds only. Current video models produce short shots, and a longer delivery comes from chaining several segments generated separately. In the studio the split runs in steps of six, eight or ten seconds, and the clips are then assembled in script order.
Do I need a microphone to get a synced voice?
No. When the shot is generated already speaking, the voice is produced with the image and no recording is needed. A microphone only becomes useful if you want to clone your own voice, and there a quiet recording with no echo or background noise matters more than the gear.
Does lip sync work in every language?
Results are solid on widely spoken languages, and articulation quality depends mostly on how the text is written: punctuation, sentence length, no abbreviations. A script stuffed with acronyms and numerals produces hesitant delivery whatever the language.
A mouth that follows the words is not luck. It comes from a carefully chosen photo, a script calibrated to the length of the shot, and one silent viewing before you publish. Those three moves take minutes and change everything the viewer perceives. To try them on your first talking shot, create an account and validate your split on a single segment before launching the batch. The EasyVids studio brings generation, voice and editing together in one place.