A box at the back of a cupboard, an album whose pages stick together, a yellowed print where your grandfather's face is dissolving into a damp stain. You want to restore old photos, but every handling tires the paper a little more, and traditional retouching software asks for hours of brushwork on a single print. AI moves the problem: it never touches the original, it works on a digital copy, and it returns a cleaned version in under a minute.
What matters next is knowing what it genuinely repairs, what it quietly invents, and when you should turn its answer down. A good restoration looks like the original photo in better condition. A bad one looks like somebody else, with unnaturally straight teeth and advertising skin. This guide walks the whole method, from scanning to the final file, with the exact wording to use. If these tools are new to you, our guide to AI image generators covers the ground we do not repeat here.
The short answer
Scan the print flat, in colour and at the largest size you can, even if the photo is black and white. Drop that file in as a reference image in an image generator that accepts an input image. Then write a prompt that describes the repair rather than the person: « remove the stains, scratches and creases, keep exactly the same face, the same hair and the same clothes ». Compare the result with the scan at full size, and keep both files. The restored version is added to the original, it never replaces it.
Scanning comes first, and half the result is decided there
This is the step everyone rushes, and the only one you cannot fix later. A model does not recover a detail that is missing from the file: it replaces it with something plausible. Photographing a print lying at an angle on a table, lit by a lamp from the side, is asking it to guess half the image. A flatbed scanner is still the best tool, even an entry level one. Failing that, a phone does the job under five conditions.
- Lay the print perfectly flat, under clean glass if the paper has curled, and hold the device parallel to it.
- Light it from the side with two soft sources, never with the flash: it burns a white reflection into the centre that no prompt can undo.
- Scan in colour even for black and white prints: the paper tones carry information the model uses.
- Aim for the largest file you can, saved without aggressive compression.
- Crop to the edge of the photo before sending, so the model never sees the table or the album page.
A simple way to judge your scan: zoom the face on screen until it fills the height of the window. If you can still make out the shape of the eye and the hairline, the model has something to work with. If it turns into a mush of large squares, it will invent a plausible face instead of recovering yours. In our own tests, that on screen check predicts the quality of the restoration far better than the file size does.
The six steps, in order
The sequence is always the same, whatever the photo. Six moves, and only one of them takes real thought: writing the prompt. The other five become automatic after your first print.
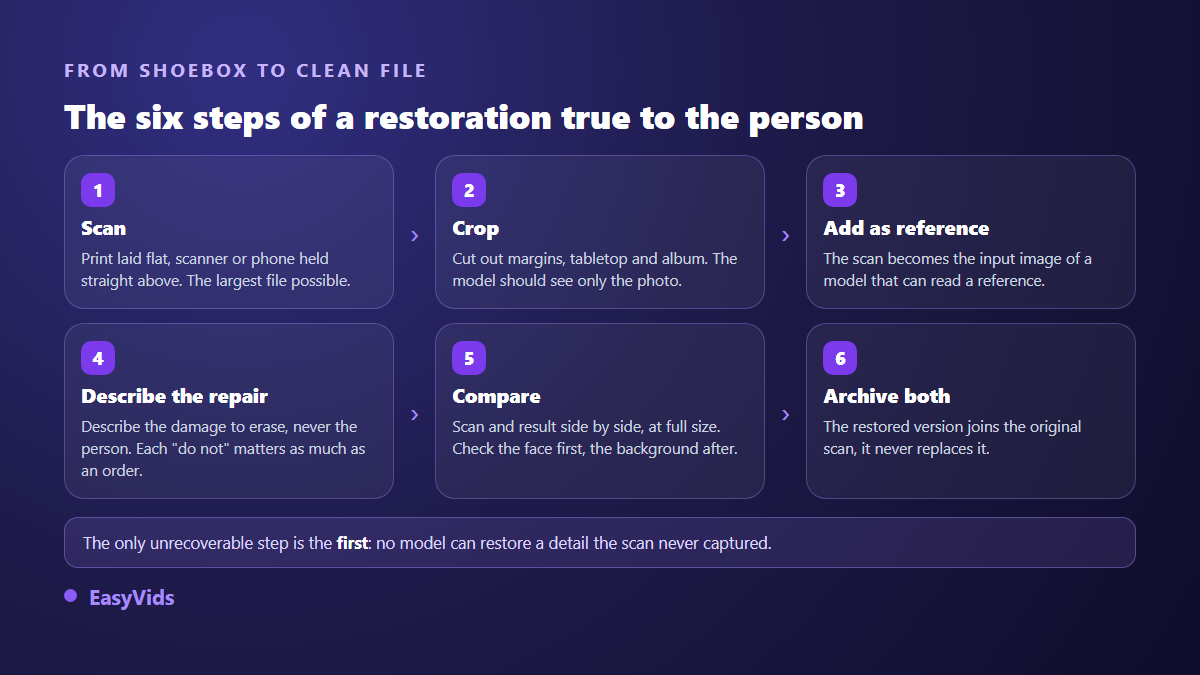
In the studio the operation comes down to three fields. You upload the scan (JPEG, PNG or WebP, up to 15 MB), you pick an image engine that accepts references, you write the prompt. One thing is worth knowing: not every engine reads input images. In our studio, choosing a model that ignores them is refused before anything is charged, because a silently discarded reference means paying for a generation that never looked at your photo. Note as well that with a reference attached, each generation returns a single image, so you compare successive attempts rather than a sheet of four.
What AI repairs, and what it reinvents
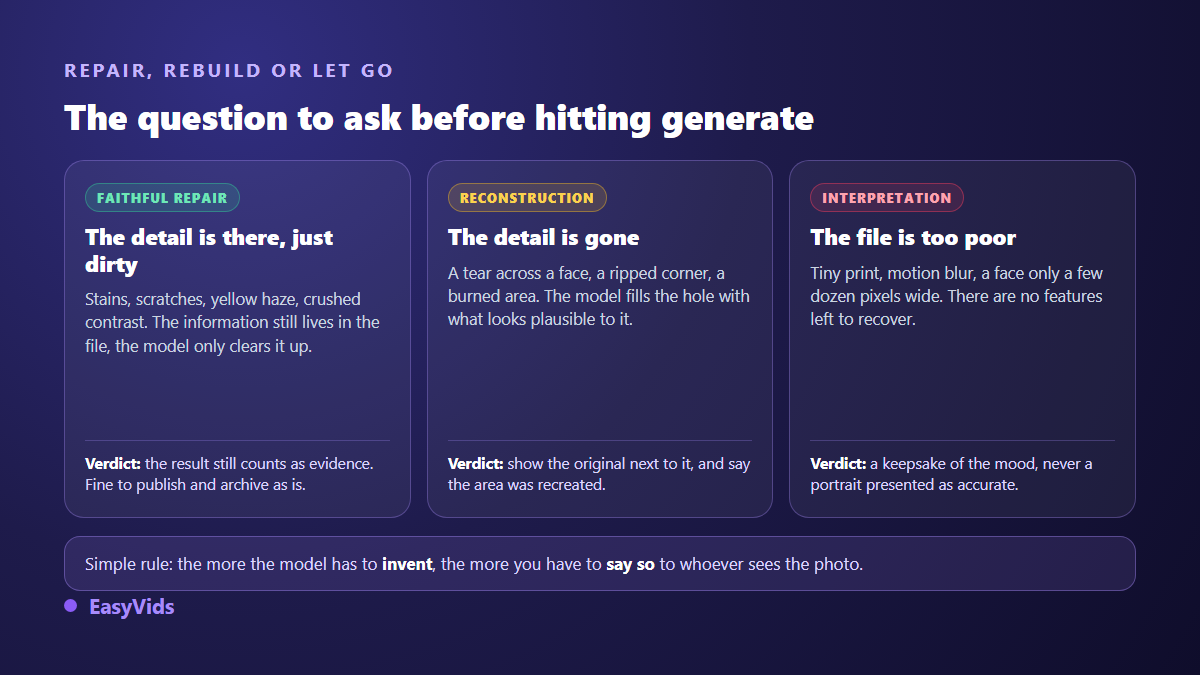
There is no single restoration operation, but four families of damage, and they are not equal. Two of them are honest repair: the information is still in the file and the model simply uncovers it. The other two are reconstruction: the information is gone and the model replaces it. Knowing which case you are in changes both the prompt you write and the trust you place in the output.
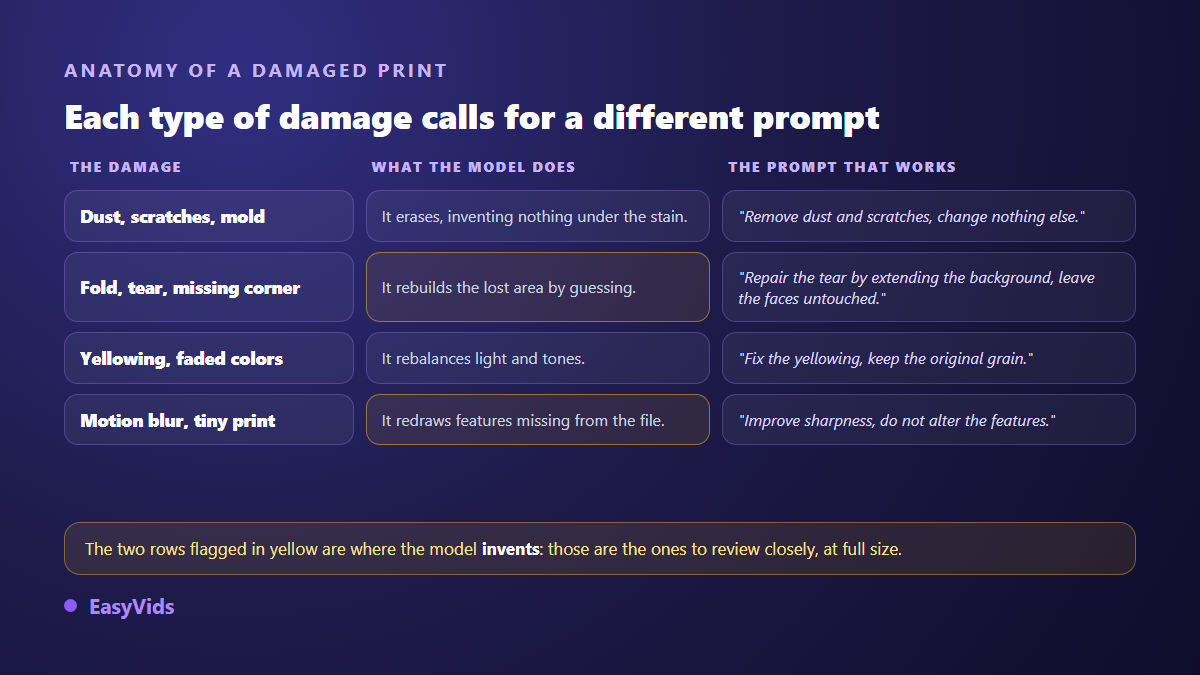
Yellowing, milky haze, fine scratches, dust and surface mould belong to the first family. A crease across a face, a torn corner, a burn and motion blur belong to the second. Nothing stops you from rebuilding, on one condition: say so. A family photo whose nose was redrawn by a machine is still a lovely keepsake, but it has stopped being a record.
Write the repair, not the person
This is the most common mistake, and it explains almost every failed restoration. Write « portrait of a woman in the 1950s, floral dress, smiling » and the model understands it must create that image. It produces a beautiful 1950s woman who is not yours. Write « restore this old photograph, remove the scratches and the yellow haze, keep the features, the hair and the clothing strictly unchanged » and it understands it must correct an existing file. Same engine, same scan, completely different outcome. The logic is the one behind any image generation, and our collection of image prompt examples shows how to build a prompt block by block.
- Nature: « This is an old film photograph, scanned. Restore it, do not redraw it. »
- Damage: « Remove the scratches, dust, damp stains and the vertical crease. »
- Forbidden: « Do not change the facial features, the hair, the clothing or the position of the people. Do not add anyone. »
- Look: « Keep a natural photographic grain and film contrast, not a smooth digital finish. »
- Framing: « Keep the original framing and proportions, do not crop. »
The forbidden line matters as much as the instruction line. Without it, the model takes the liberty of improving your relatives, and improvement is exactly what you do not want here. If English is not your working language, the studio assistant drafts the full prompt from your own words and leaves it editable before you launch.
Tears and missing pieces: how far to go
A tear across sky, a wall or a tablecloth is repaired without hesitation: the model extends a regular texture and nobody can be misled. A tear across a face, a hand or a uniform is another matter. The model will produce something credible, and that something comes from its memory, not from your family. The safest approach is to work in two passes: first ask only for cleaning while explicitly leaving the tear alone, then rebuild the damaged area from that result, naming what used to be there.
Blurry or tiny photos: what you can honestly recover
Focus blur and motion blur are not corrected, they are compensated. The model does not recover lost detail, it draws new detail consistent with what it thinks it sees. On a landscape nobody will notice. On a face a few dozen pixels wide, the output will be sharp, pleasant, and will look like a person who never existed.
Two habits limit the damage. Only push the resolution up when the scan justifies it: enlarging a poor file multiplies invented detail instead of reducing it. And run two or three attempts with the same prompt, then compare the faces. If the nose or the eye shape shifts between attempts, the model is inventing that area and you know where you stand. The studio offers several resolution levels and several engines, and the plans are listed separately because they change.
Colourising black and white without betraying the scene
Colourisation is an interpretation, never a restitution. No colour information exists in a black and white print: the model picks plausible tones for skin, sky and foliage. The result is often striking, and often wrong on the details a family cares about most, starting with the colour of a dress or a uniform. So give the model the colours you know, ask for a restrained palette rather than a vivid one, and keep the restored black and white version alongside. That one remains the record.
Publishing a restored photo: what to disclose
Private use calls for no particular precaution. Publishing falls under platform rules. The YouTube Help Centre has asked creators since 2024 to flag, at upload, realistic content that has been altered or generated by artificial intelligence, especially when it shows a real person. Meta has rolled out its own labelling of AI edited content across its networks. A lightly cleaned family photo is not treated like a fully recreated face, but the principle holds: what was fabricated gets declared.
Two technical mechanisms support this. The C2PA standard, maintained by the Coalition for Content Provenance and Authenticity, defines a metadata format that records a file's creation and editing history inside the file itself. Google DeepMind also states that images produced by its models carry an invisible watermark detectable with its SynthID tool. A generated image is not anonymous, so it is better to say a file was edited than to let someone else find out.
Mistakes that ruin a restoration
- Sending a photo of the photo, taken at an angle with the flash on: the reflection becomes a permanent white hole.
- Describing the person instead of the damage: the model creates a portrait instead of repairing yours.
- Skipping the forbidden line: teeth whiten, skin smooths out and age quietly disappears.
- Asking for everything at once on a badly damaged print: cleaning, colourising and enlarging contradict each other in one prompt.
- Overwriting the original scan with the restored version: the only truly irreversible mistake in the chain.
- Judging the result on a thumbnail: a face is checked at full size, side by side with the scan.
Frequently asked questions
Can I restore a damaged photo for free?
Yes. Most services, ours included, open a free trial when you create an account. What differs is the number of attempts, the output size and whether a watermark is applied. For a whole album, the useful question is not the cost of one attempt but whether you can rerun the same photo several times, because a convincing restoration often takes three tries.
Can AI recover a face hidden by a tear?
No. It can fabricate a believable face in that spot, which is a different thing. If the missing area covers the eyes, nose or mouth, treat the output as an illustration rather than a record. Keep the torn version, and say that the area was recreated whenever you share the repaired one.
Do I need a scanner, or is a phone enough?
A recent phone is enough in the vast majority of cases, provided the print lies flat, the device stays parallel and the flash stays off. A flatbed scanner keeps two clear advantages: it removes perspective distortion and it lights the whole surface evenly. For a small print or a negative, it is clearly better.
Can a restored photo be printed large?
That depends on the source scan, not on the model. A high resolution generation from a poor file produces a large image full of invented detail, not a faithful enlargement. Scan the print as large as you can, restore, then print. If the face was not sharp on the scan, it will not be sharp on paper either.
An old photo is not repaired by clicking a magic button. It is repaired by giving the model a good file and clear limits. Scan carefully, describe the damage, protect the face, keep the original beside it. The rest takes minutes. To handle your first print, creating an account opens the full studio, and the whole image and video toolkit sits in one place, from cleaning a print to the memory film that shows it off.