Your text is finished. It has been read back, trimmed, and you know exactly what the video has to say. What stops most people is the next step: turning that script into a real edited video, with visuals, a voice and a file you can publish. Script to video AI is not a writing problem any more. It is a preparation problem, a splitting problem and a settings problem.
The good news fits in one sentence: this stage follows mechanical rules, not intuition. A generation engine does not guess your intent, it reads your punctuation, your line breaks and your capital letters. Once you know what it looks at, you take back control of the pacing, of the number of shots, and of what lands in your export folder. This guide follows that path in order, assuming the words themselves are already settled.
The short answer
Converting a script comes down to four moves. Clean the text: firm punctuation, one idea per sentence, stage directions removed. Split it into scenes: one line becomes one shot, targeting roughly 110 characters, which is about six seconds of voice over. Lock what applies to the whole project before you generate anything, meaning aspect ratio, visual style and voice. Then fix things one scene at a time instead of relaunching everything. The full chain, from prompt to final file, is laid out in our AI video generator guide.
A finished script is not yet a shot list
A script is written for a human who fills in the gaps. A shot list is written to be executed with no interpretation at all. Between the two sits one missing operation: cutting the text into short units, each matching a shot the machine can actually produce. Most people skip it, then wonder why the video drags or stutters.
The underlying constraint is easy to state. A generated clip runs a few seconds, rarely more than about ten. Your finished video will never be a single take. It will be a run of short shots, placed end to end, timed against a voice over. A three minute text does not become one three minute shot. It becomes roughly thirty shots that add up to three minutes.
Prepare the text before you paste it
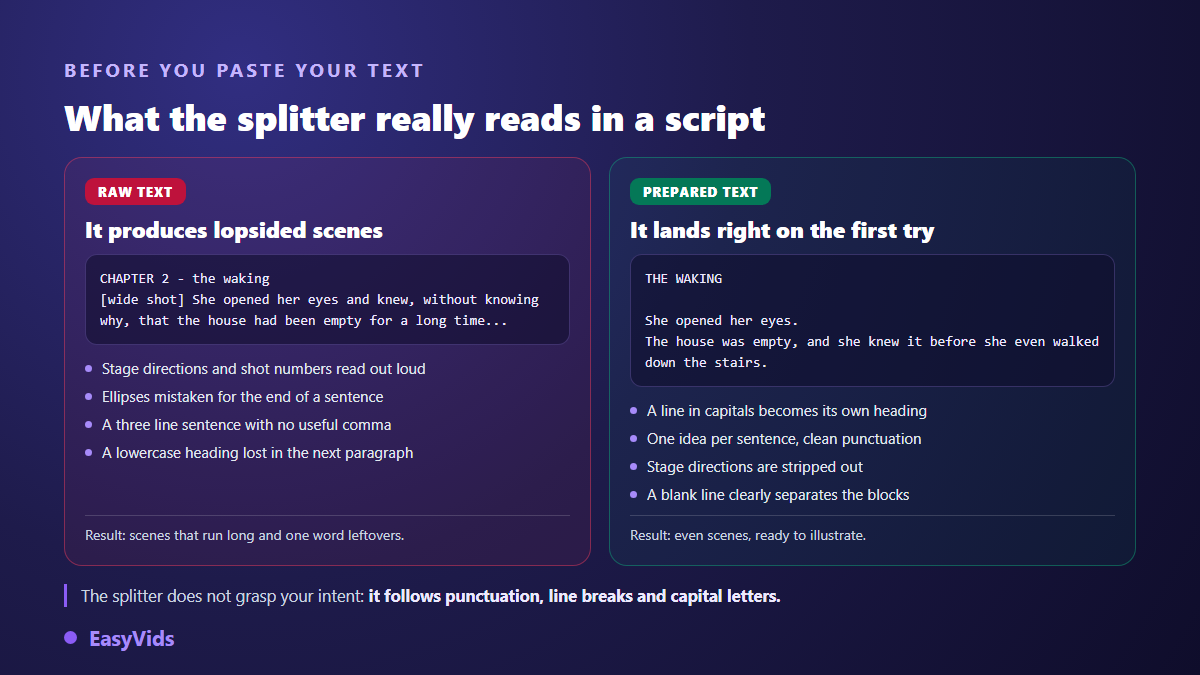
Run a cleaning pass first. It takes minutes and saves an hour later, because it works on the exact signals the splitter uses.
- Delete stage directions: bracketed notes, shot numbers, camera cues. They would be read out as spoken lines.
- Put section headings in full capitals, alone on their line: they become isolated scenes, never merged with neighbouring text.
- End sentences with firm punctuation. Ellipses followed by a space count as a sentence ending and create cuts you did not ask for.
- Break sentences that run past two lines, or add commas where you breathe: they are the only anchors a secondary cut can use.
- Separate paragraphs with a blank line. A change of place, time or speaker deserves its own boundary.
- Remove double spaces and normalise quotation marks: they distort the character count used as the target.
- Read it out loud. Whatever leaves you short of breath will do the same to the voice over.
One note on scripts coming out of a word processor or a landing page: always paste plain text. Bullets, tables, footnotes and formatting do not survive the transfer, and what remains sometimes ends up spoken by the narration. A quick round trip through a plain text editor settles it. If that kind of content is your real starting point rather than a script written to be spoken, our guide to turning text into video begins one step earlier, at rewriting for the ear.
How the automatic split reads your script
The splitter runs four passes, always in the same order. Knowing them lets you predict the outcome instead of absorbing it.
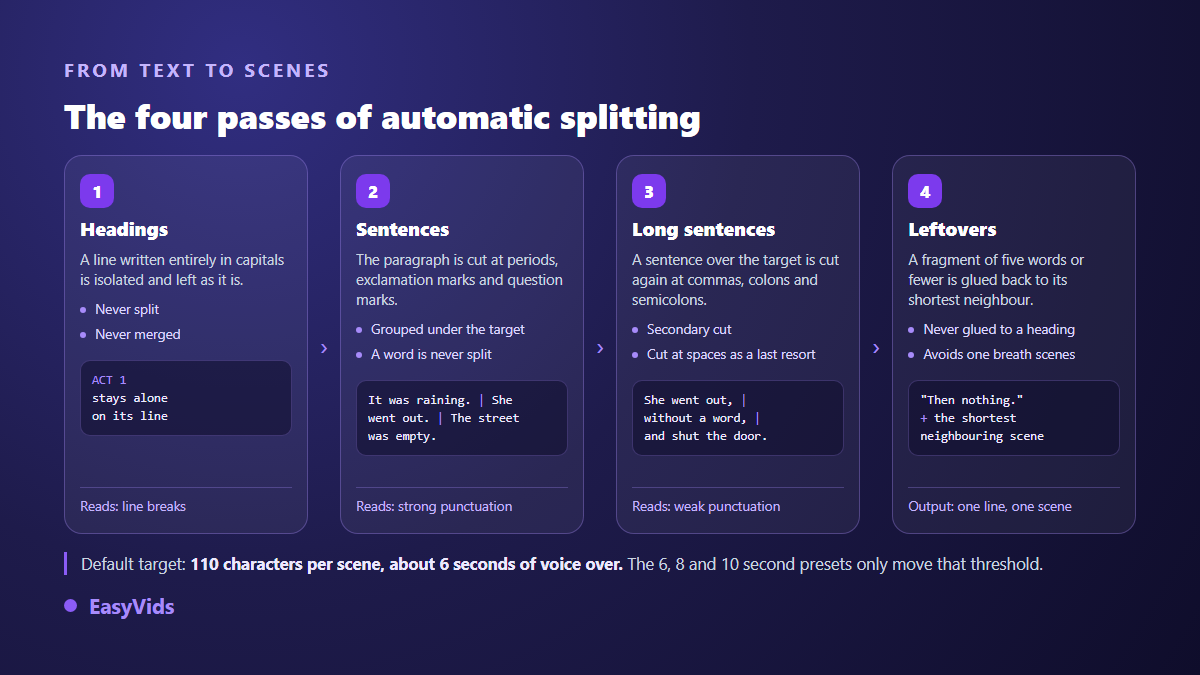
Two details explain most surprises. A line written entirely in capitals is treated as a heading: it stays alone on its scene, never cut, never merged. And a segment of five words or fewer is automatically glued to its shortest neighbour, so no shot lasts a single breath. A very short line you wanted to isolate will therefore end up attached to the one next to it unless you protect it with a manual cut.
When the result does not suit you, you are not stuck with it. Manual mode hands control back: place the cursor in the text, cut at that exact point, merge two neighbouring scenes, insert one, delete another. Other modes split by paragraph or by word count. On text with an uneven rhythm, one automatic pass followed by a few manual touches always beats a single setting forced on everything.
Choosing scene length
The default target is 110 characters, roughly six seconds of voice over. Presets offer six, eight or ten seconds, and the character value stays adjustable. This is the single most important dial in the whole workflow: it alone decides how many shots get produced, so it decides build time and perceived pacing.
Two reference points help. The first is ours: across our productions a voice over runs near 150 words per minute, which gives about fifteen words per scene at the default setting, and eight to ten scenes for one minute of video. The second comes from professional subtitling, where reading speed is capped at twenty characters per second for adult programmes. Past that, the eye gives up. Keep your text density per scene in the same range.
The trade off is direct. Short scenes give a brisk, varied video and multiply the number of shots to build. Long scenes cut the volume, at the cost of a picture sitting on screen too long and a clip that has to be looped or slowed. Since every delivered item counts against your usage, this dial moves your budget: the current plans are on the pricing page.
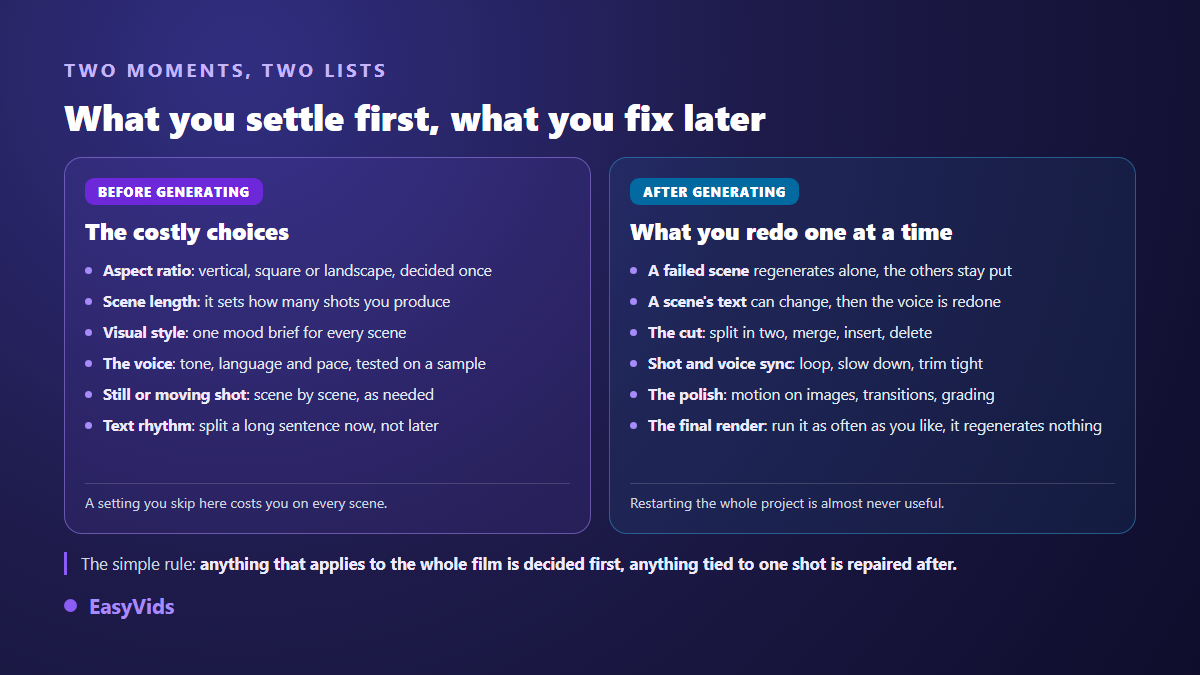
Settings you lock before generating
Some choices apply to every scene at once. Changing them after production has started means redoing the lot. Settle these while the project is still nothing but split text. If your scenes have to show an item you sell, write the enforced style as a shooting brief: our prompt formulas for product photography give descriptions already calibrated by product type, from fashion to food.
- Aspect ratio: vertical, square or landscape. It governs stills and moving shots alike, and switching later forces a full rebuild.
- Scene length, which sets the shot count and the pacing of the entire video.
- The enforced visual style, written once and repeated on every scene: period, material, light, palette.
- The exclusion list, as useful as the style itself: burned in text, logos, crowds, hands in close up.
- The voice: timbre, language and delivery, auditioned on a short sample before you commit.
- Still image or moving shot, scene by scene. An explanatory line needs a picture, an action beat deserves a shot that moves.
Voice over sets the real length of every scene
In the edit the rule never moves: a scene lasts as long as its voice over. The visual adapts, never the other way round. A still holds for the length of the line. A moving shot has five possible behaviours: loop, stretch to land exactly, play once and step aside, follow the voice by slowing down when needed, or slow without ever speeding up. That mode is picked for the project and overridden scene by scene when one shot deserves it.
The practical consequence matters. If a scene feels too long on screen, the visual is not the problem, the text is. Shorten the line, redo the voice for that scene, and the timing follows on its own. Timbre, delivery and language are chosen upstream, and our settings are gathered in the natural AI voice over guide.
Fix one scene, not the whole project
This is the most profitable habit to build and the least instinctive one. Faced with an uneven result, the urge is to relaunch everything. It is almost always pointless, and it is always slower. Before you relaunch anything, name the fault: our rundown of why AI videos come out wrong shows the cause nearly always sits in the text or the instruction rather than in the engine.
- A failed scene regenerates on its own. Nothing else is touched and the rest of the project stays put.
- Scene text stays editable. Redo the voice for that scene afterwards and its duration adjusts itself.
- The split stays alive: cut a scene in two, merge two neighbours, insert one, remove one.
- The fit between shot and voice is switched per scene when one particular clip misbehaves.
- Finishing is decided at the edit: slow motion on stills, cross fades between shots, colour grading, a micro zoom on moving shots.
- Batch processing keeps running server side, so you can close the page and pick the progress back up later.
The final assembly can be rerun as often as you like: it regenerates nothing, it only reassembles what already exists. So try slow motion on the stills, try cross fades, try a grade, and compare versions without producing anything new. Once the file is out, its audio track can be transcribed into a timed caption file, ready for the publishing platform or for the online editor.
Match the scene count to the platform
Aspect ratio is not cosmetic, it is a classification criterion. YouTube states that videos uploaded from 15 October 2024 are classified as Shorts when they are square or vertical and no longer than three minutes. The same script can therefore go in two very different directions depending on the format you pick, and that choice happens before generation, never after.
Translated into scenes, the orders of magnitude are simple at the default setting. A short piece fits in tens of seconds, a handful of shots. A comfortable long form video asks for several dozen. If your script runs well past the target length, split it into episodes rather than speeding the voice up, because a forced delivery is audible immediately. Our step by step guide to a published YouTube video walks the whole chain through to upload.
Frequently asked questions
Do I have to rewrite a finished script before converting it?
Rarely in depth, often on the surface. Keep your text and your voice as an author, but clean the formatting, break the endless sentences and strip anything not meant to be spoken. That preparation pass changes the result more than swapping engines ever will.
How many scenes for a one minute video?
At the default setting, expect eight to ten scenes per minute, around 110 characters and roughly fifteen words each. A longer preset lowers that count at the cost of pictures sitting on screen longer. The scene counter appears before the project is created, so you see the volume before producing anything.
Can I keep my own cuts instead of the automatic split?
Yes. Manual mode starts from your whole text and lets you cut exactly where you want, then merge, insert or delete. You can also run the automatic split and only touch the places that bother you, which remains the best ratio of time spent to quality gained.
What should I do when a single scene fails?
Redo that scene and nothing else. Change its text if the sentence is the problem, change its visual instruction if the picture is, then relaunch that shot alone. The final assembly is rebuilt afterwards without regenerating anything, and the video comes back with the fixed scene in place.
Does a dialogue script convert like narration?
Almost, with one difference: every line has to stay short enough to fit one scene. Put the speaker name in capitals on its own line so it stays isolated, and avoid monologues. A line that runs long will be cut in the middle, usually in the wrong place.
A finished script is already the hard part of the job. What separates it from a publishable video is not talent, it is method: clean the text, pick a scene length and hold to it, settle format and style before generating, then repair one scene at a time instead of relaunching the lot. Take the script you have, run the preparation pass, and look at the scene count before you produce a single image. The EasyVids studio keeps splitting, voice, visuals and editing in one place, and creating an account is enough to drop your first text into it.