You have the right picture, and it is far too small. A product shot pulled from an old catalogue, a logo exported at 400 pixels wide, a screenshot taken on a phone from a decade ago. You enlarge it, and it turns into a mosaic of soft squares. An AI image upscaler exists for exactly that moment: instead of stretching the pixels you already have, a model recalculates the detail that was never there.
The catch is knowing what these tools genuinely do, and what they invent along the way. AI upscaling is not a magnifying glass. It produces a new image, built from yours, with decisions the machine makes on its own. This guide covers the one action workflow, the settings that matter, and the four places to inspect before publishing. If you are starting from a blank page instead of an existing file, our complete AI image generator guide covers the other half of the subject.
How to upscale an image with AI, in one sentence
Drop your file in as a reference image inside a generator that can read input images, ask for the next resolution step up, and write a prompt that describes what must stay identical rather than what should change. The model recalculates every area instead of duplicating pixels. Generation takes under a minute. Checking the result deserves two minutes more.
Why traditional enlargement cannot work
A digital image is a grid of values. A photo at 800 by 600 holds 480,000 of them, and not one more. Display it twice as large and the software has to produce 1,920,000 values out of those 480,000. It averages: every new pixel takes the middle colour of its neighbours. The frame grows, the material stays the same, and every detail becomes four times thicker. That is why enlarged text bleeds, why an edge turns into a grey band, and why the result looks softer than the original even though it holds more pixels.
Three ways to enlarge, three very different outcomes
One word covers three mechanisms that have almost nothing in common. Confusing them explains most disappointments.
- Classic enlargement interpolates neighbouring pixels. Instant, free, built into every editor, and it adds nothing. Keep it for very small factors, up to roughly one and a half times.
- AI super resolution calls on a model trained to restore the textures and edges a sharp photograph normally has. It gives you plausible detail, never the original detail, which is enough for the vast majority of uses.
- Image to image regeneration takes your file as a reference and rebuilds the whole picture at the requested resolution, steered by a prompt. It is the most powerful route, and the only one that can also fix a crop or a background on the way.
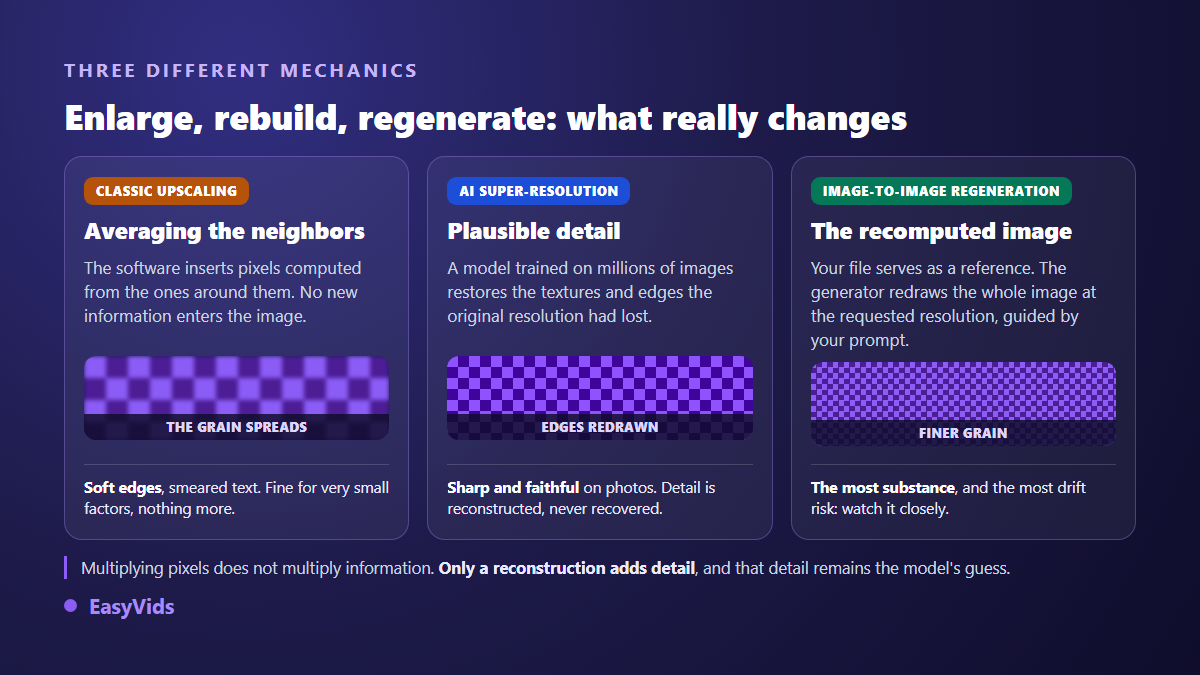
The subject decides the method. Landscapes and textures take super resolution extremely well. A known face, a brand logo or a document with text calls for far more caution, because those are precisely the areas where a model takes the most liberties.
How large does your image really need to be
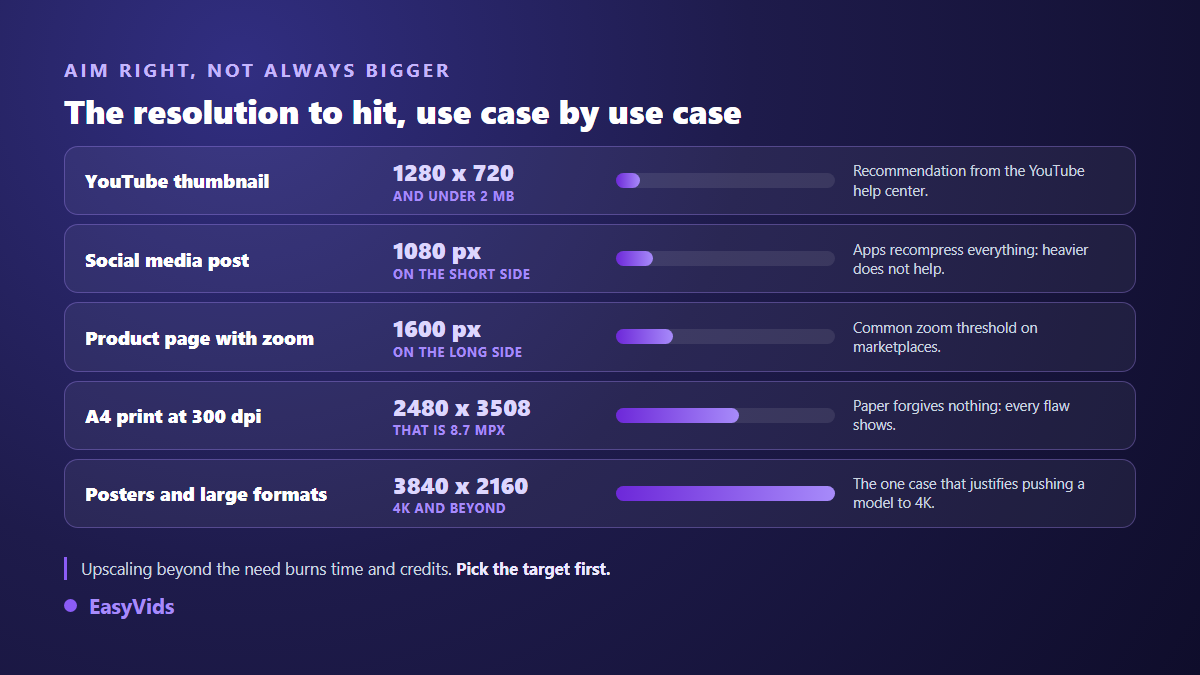
That question comes before any setting. Upscaling a story image to 4K burns time and credits on a file the platform will recompress anyway. According to the YouTube help centre, a custom thumbnail must stay under 2 MB and the platform recommends 1280 by 720 pixels, so going higher buys you nothing. Print flips the equation: the common workshop rule asks for 300 dots per inch, which puts an A4 page at 2480 by 3508 pixels.
The five step upscale
The workflow is the same in every studio. Only the button labels change from one tool to the next.
- Add your image as a reference. It is what conditions the generation. Use the original file, never a screenshot of it, or you throw away half the material before you start.
- Pick a model that reads references. Not all of them do. A model that ignores your input will hand you a lovely picture with no relation to yours.
- Set the resolution one step up. Models that expose this setting usually offer 1K, 2K and 4K. Climb one step at a time rather than jumping to the maximum.
- Keep the original aspect ratio. Turning a 16:9 into a square recrops the subject, and the model will fill the missing space with scenery that never existed.
- Write a preservation prompt, not a creative one. Describe what the image already contains and ask for more detail, not for a transformation.
Inside the EasyVids studio, this runs from the generation screen: you drop in up to four reference images, choose the model with its aspect ratio and resolution, and the credit cost appears before you launch. One safeguard is worth knowing about. If the chosen model cannot read input images, the request is refused before any charge, rather than billing you for a generation that would have ignored your file. Plan details sit on the pricing page.
The prompt decides everything
On an upscale, the prompt is not there to imagine a scene. It is there to lock down what already exists. A working formula has three parts: the nature of the image, the fidelity instruction, the quality instruction. For a product shot that reads as photograph of the same bottle, identical framing, identical background, label unchanged, more detail in the glass and reflections, photographic sharpness. What you must avoid are style adjectives. A word like cinematic gives the model permission to relight the scene, which changes your image instead of enlarging it.
What AI invents while it upscales
A successful upscale is never a restoration. The model proposes the most probable hypothesis for each missing area, and that hypothesis is sometimes wrong. Four families of content concentrate nearly all the accidents: eyes and teeth on faces, text and logos, regular patterns such as fabric or brickwork, and the outline of a cut out subject.
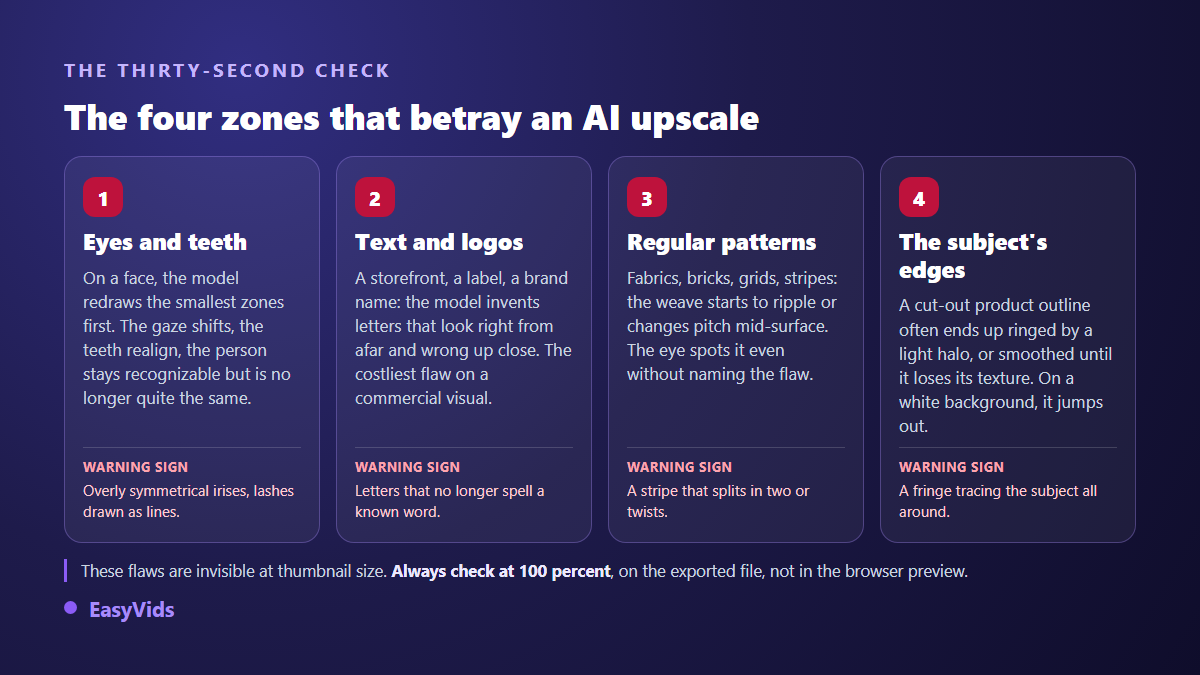
On a personal picture those shifts are forgivable. On a commercial visual they cost real money: an unreadable label or a redrawn logo is enough to get a product listing rejected, and an altered photograph of a person raises a question of representation that goes well past aesthetics. The rule of thumb is short. The more the image commits someone or something identifiable, the less freedom you leave the model.
Three checks before you publish
- View at 100 per cent, on the exported file rather than in the generator preview, which often applies its own display smoothing.
- Compare both versions side by side, flipping quickly between them. What the eye misses on a single image is obvious the moment you switch.
- Read every character in the picture, background labels included. That is where invented letters hide.
Upscale or reshoot
Not every image deserves an upscale. When the source is tiny, heavily compressed or soft to begin with, the model has almost nothing to reconstruct and ends up inventing a neighbouring image rather than improving yours. Reshooting or generating a fresh visual then gives a better result for the same effort. That is especially true in commerce, where turning a phone snapshot into a shop ready visual usually starts with a new shot rather than a rescue. The same logic applies to moving pictures, as our diagnosis of soft AI video explains: resolution is decided at generation time, never at export.
Frequently asked questions
Can you really go from a small image to 4K without losing quality?
Not without loss: missing information does not come back. A good model produces an image that looks sharp and coherent at 4K, but every added detail is a reconstruction. The result is excellent to the eye, and it is not evidence of what the original scene contained.
What upscaling factor should you not exceed?
Two times almost always works. Four times often works on textured photographs. Beyond that the model invents more than it restores. Two passes of two beat a single jump to four, as long as you check the result in between.
Can AI enlarge a face without changing it?
It gets close, never all the way. Eyes, teeth and the hairline are redrawn, so the person stays recognisable while no longer being exactly themselves. For an official portrait or a family photo, compare before and after every single time.
Should you upscale before or after cropping?
Crop first, upscale second. The other order makes the model work on areas you are about to discard, which costs time and compute, and leaves less usable resolution on the part you actually keep.
A good upscale starts with a decision rather than a setting: know where the image will end up, then aim for exactly that resolution. The rest comes down to a preservation prompt and thirty seconds of checking at full size. To try it on your own files, creating an account opens the full studio, and the EasyVids creation tools bring image generation, video and editing together in one place.