You have a photo you like and it does not move. In a feed, a still image is gone in a fraction of a second, while a moving one holds the thumb. Learning to animate a photo with AI has become an everyday skill, and it is not only about making a face talk. This guide is about motion itself: what gives a still frame the breathing quality of a shot.
The trouble is that one phrase covers seven very different techniques, and they are not equal in output or in risk. Some never touch a single pixel of your image. Others rebuild half of it, with the flaws that come along. Below: all seven, what each one produces, which photos they suit, and what to check before publishing. Everything described here matches what the EasyVids creation studio actually does.
The short answer
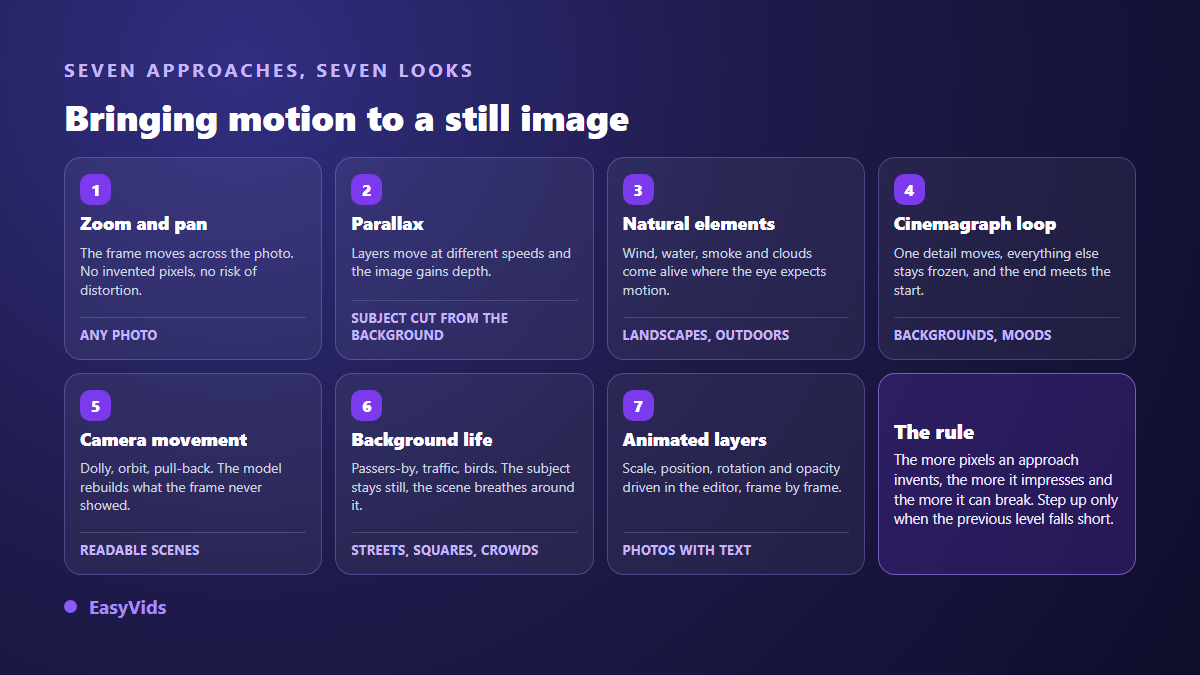
Animating a photo means turning it into a few seconds of video, through one of seven routes: animated cropping (zoom and pan), parallax, natural element motion, the frozen loop, reconstructed camera movement, background life, and layer animation in an editor. The first three and the last invent almost nothing and succeed every time. The others go through an image to video model that generates new frames: more spectacular, with a real failure rate. One rule governs everything: ask for the smallest movement that tells a story. Our guide to AI video generation sets the wider frame this article sits inside.
What animating a photo really means
One confusion comes up constantly. Making a photo talk, meaning animating a mouth over a script, belongs to a different family of tools with its own rules and its own consent questions. That side of the craft has its own walkthrough in our tutorial on building an AI avatar from a photo. Nobody speaks here. You add movement: a sky drifting, a frame sliding, depth appearing, hair caught by wind. The distinction is not cosmetic, because it decides both the technique and the kind of flaws you will be hunting.
Second point, duration. An animated photo is not a film. Depending on the route, the genuinely usable portion runs from three to roughly fifteen seconds, and the best shots are usually the shortest. Generated motion degrades over time: the longer it runs, the more it drifts. A great many failures come from asking for twelve seconds where four would have done.
1. Slow zoom and pan, the move that invents nothing
The oldest technique, and still the most profitable. The photo is untouched; the frame travels inside it. You start slightly tighter and open up, or the reverse, with a small lateral slide. The effect carries the name of the documentary maker who made it famous, and everyone calls it the Ken Burns effect.
Technically it is a progressive crop computed frame by frame, a standard filter found in every serious video pipeline. No pixel is invented, so no artifact is possible. The only real risk is jitter, when the source photo lacks the resolution to survive the zoom. In our automatic edit, every still receives a movement drawn at random from eight combinations, zoom in or out crossed with a horizontal, vertical or diagonal pan, and the amplitude follows the chosen style: barely perceptible in the soft style, assertive in the dynamic one, slow and wide in the cinematic one. The draw changes on every run, so two edits of the same project never look quite alike.
2. Parallax, depth pulled out of a flat image
Parallax, often called a 2.5D effect, splits the picture into planes: subject in front, scenery behind, sometimes foreground foliage. Each plane moves at its own speed, the nearest faster than the furthest, exactly as your eye reads the world when you walk. The brain sees volume where none exists.
It needs a photo where the subject separates cleanly from the background: a portrait with blurred backdrop, an object on a surface, a silhouette against sky. It fails on flat, crowded images or ones whose outlines blend into the scenery. There is a quiet cost too: the scenery hidden behind the subject has to be filled in, because the shift uncovers it. At low amplitude nobody notices. At high amplitude the patched area behind the shoulders becomes visible and the illusion collapses. Parallax is dosed in millimetres, never in centimetres.
3. Natural elements, the motion the eye expects
This is where generation actually starts: an image to video model takes your photo as its first frame, plus a written instruction, and builds the following frames. The trick that separates a believable result from visual mush fits in one sentence. Animate only what moves in real life. Nobody notices foliage trembling; everybody notices a wall rippling.
- Water: waves, a stream, reflections, the surface of a pool. The most reliable output of all.
- Sky: drifting clouds, rising mist, late light sliding across a scene.
- Vegetation: tall grass, foliage, wheat fields, palm fronds.
- Fire and smoke: a candle, a fireplace, steam above a cup, workshop haze.
- Fabric and hair: a dress, a flag, a curtain, a strand caught by wind.
- Light: a reflection sweeping a car body, a sign pulsing, dust in a sunbeam.
One method detail changes a great deal: name the source of the movement, not just its effect. An instruction such as light wind from the left, foliage only, everything else still produces a far cleaner shot than a vague add some movement. The model needs a direction, an intensity and a zone. Without those three, it animates everything, including what should stay frozen.
4. The frozen loop, one gesture inside a still image
A cinemagraph is a photograph where a single part moves, on a continuous loop, while the rest stays perfectly still. It is one of the most elegant formats around and one of the least used, because it demands restraint. A cup steaming in an otherwise frozen kitchen, a sign flickering in a stopped street, the sea breathing behind a motionless couple.
Two build requirements. First, an instruction that spells out what must not move, which almost nobody thinks to write. Second, a clean loop join: the last frame has to resemble the first, otherwise the seam shows on every cycle. In practice you generate slightly longer than needed, then pick the segment whose two ends match best. Our assembly chain can repeat a short clip until it covers a whole scene, so three good seconds become a thirty second backdrop without a single extra generation. That is exactly the backdrop a quote video needs, where the image supports the sentence without ever taking attention from it, and our method for building quote videos sets out that balance.
5. Reconstructed camera movement, the most spectacular route
Here you no longer move the frame, you move the camera. A push through a doorway, an orbit around an object, a pull back that reveals the setting, a descent along a facade. The model has to invent viewpoints that exist nowhere in your photo. It is by far the heaviest request you can make, and the one that fails most often.
Results can be striking, and they can also fall apart. Three precautions lift the success rate sharply. One movement at a time: a push, or an orbit, never both. A modest amplitude: an orbit of a few degrees stays believable, a full turn almost never does. A scene with readable depth, a clear front and back rather than a flat wall. When they land, these shots cut together like any others, and our scene by scene method for a short film shows how to chain them without breaking continuity. Note one constant technical limit as well: when you start from an image, most models inherit that image's aspect ratio and ignore the one you selected beside it. Crop your photo to the output format before generating, not after.
6. Background life, when the setting moves instead
A discreet and badly underrated route: the main subject stays perfectly still and the world around it comes alive. Pedestrians crossing in the distance, a car sliding down the street, birds in the sky, a curtain moving behind a seated person. The eye accepts it instantly, because it expects the world to move while a posed subject holds the pose.
This one rescues photos whose subject cannot survive generation: a face you do not want distorted, a product whose label must stay readable, a family picture. When that face is your own and has to come back video after video, it is worth fixing it once rather than animating it case by case, which is what our guide to building a digital double covers. The instruction is written backwards from habit. Describe what stays frozen first, then what moves, and specify that the movement stays in the background. Watch one recurring trap: generated extras are convincing far away and never convincing once they approach the foreground.
7. Animated layers, motion decided in the edit
The seventh route uses no generative model at all: it treats the photo as a graphic object and animates it in the editor. Scale, position, rotation and opacity move along markers placed across the clip. That is how most title sequences, brand slideshows and motion design pieces are built. It is also the route to pick whenever a date or a name has to stay perfectly legible on screen, as our guide to the wedding save the date video shows, since that kind of information tolerates no guesswork.
The benefit is twofold. The output is deterministic: what you set is what you get, no lottery and no retries. And the photo shares the frame with text, a logo or a shape, each with its own movement. Our online editor ships a catalogue of animations sorted by family, entrance, exit, accent, plus a set of Ken Burns style moves with their direction, and an assisted edit that spreads those effects across the timeline while avoiding the same pattern twice in a row. Across a series of photos, that is exactly what separates a flat slideshow from a sequence that holds. Pacing and cutting are covered in our step by step guide to a published YouTube video.
Which approach for which photo, and how to ask for it
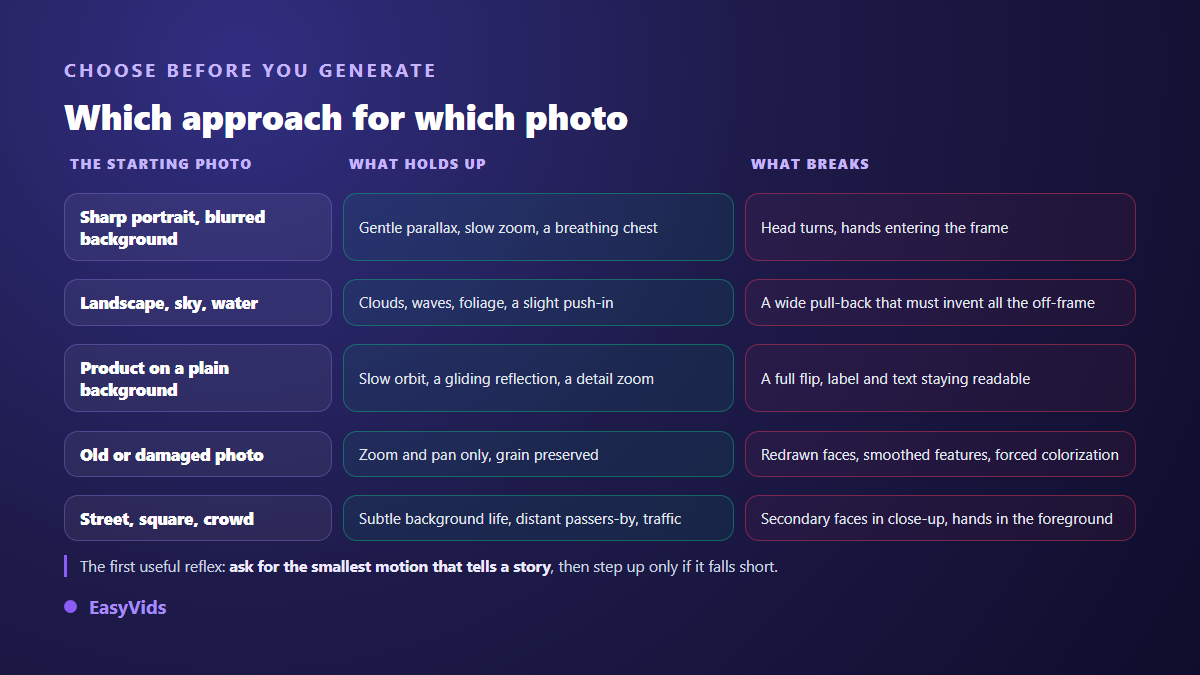
The choice follows the source photo, not the mood of the moment. An old grainy picture will not survive reconstruction; a wide landscape survives it easily. Here is the decision map that avoids most wasted retries.
Once the approach is chosen, the instruction is always written the same way. Four or five lines are enough, and their order matters as much as their content.
- What moves, named precisely: the foliage on the left, the steam above the cup, the clouds.
- Direction and intensity: to the right, slowly, a light breeze.
- What stays still, spelled out: the face, the hands, the label text, the framing.
- Camera movement, or its absence: static camera is a real instruction, and often the best one.
- The duration you want, the shortest that makes sense: extend by looping, never by generating longer.
Artifacts to catch before you publish
A generated shot gets reviewed, never published blind. Flaws come in families, and each family shows up under different viewing conditions. Watch it three times: once at normal speed for the overall impression, once slowly while scanning the frame edges, once on a loop to judge the join.
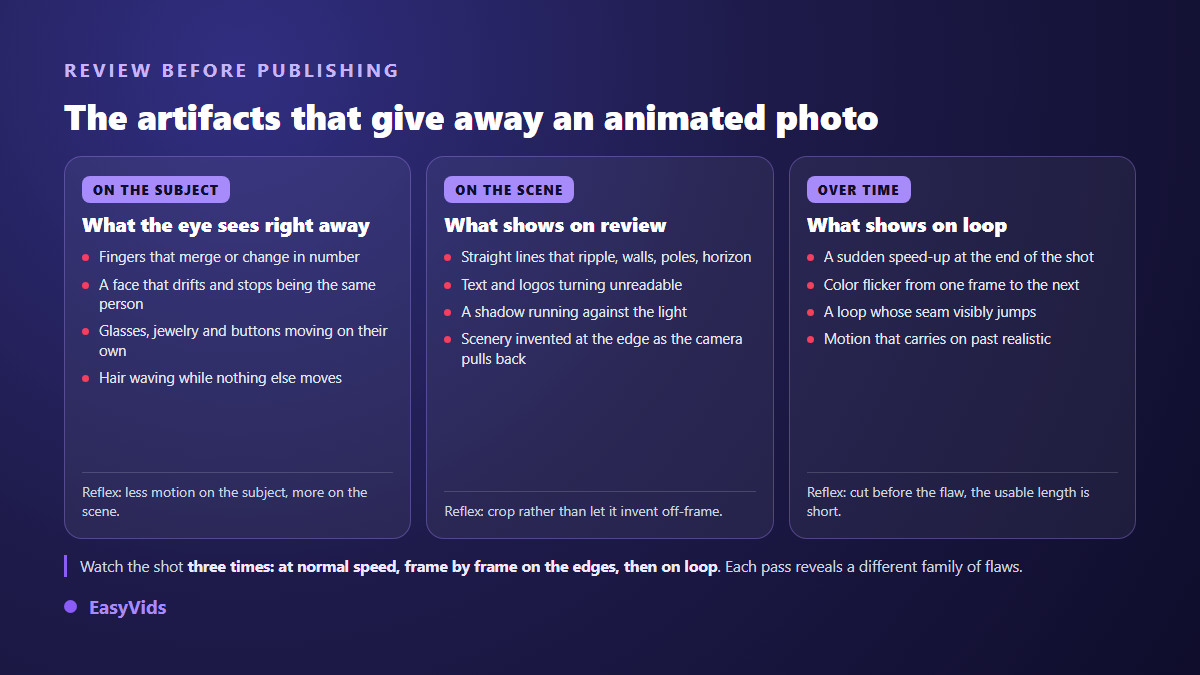
- Hands and fingers, still weakness number one: count them.
- The drifting face: by the end of the shot it is no longer quite the same person.
- Straight lines that ripple: door frames, poles, the horizon, building edges.
- Text, logos and numbers, which turn into invented symbols the moment they move.
- Shadows and reflections that contradict the light source of the original photo.
- The frame edge, where the model improvises scenery as the camera pulls back.
- Colour flicker between frames, most visible on flat areas and skies.
- End of shot acceleration, when the model runs out of material and rushes the movement.
The most effective fix is not endless regeneration, it is cutting. An eight second shot whose last three drift still gives you five perfect seconds. Every generation is billed per attempt while a cut costs nothing, so cut first and regenerate second. Plan details live on the pricing page. One last habit before upload: disclosure. A realistically animated photo falls under the altered content that major platforms ask you to flag, and YouTube describes the rule in its official help page on altered or synthetic content.
Frequently asked questions
Which photos animate best?
A sharp, correctly exposed image with enough resolution to survive a zoom. Resolution matters more than artistic quality: an animated crop inside a small photo shows its pixels. Add readable depth, a subject that separates from the background, and a naturally mobile area such as sky, water or foliage where the movement can live.
How long can an animated photo run?
Expect a few genuinely usable seconds, often between three and ten. Beyond that, drift becomes visible on almost every image. For a longer sequence you do not generate longer: you chain several short shots, or you loop a clean segment, which looks the same on screen for far less effort.
Can I animate an old family photo?
Yes, with one important reservation. Animated cropping, gentle parallax and background life all work beautifully. But the moment a model rebuilds an old face, it redraws it its own way: features shift, and on a family photo that is never a small detail. Stay with the routes that invent nothing on pictures that matter.
Do I need a powerful computer?
No. Everything happens in the browser: uploading the photo, writing the motion instruction, generating, then editing. Processing runs on the server, so your device's power is irrelevant and a phone is enough. A generation you start keeps working on its side and waits for you in your history.
How is this different from a talking photo?
A talking photo animates a mouth over a script and belongs to a dedicated pipeline, with image rights front and centre. Animating a photo in the sense of this guide makes nobody speak: you add movement, volume, a camera. The two combine well on the same project, but the techniques, the flaws and the precautions have nothing in common. Common usage questions are gathered in our frequently asked questions.
A successful animated photo is recognised less by the movement it contains than by the movement it chose not to add. Start with animated cropping, which never fails. Move up to parallax and natural elements when the image allows it. Keep reconstructed camera work for scenes that can carry it, and cut without hesitation the moment a shot drifts. Creating an account opens the studio: drop in a photo, write one line of movement, and judge the result yourself in minutes.