You have posts that work. They get read, shared, sometimes quoted, and they sit on your site while your audience spends its evenings watching video somewhere else. Learning to turn a blog post into a video is the cheapest way to get that work back: the substance exists, the structure exists, the examples exist. What is missing is a method for moving from text read with the eyes to text heard with the ears.
The trap is assuming you can paste the post into a tool and press a button. The result sounds wrong within one sentence, because a blog post is full of things nobody says out loud: links, headings written for search engines, bullet lists, subscription reminders dropped in the middle. This guide walks the operation in order, with the settings that matter at each stage. If your starting point is any old text rather than a published post, our guide to turning text into video covers the general case.
The short answer
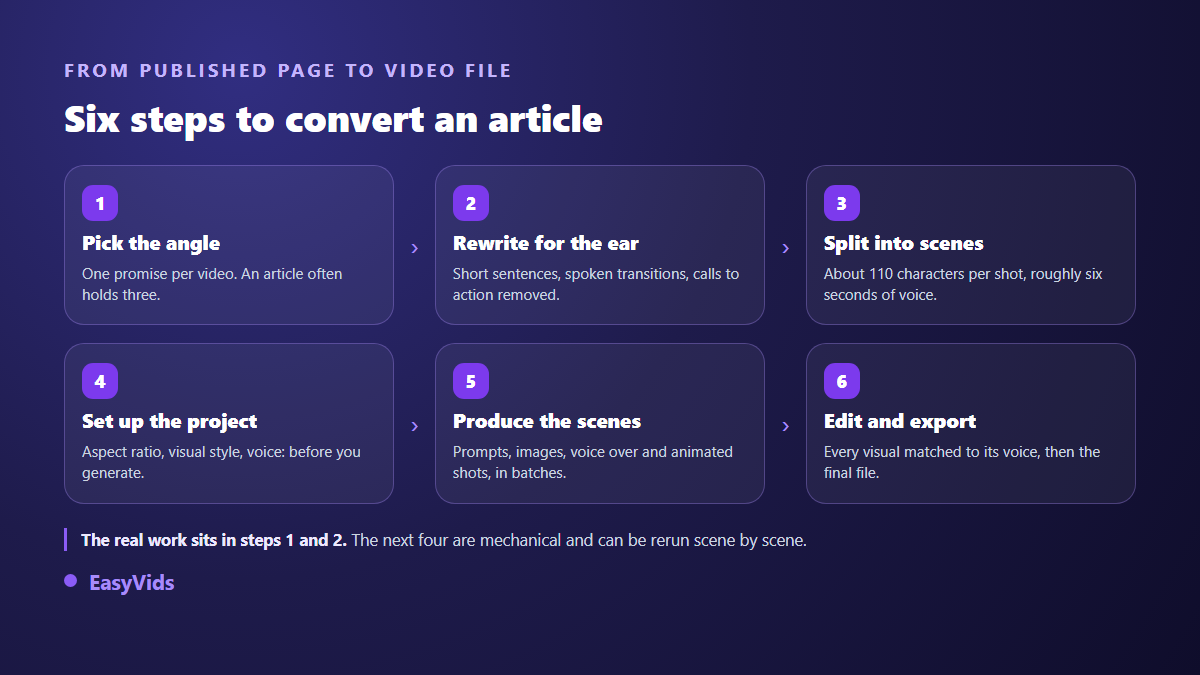
Budget about an hour for a mid length post, and work in this order. Pick one angle, even if the post carries three. Rewrite for the ear: short sentences, spoken transitions, page furniture deleted. Split the text into scenes of roughly six seconds of voice over each. Lock aspect ratio, visual style and voice before generating anything. Produce the scenes as a batch, then fix them one at a time. If your text is already written to be spoken, skip the first two steps and follow the conversion of a finished script instead.
A post and a video do not tell a story the same way
A reader scans. They skip a paragraph, jump back, reread a line, glance at a table, then pick up the thread. A viewer does none of that: they move forward, in a straight line, at the pace you impose. That single difference rules out a straight copy. Every phrase assuming a free roaming eye becomes a dead end: as we saw above, the table below, see the next section.
The second difference is density. A two thousand word post can carry ten ideas, because the reader picks the ones they care about. A video carries one, and it carries it from the first second to the last. That is why the first decision is not technical. It is agreeing to drop four fifths of your text, without regret, knowing the rest will become other videos.
Step 1: choose an angle instead of keeping everything
Open the post and look for the promise. Not the headline, the promise: what the reader can do afterwards that they could not do before. A good post often holds several, stacked, because the written format allows it. List them, number them, then keep the most self contained one, the one that makes sense without the others. That is your first video.
One rule makes the sorting fast: if a part of the post needs another part to be understood, they belong in the same video. Otherwise they make two. A seven point guide rarely makes a good seven point video. It makes one video about the two points that matter, plus five short form clips for the rest. Your conversion plan then draws itself, and you know how many videos the post contains before writing a single line.
Step 2: rewrite the post for the ear
This is the step that decides everything, and the one most often skipped. Text written to be read uses asides, brackets and nested clauses, all constructions a voice cannot deliver without losing the listener. Rewriting does not change your ideas, it changes their packaging.
- One idea per sentence. Break anything longer than two lines, even if it means repeating the subject at the start of the next one.
- Say the transitions. In writing, a heading does the work. Spoken, you need a linking sentence that announces what comes next.
- Delete the cross references. No above, no below, no link anchor read aloud as if it were prose.
- Make the numbers audible. A percentage works out loud when it is rounded and placed inside a comparison.
- Turn lists into spoken enumerations. Announce how many items are coming, then deliver them, one per scene.
- Keep one open question at a time. The viewer cannot scroll the page to find the answer.
- Read it out loud. Whatever leaves you short of breath will do the same to the voice over.
You can run this pass yourself or hand it to the writing workspace in the studio. One practical detail is worth knowing first: the idea field is not built to swallow a whole post, it is capped at a few thousand characters. What belongs in it is the outline, the promise and two or three key examples. Everything else is set beside it: tone, length expressed in words or directly in minutes of video, language, and a personal instructions box saved on your account where you describe your writing habits once and for all. A multi pass writing mode exists for demanding texts: it writes, reviews critically, corrects, then checks, and the work carries on server side even if you close the page.
Step 3: sort what is spoken, what is shown, what goes
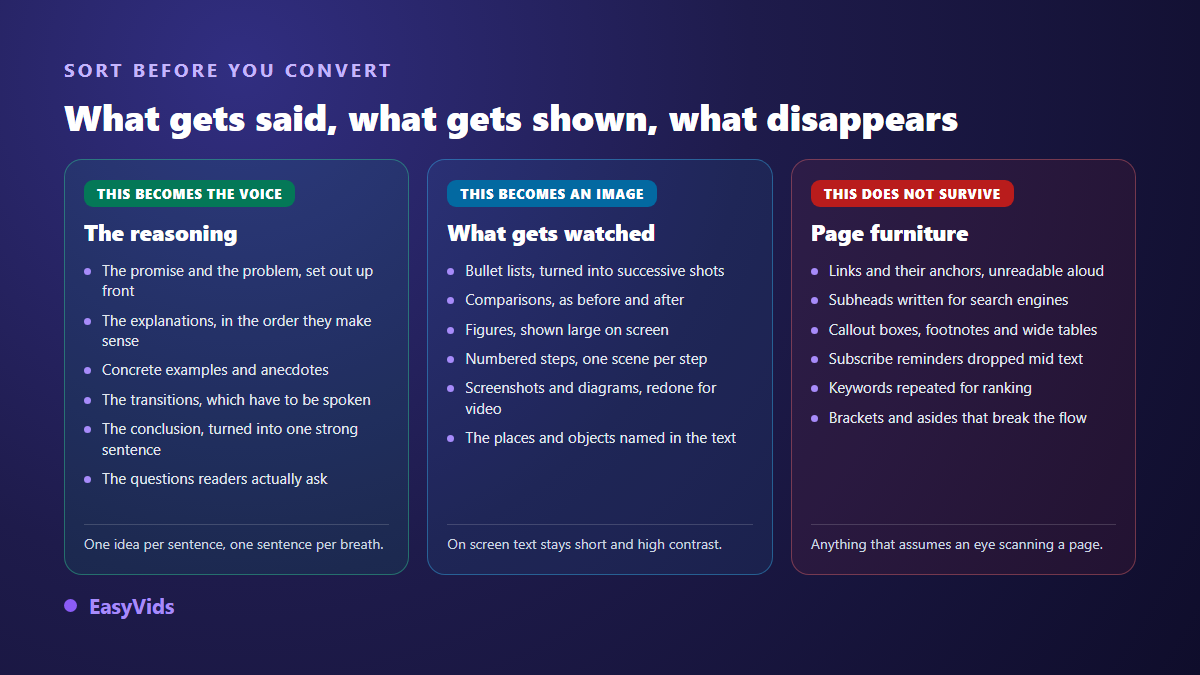
Once the angle is picked, sieve the text into three piles. The first is what becomes the voice over: the reasoning, the explanations, the anecdotes, the transitions. The second is what becomes an image: comparisons, striking numbers, numbered steps, the objects and places you name. The third is what does not survive the trip: links, search optimised headings, callout boxes, footnotes, wide tables.
The sorting has a very useful side effect. The second pile hands you, almost word for word, the visual instructions for your scenes. When the post says three people around a whiteboard, you already have your shot. When it says traffic doubled in six months, you have a shot with a number on screen. The most concrete posts convert best, precisely because they describe things you can see.
Step 4: split the text into scenes
A generated video is not one long take, it is a run of short shots timed against a voice over. Splitting is therefore the operation that turns your text into a shot list. The studio default targets roughly 110 characters per scene, about six seconds of voice. Presets offer six, eight or ten seconds, and the character value stays adjustable. Across our own productions a voice over runs near 150 words per minute, which gives eight to ten scenes for one minute of video at the default setting.
The scene count appears before the project is even created, so you see the volume before producing anything. When the automatic split falls in the wrong place, you take over: cut at the exact cursor position, merge two neighbouring scenes, insert one, delete another, and edit the text of each. Two behaviours explain most surprises: a line written entirely in capitals is treated as a heading and stays alone on its scene, and a segment of five words or fewer is glued to its neighbour so no shot lasts a single breath.
Step 5: the settings that apply to the whole project
Some choices apply to every scene at once. Changing them after production has started means redoing the lot, so paying twice for the same work. Settle them while the project is still nothing but split text.
- Aspect ratio: landscape, vertical or square. It governs stills and moving shots alike, and switching later forces a full rebuild.
- Scene length, which alone sets the shot count, the build time and the perceived pacing.
- The enforced visual style, written once and repeated on every scene: period, material, light, palette.
- The exclusion list, as useful as the style itself: burned in text, logos, crowds, hands in close up. Instructions are kept separate for stills and for moving shots.
- The voice: timbre, language and delivery, auditioned on a short sample before you commit.
- Still or moving shot, scene by scene. An explanation needs a picture, an action beat deserves a shot that moves.
The voice deserves more attention than the rest, because it carries half the perceived quality. A recycled post gives itself away through flat narration that recites instead of telling. Our settings are gathered in five habits for a genuinely natural AI voice over, and the most profitable move stays the simplest: listen to a ten second sample before launching thirty scenes.
Step 6: produce, edit, export
From here the work turns mechanical. Each scene gets a visual instruction written from its own text and the context of its neighbours, then a still or a moving shot, then its voice over. You can run those actions as a batch, choose which ones you want, and ask either to fill the gaps or to redo everything. Processing lives on the server: closing the tab or losing the network interrupts nothing, and the page reconnects on its own when you come back. Several scenes are handled in parallel, which changes everything on a long post. The full chain, from text to file, is laid out in our AI video generator guide.
The edit then assembles the scenes, syncing every visual to the exact length of its voice. That rule never moves: if a scene feels too long on screen, the visual is not the problem, the sentence is. You pick the aspect ratio and quality of the final file, you can add a slow drift on stills and cross fades between shots, and apply one shared mood filter. The assembly can be rerun as often as you like, since it regenerates nothing and only reassembles what already exists.
Turning one post into several videos
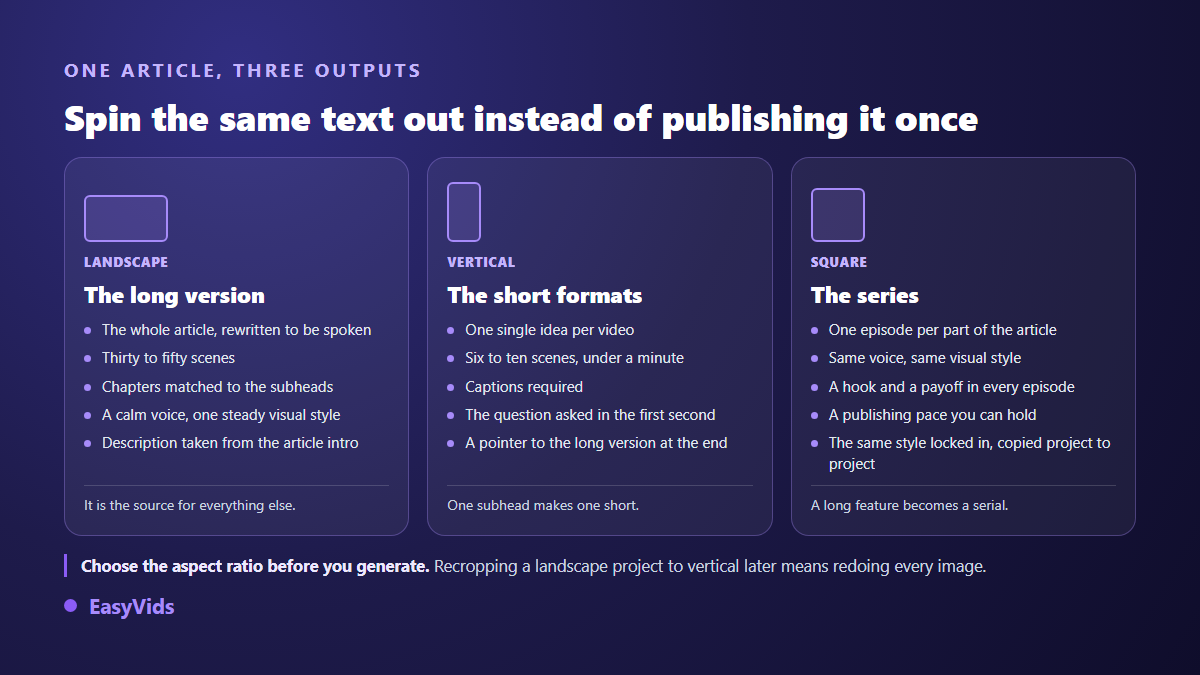
This is where the time saving becomes real. A post worked once feeds a long version, several short form clips and sometimes a series. The long version carries the main angle and acts as the source. Each self contained heading gives a short clip built on a single idea. A heavily structured feature becomes a serial, one episode per part, with the same voice and the same visual style throughout. The YouTube help centre states that videos uploaded from 15 October 2024 are classified as Shorts when they are square or vertical and no longer than three minutes, so the format decides the shop window, and it is picked before generation.
Two precautions avoid unpleasant surprises. First, never crop a landscape project to vertical afterwards, because something that mattered always gets lost, and the per platform dimensions are covered in our guide to video formats. Second, short form is very often watched with the sound off, so captions are not optional there. Once the file is out, its audio track can be transcribed into a timed caption file from the dedicated panel, and our guide to automatic captions covers the styling that stays readable on a phone.
How long the conversion really takes
Here is the split observed on a fifteen hundred word post converted into a three minute video. Choosing the angle and rewriting take the largest share, thirty to forty minutes depending on your fluency. Splitting and settings take five minutes. Producing the scenes happens while you do something else, since it continues without you. Reviewing and fixing individual scenes takes around ten minutes. The final assembly is instant.
In other words, most of the time is spent before any generation, which is good news: that is the part you already master, since you wrote the post. The second post will take half as long as the first, because visual style, writing instructions and voice settings are remembered on your account. The only dial that moves your usage is the scene count, since every delivered item counts, and the current plans are on the pricing page.
Posts that convert badly
Not every text deserves a video, and it is fairer to say so. Five profiles reliably disappoint, however careful the production.
- Pure reference pages: glossaries, lookup tables, shortcut lists. People consult them, they do not listen to them.
- Posts built on screenshots: an interface walkthrough needs a screen recording, not a generated image.
- Texts dense with figures: past about three data points per minute, listeners drop off even with numbers on screen.
- Perishable news pieces: the video outlives the page, and you will leave outdated information online.
- Sensitive legal or medical content: a loose spoken rewording exposes you more than a checked, sourced text.
What the video gives back to the original post
One worry comes up constantly: publishing the same idea twice would hurt the post's ranking. Google Search Central documentation on AI generated content, published in February 2023, states that its ranking systems aim to reward original, useful content regardless of how it was produced, and that only automation intended to manipulate rankings falls under the spam policies. A video reusing your own post in another format does not sit there. One platform obligation is worth naming too: since March 2024 the YouTube help centre asks creators to disclose, at upload, realistic content made with synthetic or altered media.
In the other direction the gain is concrete. A video embedded near the top of the post lengthens time on page. The video description points back to the post for readers who want the written detail. The thumbnail reuses the post's main illustration, giving both formats one visual identity. And your text lands in front of an audience that would never have arrived through a search engine.
Frequently asked questions
Can I paste a whole post and hit generate?
Technically yes, through manual project creation, which accepts long text and splits it into scenes. The result will disappoint if the text has not been rewritten for the ear, because the narration will recite headings, link anchors and constructions designed for the eye. The rewriting pass stays the best investment in the whole workflow.
How long should the video be for a fifteen hundred word post?
Keeping one angle, expect two to four minutes, roughly three hundred to six hundred spoken words. Reading the whole post would give ten minutes, which is rarely a good idea. The surplus is not wasted: it feeds the short form clips and the following episodes.
Do I have to redo the work for every platform?
No for the text, yes for the format. The rewritten script serves everywhere. The aspect ratio, however, is decided before generation and does not crop cleanly afterwards: build the vertical project as its own piece, with its own hook and its own ending, rather than trimming the landscape version.
How do I keep the same visual style across posts?
By writing your enforced style once and leaving it saved on your account, along with the exclusion list. It is repeated on every scene of every project, which gives visual continuity across all your videos. That is what makes a run of conversions look like a channel rather than a pile of experiments.
Should the video credit the original post out loud?
Saying it aloud adds nothing and breaks the pacing. Put the link in the description and, where the platform allows, in a clickable card. A closing line such as the full figures are in the post is enough to bridge the two, without turning the video into an advert for your own site.
Take your best performing post, print it, and do one thing: circle the main promise and cross out everything else. You have your first video. The rest is a mechanism you will repeat faster and faster, until it feels like a publishing reflex rather than a project. The EasyVids studio keeps rewriting, splitting, visuals, voice and editing in one place, and creating an account is enough to drop your first text into it.