You want to speed up a video to fit a shorter format. You push the rate to 2×, and the voice suddenly sounds like a cartoon character. The move looked harmless, the result is unlistenable. The wall is the same for everyone: trimming a tutorial that drags, tightening a slow presentation, turning a long take into a time lapse. The picture obeys without complaint, the sound takes revenge.
That flaw is not a law of nature. It comes from a calculation method, not from a limitation of video files. Two very different techniques hide behind the same speed slider, and only one of them protects the pitch of a voice. Here is which to pick, which rate suits which goal, and how to run the whole thing in a browser with nothing to install. If editing itself is new to you, our guide to online video editing sets the ground this tutorial builds on.
The short answer
To speed up a video without wrecking the audio, use a tool that can preserve pitch, an option usually labelled pitch preservation or time stretching. Set your rate, switch off the pitch change, export. Without that option the tool simply plays the file faster: at 2× every frequency doubles, which lifts the voice by a full octave. With it, only the duration moves. The rest of this article covers when each method belongs, because both have a real use.
What actually happens to sound when video speeds up
An audio file is nothing more than a long series of pressure measurements taken at regular intervals. The number of measurements per second is the sample rate. When a player runs those measurements faster than they were recorded, it does not only shorten the duration: it shifts every frequency upward by the same ratio. Doubling the speed doubles the frequency of every sound, and a doubled frequency is exactly one octave in musical terms. That is why a voice at 2× sounds like a cartoon, and why the same voice at 0.5× sinks into the low end.
This was how tape machines and turntables behaved, and video players inherited it for years. Browsers switched sides: the HTML specification now defines a preservesPitch property on audio and video elements, enabled by default. That is why a video played at 1.5× in a browser stays perfectly understandable. Do not misread it though. That correction applies to playback only, never to your file. Speed a clip up in an editor without thinking, and the export carries the distorted audio for good.
Resampling versus time stretching
Two calculations live behind that one slider. The first, resampling, simply replays the file at a different rate: the turntable effect, instant and free in computing terms. The second, time stretching, chops the sound into very short slices and glues them back together tighter or looser while holding the original pitch. These are different operations, not two positions of the same knob.
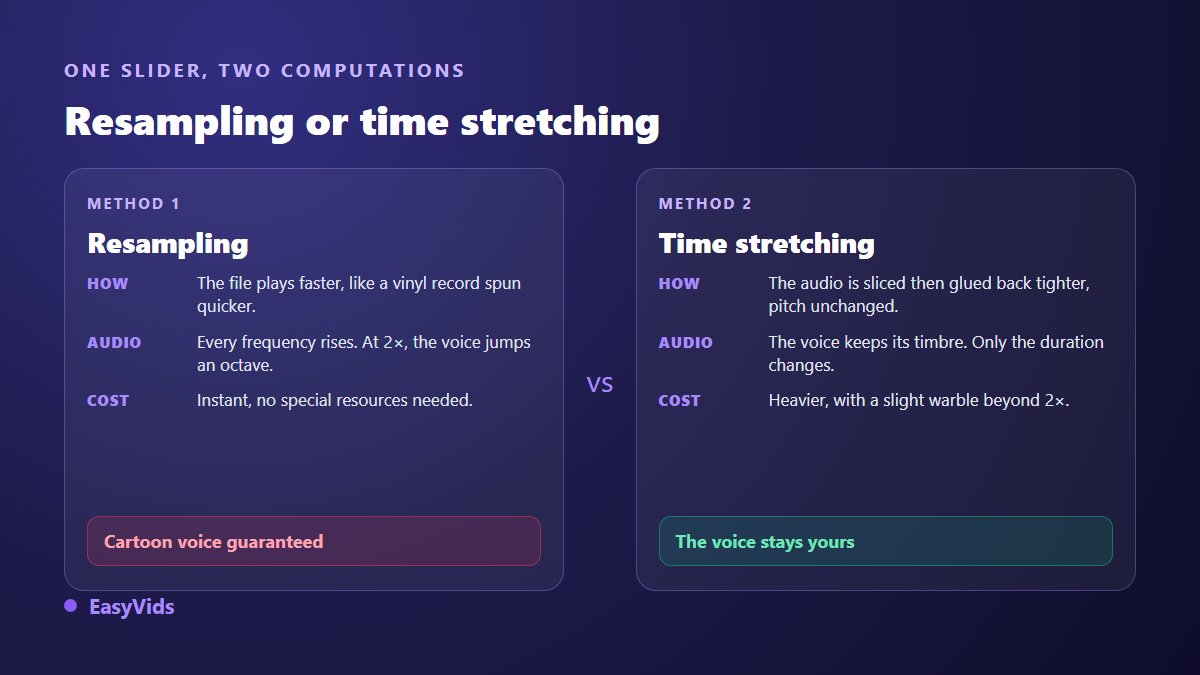
Time stretching is not magic either. It works in slices, and that slicing shows when you ask too much of it: a slight wobble on held vowels, a shimmer on music, especially past 2×. Keep the practical border in mind. Up to 2×, time stretching stays clean on spoken word. Beyond that, give up on the original audio and replace it, with a fresh voice over or with music.
Which speed for which goal
The rate is not a matter of taste, and certainly not a matter of what the editor feels after watching the footage twenty times. It follows from what the viewer has to understand, and from whether speech has to be followed at all.
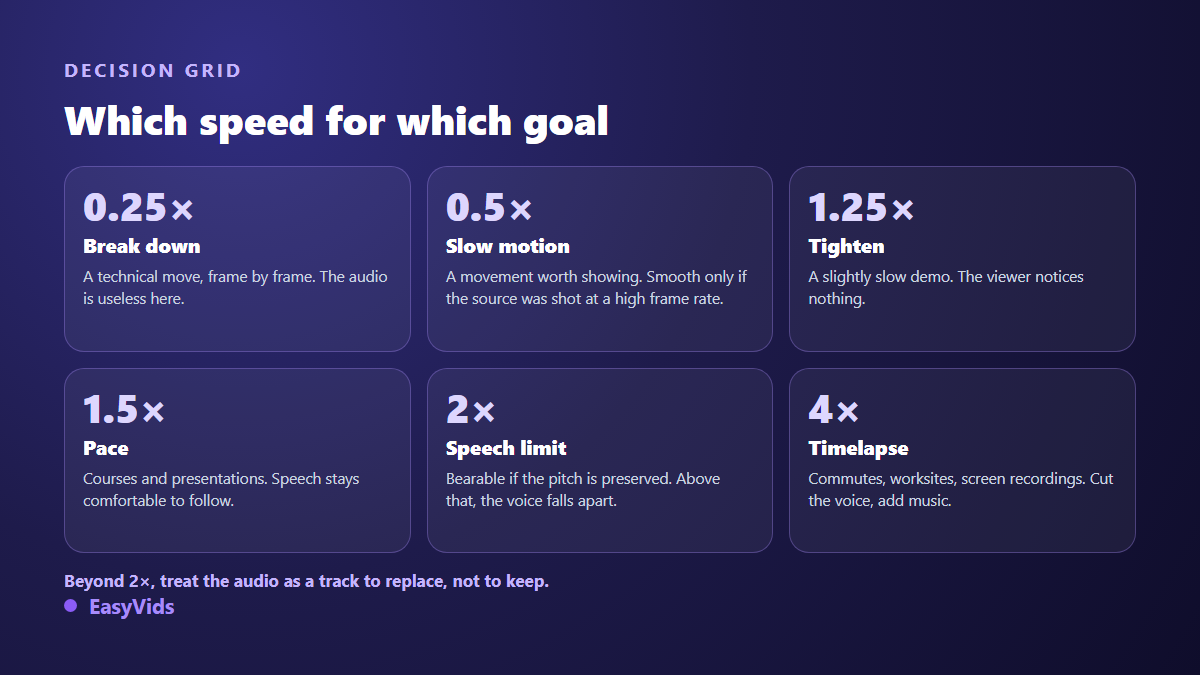
- 1.1× to 1.25×: the pace tightens and nobody notices. This is the default for any live demonstration.
- 1.5×: the comfortable ceiling for a course or a presentation, as long as pitch is preserved.
- 2×: workable for spoken content you want to skim. Breathing disappears and attention tires faster.
- 4× and above: pure time lapse territory. Journeys, build sites, screen recordings. Drop the original sound and lay music over it.
- 0.5×: classic slow motion, smooth only if the source was shot at a high frame rate.
- 0.25×: near frame by frame analysis of a gesture. Audio no longer plays any role.
A duration check helps you decide. A ten minute video at 1.25× lands at eight minutes, and at 1.5× it lands at six minutes forty. The gain is real but never proportional: going from 1.5× to 2× only saves another minute and forty seconds on that video, for noticeably more tiring audio. That is usually the signal to cut passages instead of speeding up further.
Speeding up a video in your browser, step by step
Nothing needs installing. In the EasyVids online editor, speed is a panel attached to whichever element is selected on the timeline. That detail matters: you can speed up one clip inside a twenty clip edit without touching anything else. The same panel works by touch on a phone screen, and our round up of editing apps that run on mobile as well as in a browser sets out what each family of tools really allows.
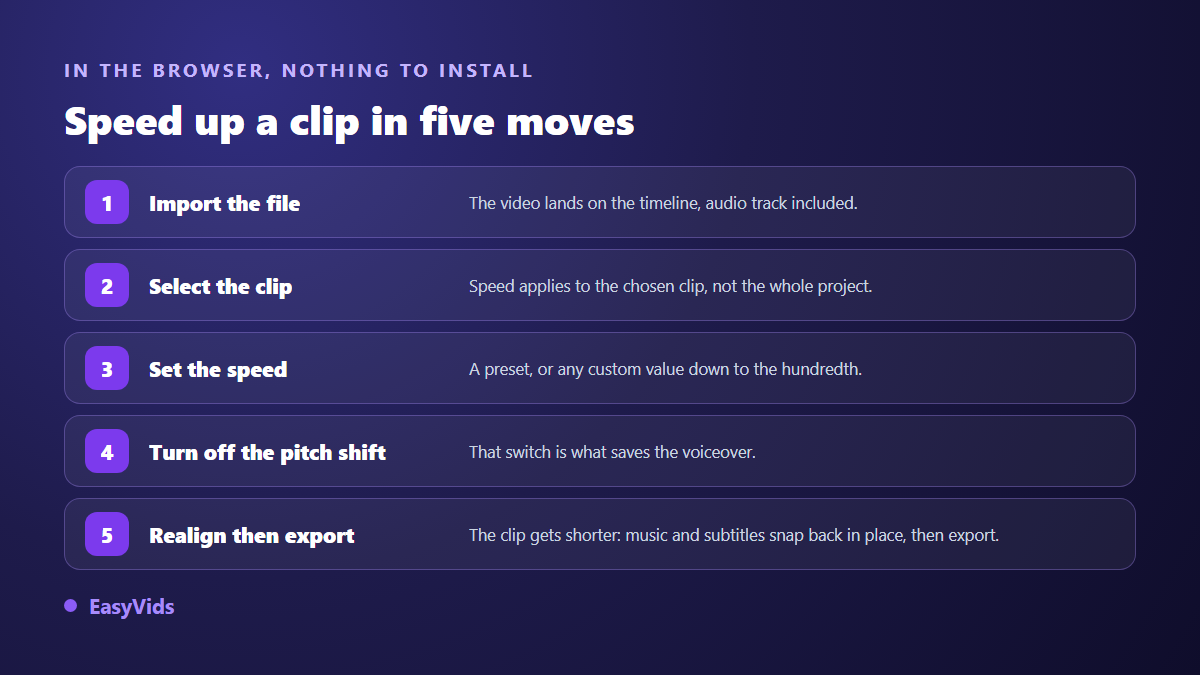
- Import your file. It lands on the timeline with its audio track.
- Click the clip you want to treat: the Speed panel appears in its properties.
- Pick a preset (0.25×, 0.5×, 1×, 1.5×, 2× or 4×) or type a free value, down to the hundredth.
- Switch off the pitch change toggle. It is on by default, and it is what lifts the voice.
- Watch the clip length adjust itself, which shifts everything that follows on the timeline.
- Realign music, titles and overlays to that new duration.
- Export as MP4 or WebM at the quality level your target platform deserves.
Two details change daily use. Speed applies to a standalone audio track as readily as to a video clip, so you can compress an imported voice over without touching the picture. And the setting stays editable, because it is stored as a property of the clip rather than burned into the file. Nothing is final until you export. The EasyVids studio opens that editor straight in the browser, phones included.
Treat picture and sound as separate tracks
Sometimes the best way to speed up a video without ruining the audio is to leave the audio alone entirely. Detach the audio from the video clip, which the editor does in one click, and you end up with two independent elements. The picture runs at 4×, the voice stays at its natural rate on its own track, or gives way to music. That is exactly how a narrated time lapse is built: fast footage, calm narration on top.
What speed does to the picture
Audio steals the attention, but the picture pays a price too. A video is a series of still frames at a given rate: 24, 25, 30 or 60 frames per second depending on the source. Speeding up means throwing frames away. At 2× from a 30 frames per second source exported at 30 as well, every second frame is dropped. At 4×, only one in four survives. Motion turns choppy, and no quality slider brings it back, because the information is simply gone.
Two habits limit the damage. First, do the arithmetic: to lose nothing on a 2× speed up from a 30 frames per second source, you would export at 60, and the editor offers 24, 25, 30, 60 and 120 frames per second in the project settings. Second, shoot at a high frame rate whenever you already know the footage will be sped up or slowed down. Slow motion at 0.5× from a 60 frames per second source stays fluid, while the same treatment on 24 frames per second turns into a slideshow.
Speed up one passage, not the whole video
A whole video rarely deserves a single rate. The opening sets context, the middle shows a long manipulation, the end wraps up. Split the clip wherever the pace should change, then set a different rate on each piece. Splitting keeps the setting on both halves, so you cut, select the middle, push it to 4×, and the rest keeps real time. Watch one side effect: every rate change creates an audible seam if sound continues across it. Either mute the original audio on the fast section and let music carry the transition, or place the change on a cutaway, where the ear already expects a break.
Mistakes that give a sped up video away
- Speeding up to hide a flabby edit: the slowness comes from the content, not from playback.
- Forgetting pitch preservation, then republishing the video a second time to fix it.
- Speeding up a generated voice over when regenerating it at a faster delivery sounds far more natural.
- Leaving captions timed to the old duration: the drift grows as the video runs.
- Pushing spoken content to 3× or 4×, then wondering why nobody watches to the end.
- Exporting below the source frame rate, which adds lost frames to frames already sacrificed.
Captions deserve a closer look, because they spoil plenty of otherwise decent edits. A caption file holds absolute timestamps, so once the clip gets shorter every line arrives late, and the gap widens as the video plays. The safe order is to generate captions after the speed change, on the final cut, following the method in our guide to automatic subtitles.
Frequently asked questions
Can you speed up a video without losing quality?
The picture loses no definition, the pixels are untouched. What you lose are whole frames, the ones dropped to fit the new duration. A freeze frame looks just as sharp, while motion looks less fluid. Exporting above the source frame rate cuts that loss sharply.
What is the maximum speed a voice can take?
For spoken content meant to be followed, 2× is the practical ceiling, and only with pitch preserved. Beyond that, listeners stop processing words and just watch the pictures go by. For content without speech there is no ceiling: 4× works fine with music over it.
Does speeding up a video change the file size?
Almost always downward, since the video lasts less time. One nuance is worth knowing: fast footage contains a lot of motion, which codecs compress poorly. A two minute time lapse can weigh more than a two minute calm scene of identical length.
Can I do it from a phone?
Yes, as long as the editor runs in the browser. Nothing to install, the timeline shows on the phone screen and the speed value is set with a finger. A larger screen stays more comfortable for placing cuts precisely, but the exported result is the same.
Speeding up a video is a rhythm decision, not a production shortcut. Set the rate around what the viewer needs to understand, switch off the pitch change whenever a voice matters, and treat picture and sound as two tracks rather than one welded block. Create an account to open a project and retime your first clip.