You hung a green sheet in the living room, recorded your piece to camera, and the result looks nothing like the plan. Patches of background that refuse to go, a green rim around your shoulders, strands of hair eaten by the cutout. Searching for a green screen online tool led you to a dozen services promising one click compositing, and one click is never enough. The tool is rarely the culprit. The five minutes of filming that came before it usually are.
Chroma keying is an old, precise technique, and a browser handles it perfectly well. It asks for one thing only: a flat, evenly lit, uniform colour that appears nowhere on your subject. This guide walks the whole chain, from fabric to export. Why green, how to light it, what the four keyer controls actually do, how to get a background that holds up, and when a green screen is the wrong answer entirely. For everything that comes after the key, our guide to editing video in the browser picks up the rest of the journey.
The short answer
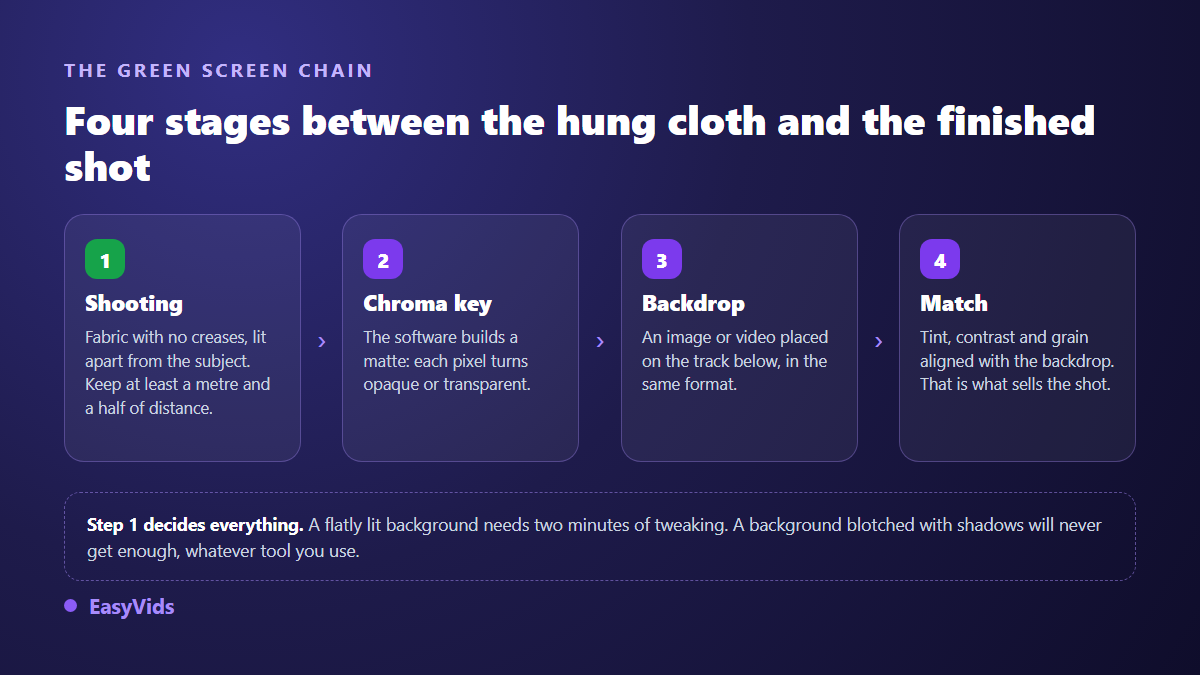
Stretch the fabric until no crease is left, stand about five feet in front of it, light the background separately from your face, then record. Drop the file into an online editor that includes a chroma key, sample the green with the eyedropper, raise the tolerance until the background is gone, then choke the edge by a pixel or two and soften it slightly. Place your background on the track underneath, in the same aspect ratio. A clean key is mostly won before the computer: an evenly lit backdrop needs two minutes of adjustment, a shadow stained one will never get enough.
What a chroma key actually does
The software does not erase the green. It builds a matte, an invisible black and white image telling every pixel whether to stay opaque or turn transparent. It compares each pixel to the colour you sampled, measures the distance, and turns that distance into transparency. Everything you adjust afterwards only tunes how strict that comparison is.
That mechanism explains nearly every failure. A shadow on the fabric is no longer the same green, so it stays. A dark green sweater sits close to the backdrop colour, so it punches a hole. A fine hair shares its pixel between subject and background, so it ends up half transparent. Understanding this beats any preset: you stop nudging sliders and start fixing the cause.
Why green rather than any other colour
The choice of green has nothing to do with taste. The Bayer filter, the colour grid used by almost every digital sensor, carries twice as many green photosites as red or blue ones. The green channel is therefore the best sampled and the least noisy of the three, which yields a cleaner matte for the same amount of light. Saturated green also sits far away from skin tones, which keeps holes out of faces.
Blue keeps two specific uses. It wins whenever your subject wears green, and on very light hair, which green contaminates more visibly. A blue backdrop asks for more light to reach the same quality. In a living room with two lamps, green stays the sensible bet.
Filming a green screen that keys itself
The shoot decides everything. These habits separate an instant key from an evening of damage control.
- Stretch the fabric flat: a crease makes a shadow, and a shadow is no longer the same green.
- Stand well away from the backdrop, since the green bouncing onto your shoulders fades with distance.
- Light the backdrop with its own sources, placed on both sides, so the tone stays even from edge to edge.
- Light the subject separately, with a more directional source, because that is what rebuilds the depth the background will demand.
- Keep green out of your wardrobe, your jewellery and anything you hold on camera.
- Lock focus, exposure and white balance: automatic correction mid take makes the backdrop tone drift.
- Record in the highest available resolution and avoid heavily compressed modes, because the cutout lives in a handful of pixels.
One technical detail explains most staircase edges. Consumer compression formats store colour in 4:2:0, at a quarter of the resolution kept for luminance: your camera holds far more detail on brightness than on hue. The keyer works on hue. You will not change that without professional gear, but you can compensate for it. The brighter and more even the backdrop, the less that approximation shows.
The four keyer controls, in plain words
Names differ from one tool to the next, the logic does not. Four sliders are enough, and they belong in this order.
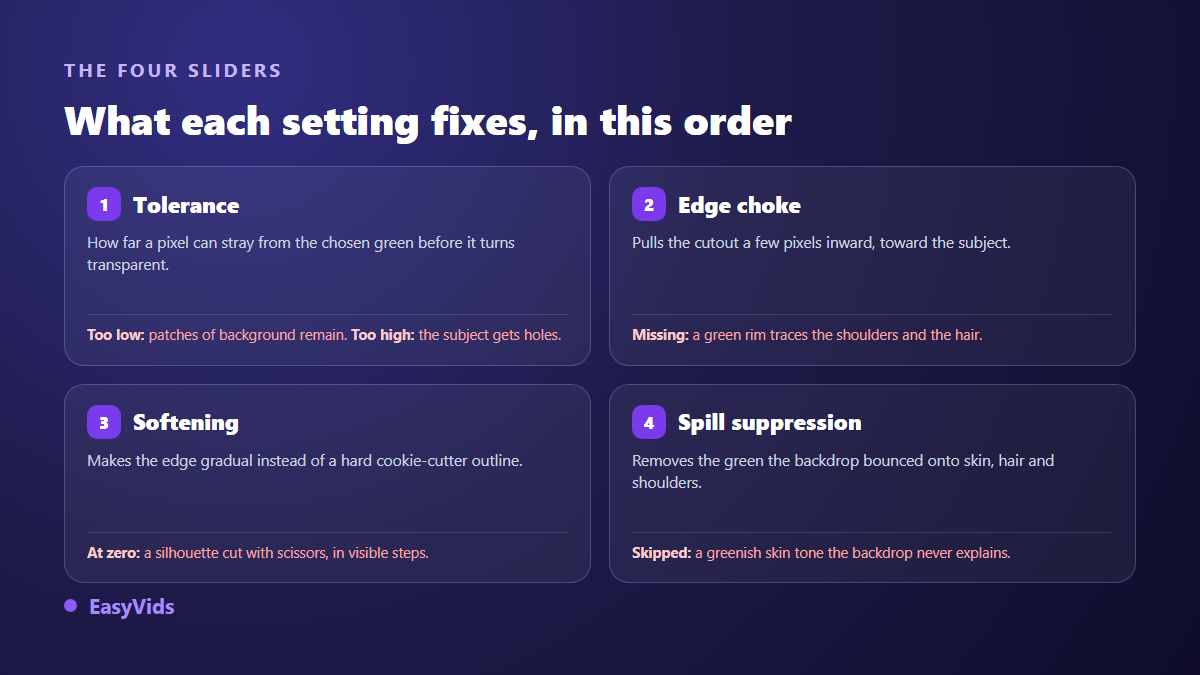
Start with tolerance, alone, leaving everything else untouched. Raise it slowly until the background disappears completely, then stop just before the subject starts hollowing out. If your tool can display the matte in black and white, use it: the background should read as solid black, the subject as solid white, and only hair is allowed to sit in grey.
Edge choke comes next, and it alone kills the green rim on your shoulders: one or two pixels is plenty, more starts eating the silhouette. Softness makes the edge gradual so it stops looking cut with scissors, but stay subtle, because an overly soft edge reads as a blurred sticker. Spill suppression finishes the job by neutralising the green the fabric threw back onto skin and hair. Pushed too far, it turns complexions pink or grey.
The background: find it, film it, or generate it
Once the subject is cut out, something has to go behind. Three sources exist. A still image, the simplest and steadiest. A moving background, livelier, but you have to watch that its motion does not contradict the subject. A generated background, which offers something rare: you order it to the exact measurements of your shot. That is where our guide to AI image generation earns its place, because a stock backdrop rarely bends to your framing.
Three instructions make a generated background believable behind a filmed person. Camera height first: if you shot at eye level, ask for a scene seen at eye level, otherwise the horizon line will cut you in the wrong place. Focal length next, because a wide angle interior behind a tight portrait creates an unease viewers cannot name. Light direction last, which has to arrive from the same side as the light on your face. Ask for the right aspect ratio at generation time, 16:9 for a horizontal video and 9:16 for a vertical one, rather than cropping afterwards.
The colour match, where a composite gives itself away
A perfectly cut subject still looks wrong as long as it shares nothing with its background. Viewers could not explain why, but they see a collage. Five quick checks make that impression go away.
- Colour temperature: warm or cool the subject until it belongs to the same time of day as the background.
- Contrast: a soft background behind a heavily contrasted subject fools nobody.
- Grain: a generated background is perfectly smooth, filmed footage never is, and a light shared grain glues them together.
- Sharpness: if the background is slightly soft, the subject cannot be sharper than life allows.
- Ground contact: a discreet shadow under the feet, even an approximate one, beats a character who floats.
The green screen cousin: black backgrounds and the Screen blend
Not every element you composite needs a chroma key. Smoke, sparks, rain, light leaks and most overlay effects are filmed against black. Those need no keyer at all: drop the clip on a track above your shot and set its blend mode to Screen. The maths keeps whatever is bright and drops whatever is black.
The EasyVids editor does exactly that: stacked video tracks, per layer opacity, seventeen blend modes, masks with feathered edges, and the colour controls a match needs. To be straight about the rest, because an empty promise always comes back: it does not currently include an automatic chroma key. The green screen key itself belongs in a tool that ships one, and the editor takes over for assembly, text, captions and export. If your take leaves the camera in a container the editor will not open, converting it to a standard MP4 online, with nothing to install clears that up before the import. What EasyVids adds to a green screen shoot is the background, generated in the aspect ratio and the light your shot calls for.
When a green screen is the wrong answer
A green screen solves one precise problem: you have a real subject and you want to move it somewhere else. Other situations call for another move, and stubbornness costs hours.
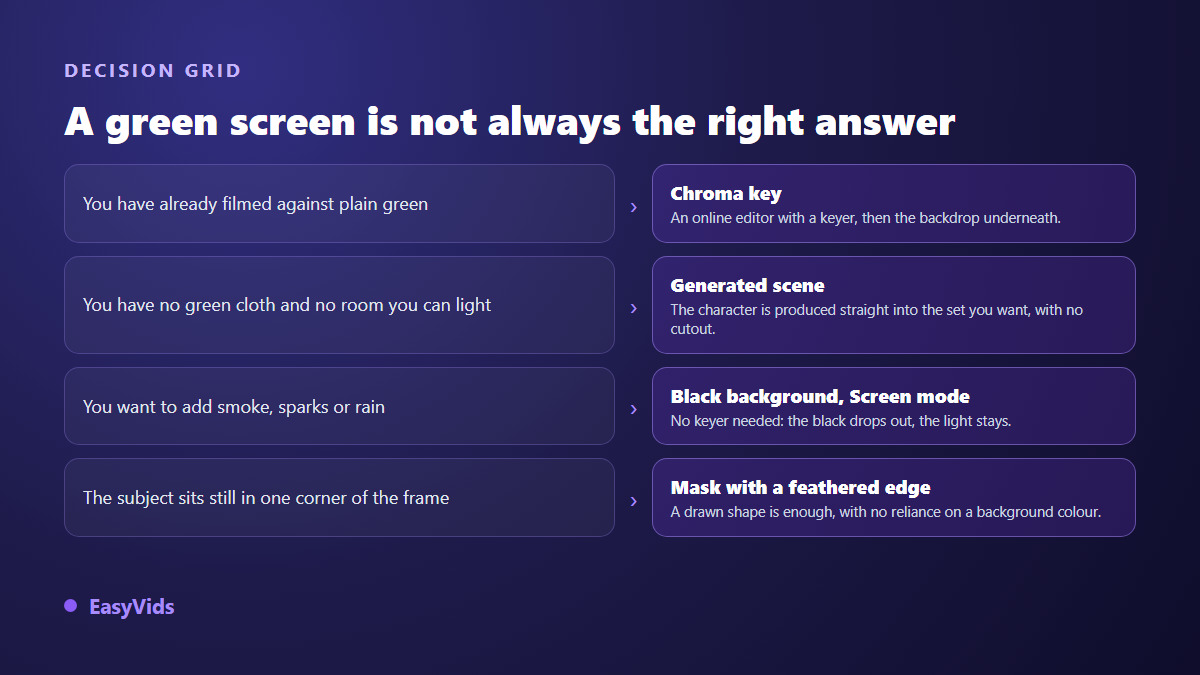
If you own neither fabric nor a room you can light, the fastest route is to produce the scene you want directly, presenter included, without cutting anything out. That is the principle behind our guide to virtual presenters. If your subject is a photo rather than a video, the problem has another name and another fix, as our product photo cutout method shows.
Frequently asked questions
Can a green screen be keyed straight in a browser?
Yes. Video decoding, matte calculation and export all fit in a tab on an ordinary machine. The limit no longer comes from the browser but from the file: a long, high resolution, heavily compressed take asks for more memory and more patience than a short, well exposed one.
Which shade of green works for a home made backdrop?
A bright, saturated green, matte rather than glossy. Studio backdrops aim at a deliberately garish tone, far from any natural colour. A sea green or olive sheet works badly, because it sits close to skin and hair tones. Matte matters as much as hue, since a glossy surface throws back highlights that are no longer the same green.
Why is there still a green rim around my hair?
Because the backdrop bounced its colour onto you. That is spill, and it clears in two moves: choke the edge by a pixel or two, then use your keyer's spill suppression. On set, step further from the fabric and add a small light behind you, opposite the backdrop. It redraws the outline and pushes the green back.
Does green screen work with phone footage?
Yes, as long as you lock exposure and white balance before recording. Phones correct the image continuously, and that correction shifts the backdrop tone during the take, which unsettles the matte. Skip portrait mode and automatic effects too, since they already apply a rough cutout you have no control over.
Do I really need a green screen to change a video background?
No, but the alternative is less precise. Some tools separate a person from their surroundings with no reference colour, with solid results on a static upper body and fragile ones on loose hair or moving hands. Green screen still delivers the cleanest edge, which is why it has not disappeared from studios.
Keep the order in mind: the shoot carries the weight, and the sliders only reveal what the light already gave you. Stretch the fabric, step away, light the backdrop on its own, and the rest settles in minutes inside a tab. To prepare the background that will sit behind you, in the right ratio and the right light, create a free account and generate it to the measurements of your shot. The EasyVids studio then brings assembly, text and export together in one place.