A large share of your audience watches with the sound off. On a train, in a waiting room, at a desk, the mute button stays on and the video plays in silence. Knowing how to add subtitles to a YouTube video answers that behaviour directly, and it takes less time than editing a single scene.
The real question is which route to take. YouTube offers three from its management interface, and a fourth happens before you ever upload, in the edit, by burning the text into the picture. They differ in look, in control and in workload. This guide walks through all four. If you want to understand first how a machine turns a voice into text, our guide to automatic captions covers the groundwork.
The short answer
Open YouTube Studio, click Subtitles in the left menu, pick the video and the language. According to the YouTube help centre, three entries sit there: upload a subtitle file, paste your text and let auto sync align it with the audio, or type the captions manually. Automatic captions appear on their own in supported languages, with nothing to do on your side. For a look you fully control, especially in vertical format, the professional route is to build the captions in an editor, style them, then burn them in before uploading.
Four routes, and they are not equal
The choice comes down to three questions: who decides whether the text shows, who decides how it looks, and how much time you are willing to spend. A caption track is switched off with one tap by the viewer. Burned in text never switches off. That single difference changes everything on a phone.
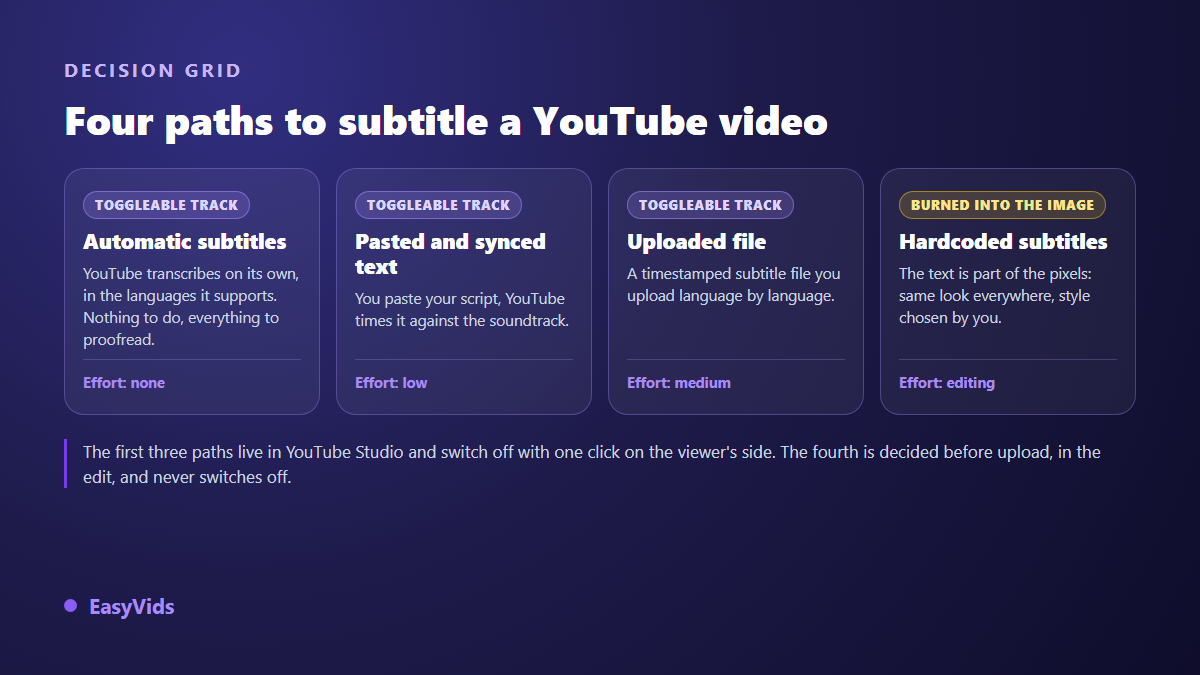
- Automatic captions: YouTube transcribes on its own. No effort, but a text to proofread, with no guarantee on punctuation or proper nouns.
- Pasted and auto synced transcript: you supply the script, the platform places the timings. The best effort to result ratio when the video was written before it was shot.
- Uploaded file: you send a timed file, one language at a time. The finest control over both wording and timing.
- Burned in subtitles: the text becomes part of the pixels, in the font and colour you chose. Visible everywhere, including where a track never shows.
Route 1: let YouTube transcribe on its own
This is the effortless route. Processing the video triggers a transcription and a track appears in the detected language. The YouTube help centre states two limits that decide the quality: automatic captions do not cover every language, and their accuracy depends on the audio quality.
In practice a clean voice recorded without music on top gives a surprisingly usable text. A noisy recording, a strong accent, technical vocabulary or brand names give a text that can be embarrassing. The useful habit is to open the transcript in YouTube Studio, read it once, fix the errors and publish it as the official track. You keep the convenience and drop what undermines your credibility.
Route 2: paste your script and let the machine align it
This route is the forgotten one, and often the most profitable. You paste the full text of your video with no timecodes at all, and auto sync lines the sentences up with what is spoken. The wording is yours, so spelling, names and punctuation are right. The timing comes from the machine, so you never count a second by hand.
Two precautions make the alignment reliable. Clean the script before pasting: strip shot directions, production notes and anything never said out loud. And if your delivery drifted from the written text, update the script to match what was actually recorded. Auto sync looks for words inside the audio, it does not guess the ones you improvised.
Route 3: upload a subtitle file
This is the control route. A subtitle file holds numbered blocks, a start and end timecode, then the text shown on screen. SRT remains the most common format, and the YouTube help centre accepts several others, VTT among them. Building, fixing and shifting such a file is covered in our guide to the SRT file.
The value goes beyond YouTube. The same file works again on a website, on a training platform or on another network, and it can be translated line by line without touching the video. Two classic traps deserve attention: a file saved in the wrong encoding breaks every accented character, and an edit reworked afterwards shifts every block that follows the cut.
Route 4: burn the subtitles into the picture
The three previous routes produce a track the viewer has to switch on. A large part of the audience never does, and depending on the surface the track does not always appear. Burning the text in settles the matter: it is part of the image, it shows everywhere, in your font, your colour and your position. That method is detailed in our guide to burning subtitles into a video.
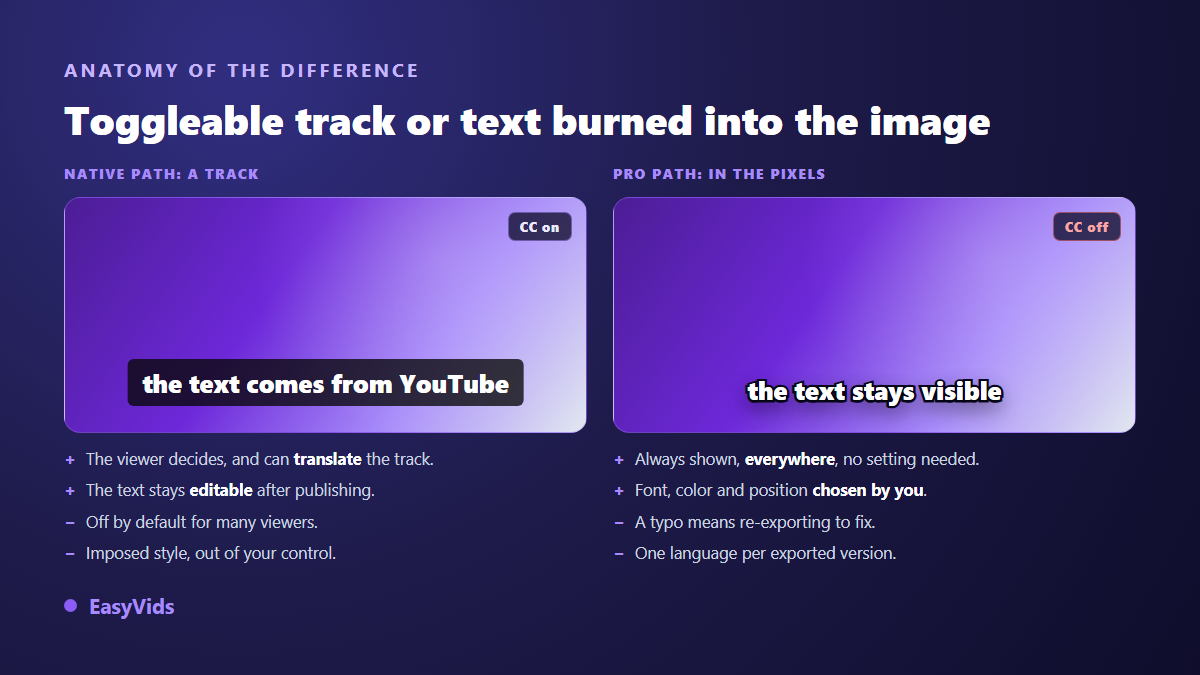
The trade off is real. A typo spotted after publishing means fixing, re exporting and uploading again. Each language needs its own exported version. One practical detail is handled in the edit: if a viewer also switches on the automatic track, both texts stack at the bottom of the screen. Lift your burned in captions above that strip and the overlap stops being a problem.
The pro method, from audio to a file ready to upload
Here is how it runs inside the online editor of the EasyVids studio, which works in the browser with nothing to install. You drop the video on the timeline, open the Subtitles panel, and let the transcription produce the first pass.
- Import the video: image, video and audio files go straight into the project.
- Open the Subtitles panel and pick the spoken language, or leave automatic detection to work it out.
- Run the generation: the project audio is transcribed, then split into short segments of no more than seven words so they stay readable on screen.
- Fix the text: every caption becomes an independent text element on its own track, which you can edit, move or shorten one by one.
- Style it: one preset is enough, from a classic broadcast caption to a crisp outline or a highlighted word.
- Export to MP4 or WebM at the quality you want, then upload the file to YouTube.
Two honest notes before you start. The editor imports an existing SRT or ASS file, but it does not produce a subtitle file for download: for the native route, YouTube auto sync stays the shortest path. And caption generation runs with a signed in account, on credits, in proportion to the length of the audio; the plans are listed on the pricing page.
The settings that decide whether your captions get read
A failed caption never looks like a mistake. It shows up as a viewer who leaves, without ever knowing why they lost interest. Five settings do most of the work, and they fit in one picture.
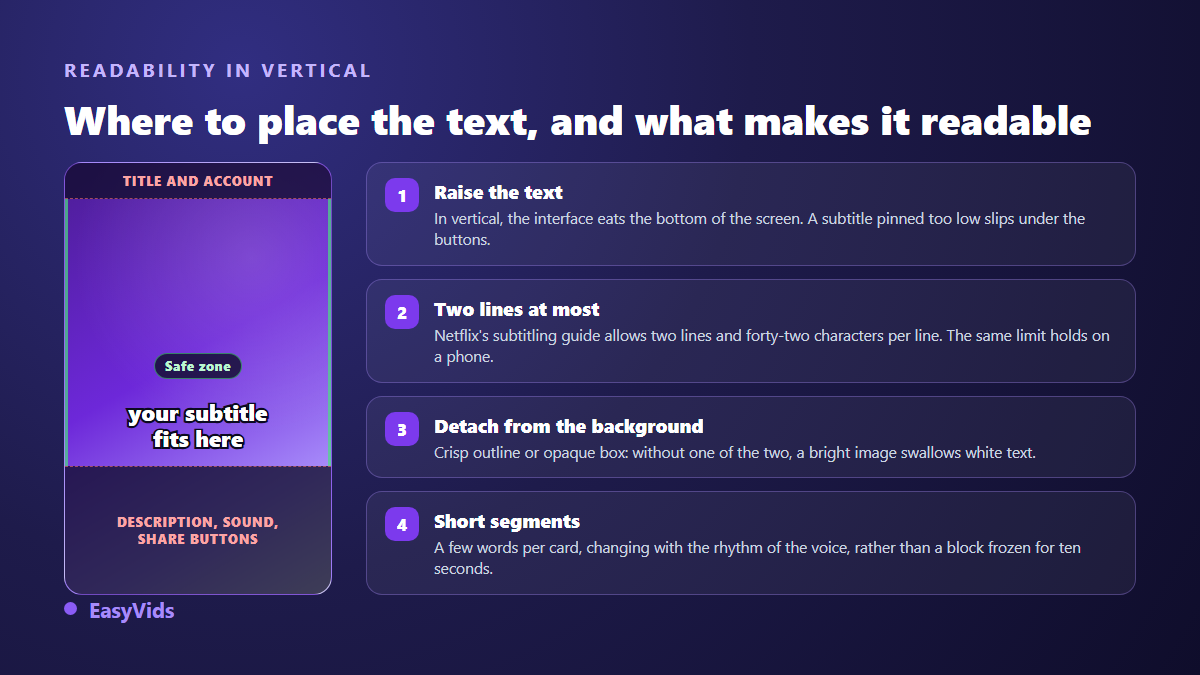
- Size: it has to read on a phone held at arm's length, so larger than what feels comfortable on a desktop screen.
- Contrast: a crisp dark outline, or a solid background behind the text. Plain white vanishes the moment a bright shot arrives.
- Line length: the Netflix timed text style guide keeps forty two characters per line and two lines at most. That is a sound baseline on any platform.
- Position: above the interface strip, never flush with the bottom edge of the frame.
- Pace: the text changes with the speech. A block frozen for ten seconds is no longer read, it is endured.
Shorts and vertical: the interface trap
In vertical format the bottom of the screen is not yours: title, channel name, description, sound button and share icons all live there. A caption sitting flush with the edge disappears behind them, and your editing software never shows you that. Lift the text block into the lower third, then check the result on a real phone before publishing. Our settings for Shorts captions give the margins to respect.
Short form also has its own animation habits. Word by word captions, which reveal one word at a time in sync with the voice, hold attention on fast paced videos, and our method for recreating that style shows how to build it without losing readability.
Several languages without touching the edit
A caption track is added language by language from YouTube Studio without touching the video file: you add a language, you upload or type the text, the video stays as it is. That is the strongest argument for the native route on a channel aiming at an international audience. The translation work is done once and benefits every video already online.
Burned in text asks the opposite: one exported version per language. The combination that works best is to burn in the main language, the one most of your audience speaks, and add the others as toggleable tracks. Every viewer sees something, and anyone who speaks another language finds it in the menu.
Frequently asked questions
How long do automatic captions take to appear?
They arrive once the video has been processed, and the delay depends on its length and on platform load. A short video usually gets them soon after upload. The YouTube help centre notes that they are not available in every language and that their accuracy depends on audio quality.
Do subtitles really help a video get found?
They mainly help retention, which feeds recommendation: a viewer with the sound off stays instead of leaving. The text also gives the platform written material tied to your video. Be wary of promises of automatic ranking gains, though: no public data lets you verify them.
Can subtitles be edited after publishing?
Yes for a track. YouTube Studio lets you reopen the language, correct the text and republish it, without replacing the video or losing its statistics. No for burned in subtitles: they are part of the image, so any fix means re exporting and uploading again at a new address.
Can I caption someone else's video?
Not from the public interface any more. YouTube closed community contributions in September 2020, the feature that let viewers submit captions for someone else's video. On your own channel you can hand the task to someone you trust by granting them channel access.
Is it better to burn in or to keep a toggleable track?
Both, when you can. Burn in the main language so the text shows with no setting to change, and add the other languages as tracks so viewers keep the choice. If only one were possible, keep burning in for vertical and short formats, and the track for long videos watched on a large screen.
Captioning is not a finishing touch, it is a condition for being watched. Take your next video, pick the shortest route for it, read the text through once, lift the block above the interface strip, and watch what happens to retention in the first ten seconds. To generate captions, style them and export a video ready to upload with nothing to install, create your account and open the editor.