
You open the clip on a big screen and the face that looked fine on your phone now looks like a watercolour. On screen text smears, hair turns into one solid mass, the background collapses into flat patches. That is the moment people start looking for a way to fix a blurry video, hoping for a slider that puts everything back. That slider does not exist anywhere, because no software can restore detail that was never recorded.
The good news is that blur is rarely a mystery. It has a cause, and every cause leaves a recognisable signature on screen. Depending on whether it happened while filming, in your recording settings or during compression, the fix changes completely. This guide walks through the seven usual suspects, how to identify each one in about thirty seconds, and the moves that genuinely help, most of them available in an editor that runs in your browser.
The short answer
Start by watching when the picture goes soft. If it happens only at moments, on certain shots or during movement, the cause is in the shooting: focus, camera shake, light. Those seconds cannot be repaired, they get cut or reshot. If the whole clip is uniformly mushy from start to finish, the cause is technical: a low recording resolution, an aggressive crop, or compression applied at export and upload. That second case is often fixable, provided you go back to the original file and export again properly.
Seven causes and how each one looks
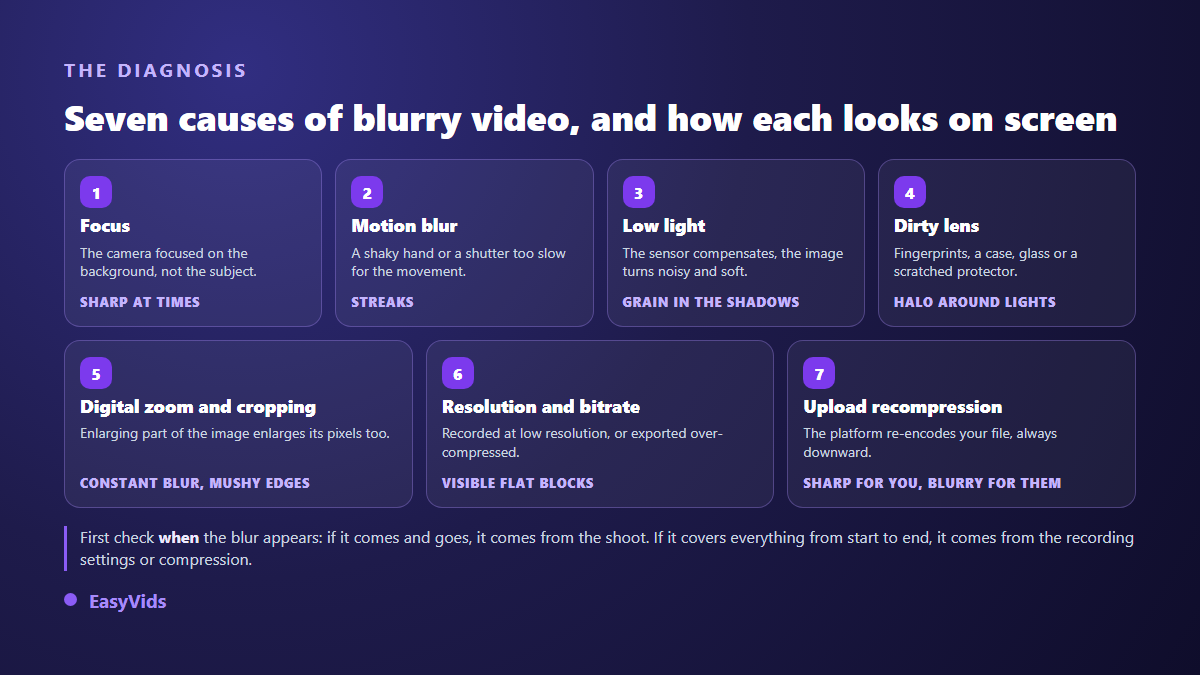
The diagnosis takes under a minute. Pause on a shot you consider ruined, zoom into the frame, then look for what is still sharp: the background, the subject, or nothing at all. That single observation already rules out four causes out of seven.
1. The camera focused on something else
Cameras focus on whatever they believe is the subject, usually the most contrasted area in the frame. An off centre face, an object held at arm's length, a bright window behind a backlit person: in each case the device picks the wrong plane. The signature is easy to read, part of the image is perfectly sharp while your subject is not. Tap your subject on screen and hold until the lock appears, so focus stops hunting mid take. Check your distance too: every lens has a minimum focusing distance, and filming an object a few centimetres from a phone produces footage nothing will save.
2. Camera shake, or a shutter that is too slow
Two different problems hide behind the word shake. One comes from the camera: the whole frame smears, including static objects. The other comes from the subject: a moving person leaves a trail while the set stays sharp. The first is solved by stability, the second by speed. The film convention known as the 180 degree rule sets shutter speed at roughly double the frame rate, so a fiftieth of a second at 25 frames per second. Below that, each frame records a slice of movement. On a phone you often need the manual or pro mode to reach that setting, so failing that, brace your elbows, rest the device on something solid, and slow your camera moves down.
3. Low light, the least suspected cause
A dark scene triggers three automatic compensations, and all three hurt sharpness. The sensor amplifies the signal, which adds noise. Exposure time lengthens, which brings back motion blur. Then internal processing applies noise reduction that smooths textures to hide the grain, wiping out hair, fabric and skin detail along the way. The result looks painted, with oddly smooth faces and grain in the shadows. This is the most profitable cause to fix because it needs no gear: face a window rather than turning your back to it, switch on whatever light is available, move a lamp just outside the frame. That smoothing is permanent, no later setting rebuilds a texture the camera erased while recording.
4. A dirty lens, a case, a pane of glass
Phones live in pockets and under fingers. A greasy smear on the lens is invisible to the eye but scatters light across the whole frame: contrast collapses, halos bloom around light sources, everything looks hazy. The same happens through a car window, behind a scratched screen protector, or with a case that overlaps the lens opening. Wiping the lens before you film removes this cause in five seconds.
5. Digital zoom and cropping, or enlarging pixels
Optical zoom changes the focal length, digital zoom simply crops the sensor and enlarges what is left. You add no information, you stretch what already exists. The signature is distinctive: pasty edges and vanished texture, with normal brightness and colour. The same mechanic hits during editing. Taking a landscape clip and reframing it as a vertical post means blowing up less than a third of the original frame, and the loss is arithmetic. Decide the aspect ratio before you shoot, keeping the dimensions each platform expects in mind.
6. Recording resolution and bitrate
Plenty of devices ship in a storage saving recording mode. An action camera set low, a default screen recording, an older phone: the file comes out 720 pixels tall, looks acceptable on a small display and falls apart on a television. Checking takes seconds, the file properties show the real resolution. Bitrate matters just as much and hides better. A badly compressed 1080 file looks worse than a well encoded 720 one. Insufficient bitrate shows up in moving areas: water, crowds and moving foliage break into small blocks that crawl.
7. Recompression, when the clip was sharp before upload
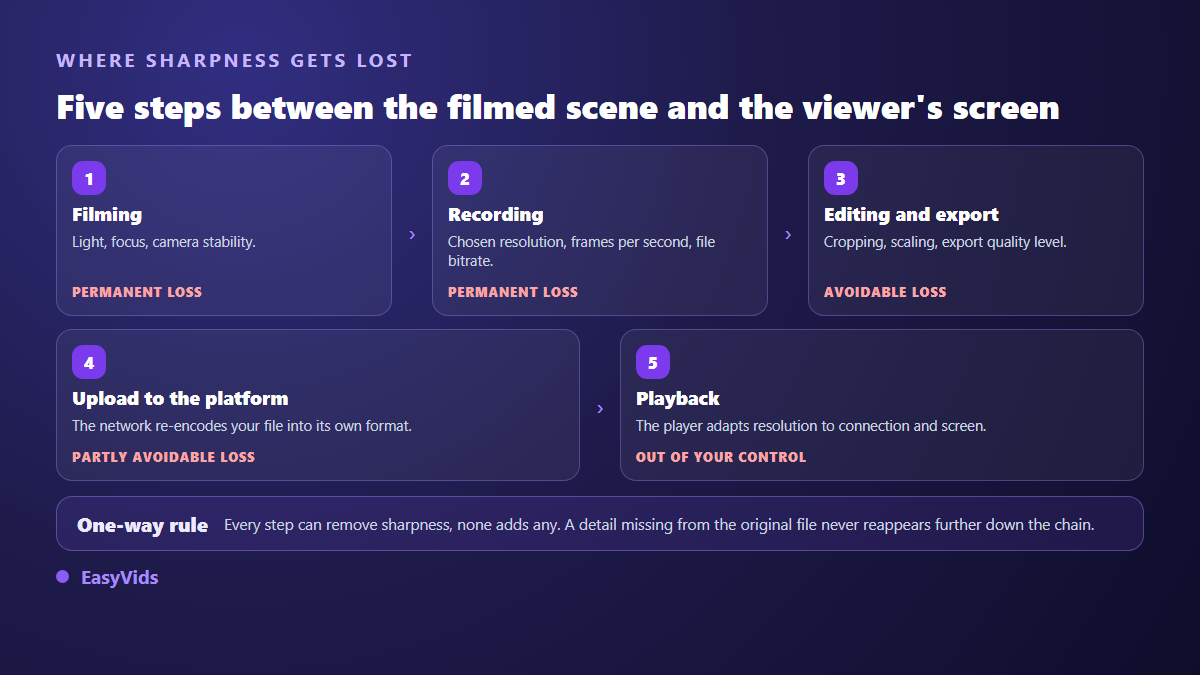
Your file is sharp on your computer and turns soft once shared. Nothing unusual: every service reencodes what it receives, in its own format and bitrate. The WhatsApp help centre states that files sent as documents are not compressed, unlike a normal in chat send, which is the simplest workaround when quality matters more than convenience. For video platforms, feed them a generous source. The YouTube help centre publishes recommended upload encoding settings that place 1080 at 30 frames per second around 8 Mbps, and much higher above that. Check playback before drawing conclusions, since the displayed quality adapts to the connection and player size. Fine strokes are also the first casualties of compression, which is why a readable caption font matters more than it seems.
The special case of AI generated clips
A generated video follows the same laws, with two extra causes. Fast models often render at a reduced resolution, and heavily animated or very dark shots come out softer than calm ones. One rule applies to every studio, ours included: exporting a project in 4K when the scenes were generated at 720 only enlarges the picture, without adding a single detail. Our guide to AI videos that lack sharpness covers the specific habits that help.
What an editor can genuinely recover
A video does not look soft only because detail is missing, it also looks soft because contrast is missing. A flat file always reads as mushy, and that part of the problem does respond to treatment. Deepen the blacks, open the contrast slightly, pull back saturation on an overly loud image, and perceived sharpness climbs noticeably without a single pixel being invented.
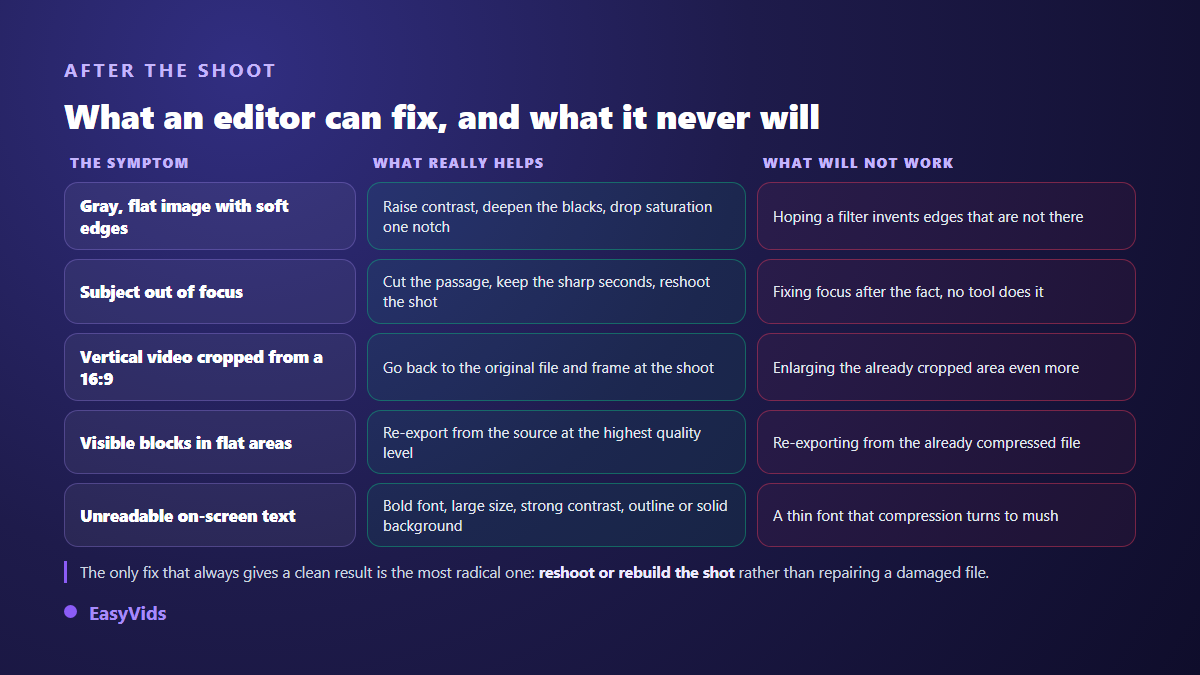
- Always start from the original file, never from a version that already went through a social network.
- Cut the passages where focus failed instead of sitting through them.
- Work the contrast and the blacks before touching anything else.
- Avoid enlarging a shot that was already cropped, every enlargement removes material.
- Export at the highest quality setting available, even if the file gets heavy.
- Make on screen text bold and contrasted, it is what exposes a soft image.
Being honest about the limits matters here. Our online editor offers brightness, contrast, saturation and hue controls, scaling and rotation, masks, speed, captions and several export quality levels. It has no magic sharpening slider, and that is deliberate: such filters mostly amplify noise and edges that already exist. Treat any service promising to make any video sharp with caution, since the output often looks like a smoothed drawing rather than your footage. The EasyVids studio brings these tools together in one browser tab, with nothing to install.
When reshooting beats repairing
On a testimonial or a family memory, a ruined shot is irreplaceable and you live with it. On a cutaway, a location, a transition or a product on a table, the trade off is different: refilming three seconds or generating a replacement shot takes less time than fighting a damaged file. That is where an AI video generator earns its place, not to replace everything, but to patch a hole in an edit without scheduling another shoot.
Frequently asked questions
Can a blurry video really be made sharp?
Not in the way the question is usually meant. You improve the result through contrast, colour and framing, which is sometimes enough to make a clip publishable. You do not rebuild a face that was never recorded sharply. The gain lies in perceived sharpness, never in recovered detail.
Does exporting in 4K make a video sharper?
No. Exporting above your source resolution enlarges the picture without adding information, and inflates the file along the way. The useful rule runs the other way: export at your source resolution with the best quality setting, and let the platform build its smaller versions.
Why does my video only look blurry after sending it?
Because the messaging app or social network reencodes what it receives. The WhatsApp help centre notes that sending a file as a document keeps it untouched, while a standard send compresses it. On a video platform, upload a generous source and check the resolution the player selected before concluding anything.
Do I need paid software to fix a blurry clip?
Not for the moves that matter. Trimming, reframing, adjusting contrast and exporting cleanly all happen in an online editor you can try for free. Paid plans mainly cover production, generating replacement shots and exporting at volume, and the details sit on the pricing page.
Is blur always a defect?
No. A blurred background isolates the subject, mild motion blur makes action feel smoother, and deliberate blur hides a face or a licence plate. The difference is intent: chosen blur sits on a precise area, unwanted blur covers the whole frame without your consent.
Treat a blurry video like a breakdown: find the cause before the cure, and accept that some causes are final. The five minutes spent checking the lens, the light and the recording resolution pay off more than hours of retouching. For the part that can still be fixed, trimming, contrast, framing and export, creating an account opens the online editor and the generation studio, with nothing to install.