Your video runs too long. Ten seconds of fumbling at the start, a gap in the middle, an ending that drifts while you hunt for the stop button. You want to trim a video online right now, without downloading a multi gigabyte editing suite to remove thirty seconds. The request is simple. The answers rarely are: forced watermarks, upload queues, duration caps.
A modern browser handles this on its own, often better than the tiny single purpose tools that fill the search results. Your file stays on your machine, the cut is instant on screen, and the export is computed locally. This guide walks the whole method, from dropped file to exported file: the three different cuts hiding behind one word, the exact shortcuts, frame level accuracy, and what trimming really does to quality. For everything that comes after the cut, our guide to editing video in the browser takes over.
The short answer
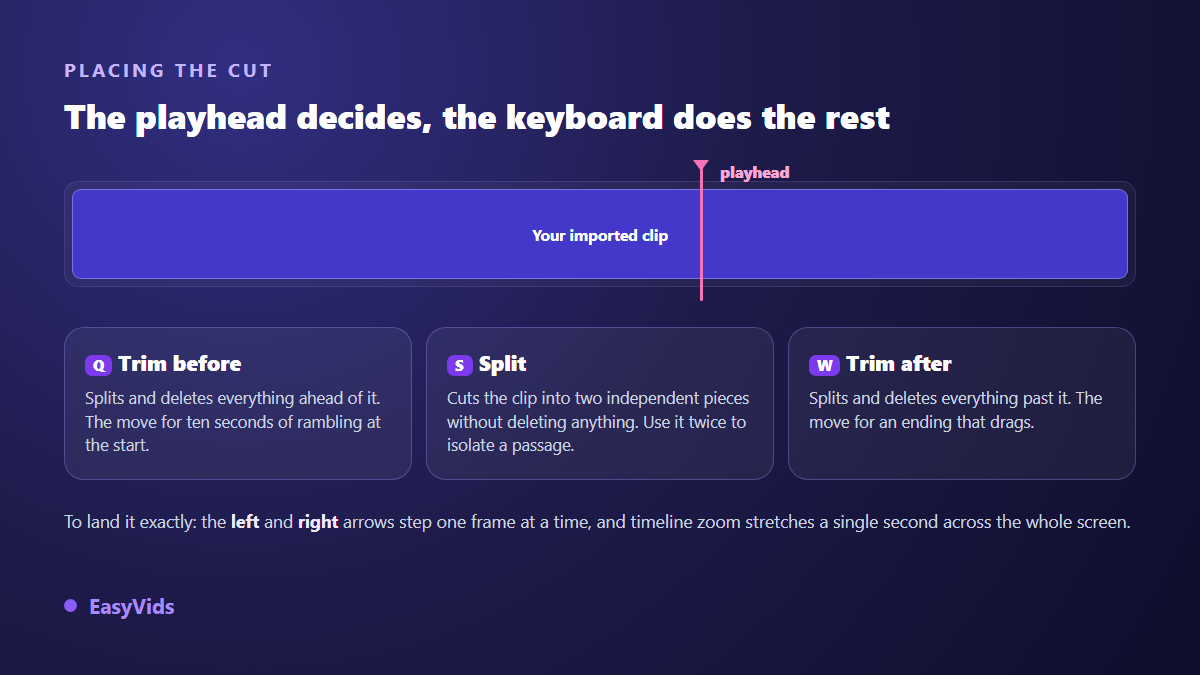
Open a browser based video editor, drop your file in, move the playhead to the cut point, split the clip, delete the part you do not want, export. A simple trim takes under two minutes on a short video, export included. In the EasyVids editor it comes down to three keys: S splits the clip under the playhead, Q cuts and removes everything to the left, W cuts and removes everything to the right.
Three different cuts behind one word
Trimming covers three operations that need different gestures. Trimming the ends removes the head and the tail and never touches the middle. Removing a passage means opening two cuts around a zone, then deleting what sits between them. Pulling out a clip means keeping one portion and discarding the rest, usually to publish a strong moment as a short. Knowing which one you want before you open the editor saves half the back and forth.
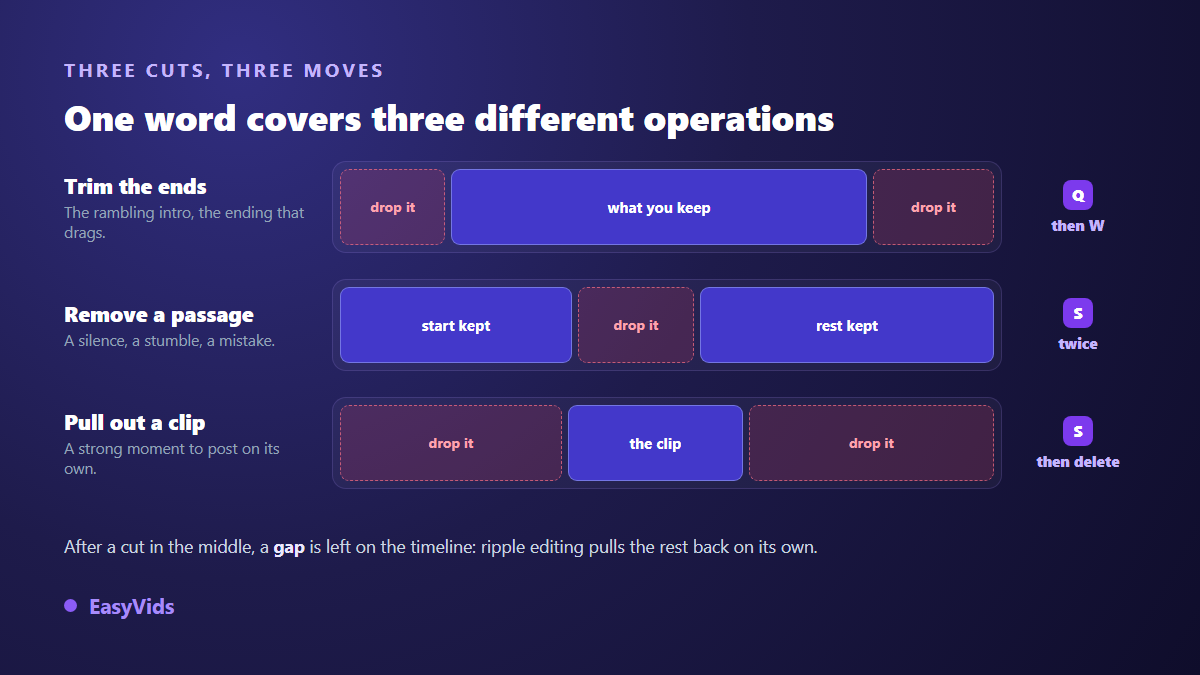
One practical difference separates these cases. Trimming the ends leaves no trace: the clip starts later, ends earlier, nothing else moves. Removing a passage in the middle leaves a gap on the timeline, and you have to decide what to do with it. That is where most edits quietly fall apart.
The method, from dropped file to exported file
Here is the full sequence. It stays the same whichever online editor you use, only the button labels change.
- Open the editor in a tab, with nothing to install and no extension to add.
- Drop your video file onto the import area. Common video, image and audio formats are accepted.
- Drag the clip onto the timeline, then zoom into the zone you need to work on.
- Move the playhead to the exact cut point, frame by frame with the arrow keys if needed.
- Split with S, or cut straight away with Q and W to drop what comes before or after.
- Select the unwanted piece, delete it, then close the gap with ripple editing.
- Listen back to the cut, then export to MP4 at a high quality setting.
One detail matters at import time. Footage from a recent phone sometimes arrives in a codec the browser cannot decode, HEVC in particular. The preview turns black or stutters even though the file is perfectly healthy, which looks like a broken tool. The fix is a conversion to MP4 H.264 before importing, and a serious editor flags the case instead of leaving you guessing.
Land the cut on the right frame, not the right second
A cut that misses by a tenth of a second is audible. Viewers could not tell you why, but they hear the clipped syllable or see the truncated gesture, and their attention slips. Accuracy is a frame level question, and three tools are enough to get it.
Timeline zoom spreads one second across the full width of the screen, which reveals what a wide view hides. The left and right arrow keys move the playhead one frame at a time, the only reliable way to hit a precise point. Snapping pulls the cut onto neighbouring clip edges and onto the markers you dropped earlier, which prevents the one frame offsets you cannot see on screen but that survive into the final file.
Cut on a silence, never mid word, and leave a breath before the next line starts. If your video carries a voice, always listen back before you commit: the ear catches in one second what the eye lets through. Undo takes you back as many steps as you need, so experimenting costs nothing.
A middle cut leaves a gap unless you plan for it
Removing a passage in the middle leaves empty space between the two remaining pieces. You can drag the second part left by hand, which is fine on a single isolated clip. Or you can switch on ripple editing, which pulls everything after the cut back by exactly the length you removed.
Ripple becomes essential the moment several tracks stack up. Video, voice over, music and captions all run along the same timeline. Moving the picture by hand and forgetting the audio creates a drift that compounds with every cut, and it becomes obvious by the second half of the video. With ripple on, everything living after the cut shifts by the same amount, across every affected track.
What trimming actually does to your file
A video is not a stack of independent pictures. Modern codecs, H.264 first among them, store only some frames in full, the key frames, and describe the following ones as differences from those. Cutting between two key frames forces the surrounding stretch to be recomputed. That is re-encoding, and re-encoding always costs a little quality.
Two practical consequences follow. First, do not loop through exports. A video that is trimmed, exported, reimported and trimmed again loses a little sharpness each round. Work from the original file and export once. Second, the quality setting at export matters far more than the number of cuts. A high setting on an MP4 in H.264 is the safe choice everywhere; WebM in VP9 gives lighter files when the destination accepts it.
Pick the aspect ratio before you cut, never after
One habit saves a lot of wasted work: choose the framing before trimming, not at export time. A video edited in 16:9 and then cropped to 9:16 for a short always loses material on the sides, sometimes the subject itself. The exact sizes each platform expects are gathered in our video format reference.
If your trim exists to produce a vertical clip from a horizontal recording, work in the counterintuitive order. Set the vertical frame first, check the subject stays inside it for the whole stretch you plan to keep, and only then cut. You will sometimes find the passage simply does not survive in vertical, and it is better to learn that before exporting.
Captions do not follow the cut on their own
This is the most common oversight. You remove eight seconds in the middle, you export, and your captions run late for the entire second half. A caption file holds absolute timecodes: it knows nothing about what you just deleted. If the captions live inside the editor on their own track, ripple editing moves them with everything else. If they come from an imported file, they have to be realigned, and our method for fixing out of sync captions separates the two cases, a constant offset and a progressive drift.
The comfortable order stays the same in every situation: cut first, caption second. A transcription run on the final video lands correctly the first time, while one produced before the cut needs a full realignment. What remains is the choice between automatic transcription and typing the lines yourself, and our guide to adding subtitles to a video settles it according to length and the level of polish you need. If you must start from an existing file anyway, how an SRT file actually works shows how to shift its timecodes without redoing everything.
Browser, installed software or the platform's own tool
Three places let you trim a video, and they answer different situations. The grid below sets out what really separates them.
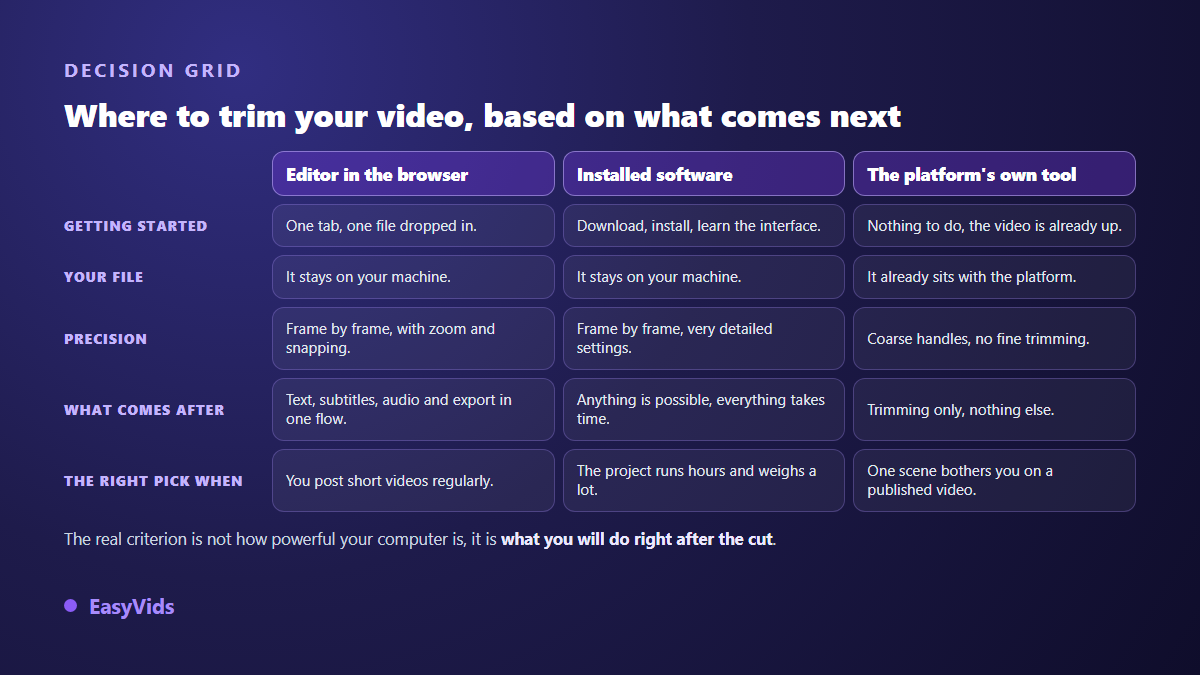
The platform's built in tool deserves its own note. According to YouTube's help centre, a published video can be shortened from YouTube Studio without losing its address: the link, the view count and the comments are preserved, and the edit replaces the public version after processing. That is valuable when a single scene is a problem on a video already running. Accuracy stays coarse and the rest of the edit is out of reach, so treat it as a patch, not as a production method.
For regular work the online editor wins for one simple reason: trimming is almost never the only thing to do. You will follow it with on screen text, captions, a volume pass, sometimes a replacement shot. It all happens in one place, with no export in between, which means no extra trip through the codec. What each part of the studio gives you is set out on the pricing page.
The mistakes that spoil a cut
The same flaws come back again and again, and none of them needs any particular skill to avoid.
- Cutting mid word: step back to the silence before it, even at the cost of half a second too much.
- Forgetting the audio track: without ripple editing the picture moves and the sound stays put.
- Stacking intermediate exports: every trip through the codec eats a little sharpness.
- Cropping after trimming: the aspect ratio comes first, or the subject ends up outside the frame.
- Captioning before cutting: transcribe the final version, never the raw footage.
- Butting shots edge to edge: leave a breath, a cut with no air feels exhausting.
Frequently asked questions
Does trimming a video online reduce its quality?
Slightly, and only because of re-encoding: the recomputed stretch around the cut goes through the codec again. With a high quality setting and a single export, the difference is invisible. What really degrades a video is a chain of exports and reimports, not the cut itself.
Do I have to upload my file somewhere?
No, not with an editor that works inside the browser. Your file is read and stored locally, the cut applies to playback, and the export is computed by your own machine. Nothing travels to a server, which is also why the whole thing feels instant instead of making you wait twice.
Can I trim a video from a phone?
Yes for cutting and editing, with a caveat on export. Some mobile browsers, on iPhone and iPad especially, do not yet expose the encoding interfaces required, so the render fails or crawls on long videos. A good editor detects that and warns you before the render starts rather than after.
How long can the video be?
The limit comes from the storage your browser grants the site and from the memory of the device, not from the tool. A few minutes of footage is no trouble on an ordinary machine. Past an hour of heavy rushes, installed software stays more comfortable.
How do I trim a video without a watermark?
By choosing a tool that does not add one. A watermark is a commercial decision, never a technical constraint: an export computed by your browser produces a clean file. Be wary of services that only mention their watermark once the render is done.
Cutting well is not a matter of powerful software, it is a matter of method: know which of the three cuts you want, land it on the frame, close the gap across every track, and export once. Everything else follows. To try it on your own file, create an account and open the editor: the EasyVids studio brings trimming, captions, sound and export together in a single tab.