You have an edit that works. It is horizontal. You drop it into Instagram and the app parks it in the middle of the screen, tiny, surrounded by grey. Sometimes it crops on its own and slices off the head of whoever is speaking. Learning to resize a video for Instagram is therefore not an export checkbox: it is a framing decision, and it belongs at the start of the job, not the end.
This guide walks the whole path: which frame to target depending on where you publish, how to crop without losing the subject, what to move before the interface covers it, and which export settings limit the damage during recompression. If you only need the raw numbers, our Instagram video size reference lists them. Here we deal with the craft.
The short answer: frame, recompose, export
Resizing happens in three moves. First you lock the target frame for the surface you publish on: 1080 x 1920 for a Reel or a story, 1080 x 1350 for a portrait post in the feed. Then you recompose each shot inside that frame, scaling and moving the footage yourself instead of letting an automatic crop decide. Finally you export an MP4 at the exact dimensions, keeping the frame rate of the source. Everything else is about lifting text and captions out of the areas the interface covers.
Resizing is not a file conversion, it is a change of frame
The word conversion suggests changing container, from MOV to MP4 for example. For Instagram that is almost never the issue: the platform accepts common files and reencodes everything it receives. The real subject is the aspect ratio, the shape of the rectangle. Footage shot in 16:9 tells its story across the width. A Reel is watched down the height. Between those two there is no honest automatic conversion.
The arithmetic is worth stating once. A 1920 x 1080 file cropped over its full height to 9:16 keeps only 608 pixels of width, barely a third of the original image. Whatever lived on the sides is gone: the second person, the product sitting on the right, the title bar. Knowing this in advance changes how you work, because the question stops being how to crop and becomes what to keep.
Pick the target frame before touching the edit
Instagram does not have one frame, it has several. Reels and stories fill the whole screen in 9:16, according to the Instagram help centre. In the feed, the documentation Meta publishes for developers describes an accepted range running from 1.91:1 landscape to 4:5 portrait, and 4:5 always wins on displayed height. Stories add their own constraint, since their interface elements do not sit where a Reel's do, as our story dimensions guide explains.
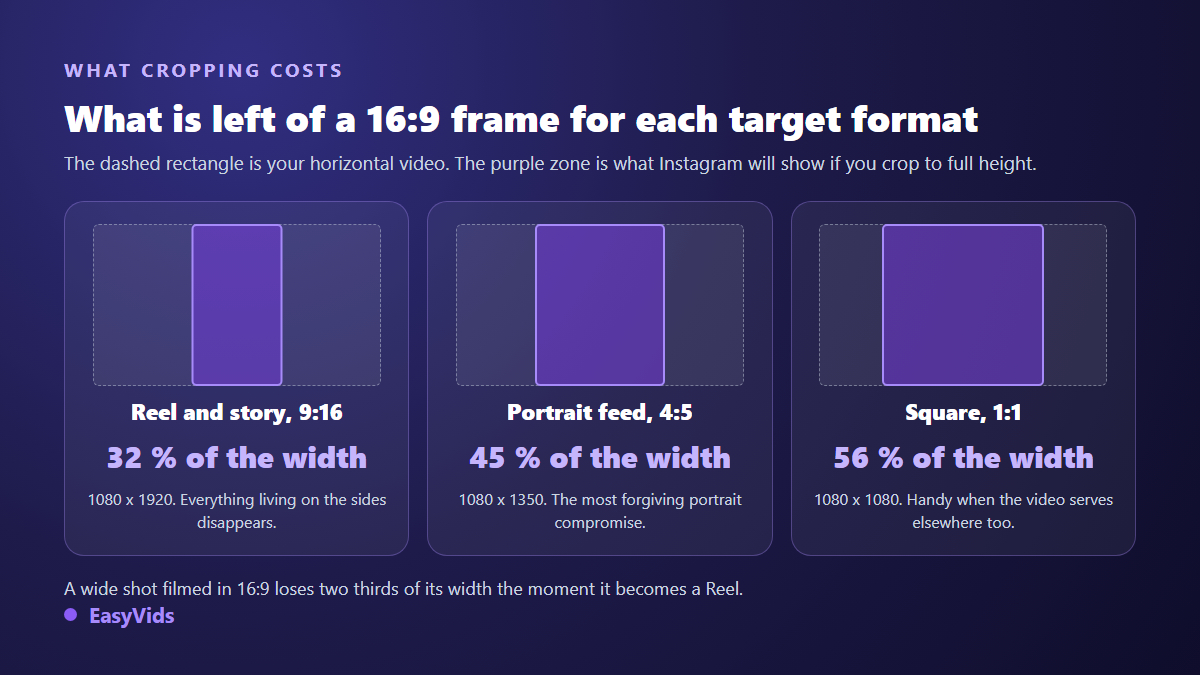
So the decision belongs upstream. A wide interview survives better in the feed at 4:5 than in a Reel where it would lose two thirds of its width. A tight shot on a face works anywhere. A product demo held at arm's length in the centre of frame takes 9:16 without effort. That diagnosis costs thirty seconds and prevents a botched resize you only notice once the video is live.
Three ways to resize, and what each one costs
There are exactly three ways to fit horizontal footage into a vertical frame. None of them is free. The right one depends on the shot, not on habit.
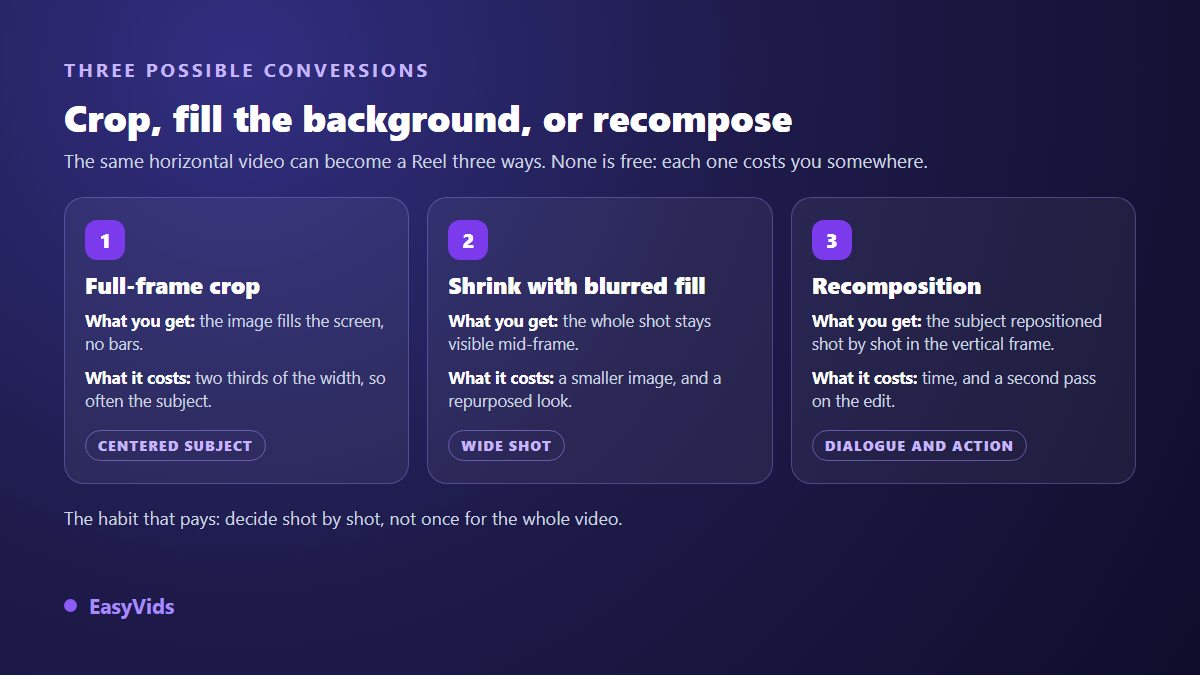
- Full frame crop: scale the footage until it fills the height, then slide it sideways to keep the subject. Clean result, no bars, but only for shots where the essential already sits near the centre.
- Scale down with a blurred background: the whole shot stays visible in the middle, and the empty space is filled with a blurred copy of the same image. Nothing is lost, but the useful picture gets small and the trick is noticeable.
- Recomposition: you work shot by shot, cropping some, shrinking others, cutting the ones that cannot be saved. It takes longer, and it is the only method that produces something actually built for vertical.
- The false good idea: adding black bars to force the ratio. They are burnt into the image, stay visible on playback, and shrink the useful area for nothing.
A mix of all three usually wins. Tight shots go full frame, the wide opening shot gets a blurred background, and two impossible shots simply leave the edit. The habit that makes the difference fits in one line: decide shot by shot, never once for the whole video.
Cropping without losing the subject
Automatic cropping centres. That is its only strategy, and it is why it fails. In a dialogue shot, the person speaking rarely sits in the middle of the frame. In a demo, the useful gesture often happens to one side. The manual rule is simple: find the point of attention in each shot, then place the vertical frame over it, even if the set falls out of the picture.
When the subject moves during a shot, a fixed frame no longer works. Two options exist. Cut the shot as the subject crosses, and use two successive framings. Or animate the move: in the EasyVids online editor, the position and scale of a clip can be changed directly, and keyframes let the frame glide during playback. That artificial pan reads far better than a subject drifting out of frame.
The step by step inside an online editor
Resizing properly needs no installed software. An editor that runs in the browser is enough, provided it lets you lock the project frame and reposition every clip inside it. This order avoids going back and forth.
- Create the project and set the aspect ratio before importing anything.
- Pick the 1080 x 1920 vertical preset, or type 1080 x 1350 as a custom size for the feed.
- Import your original video, whatever shape it currently has.
- Scale and move each clip inside the frame, watching the point of attention.
- Add a blurred or solid background on the shots you would rather not crop.
- Lift text, logos and captions towards the middle of the frame.
- Trim the duration if needed, then export as MP4.
The EasyVids editor covers that path: 16:9, 9:16, 1:1, 4:3 and 3:4 presets, custom dimensions for anything else, a background in solid colour, gradient or a blur of your own footage, and MP4 or WebM export with four quality levels. Nothing to install, and the pricing page sets out what the free usage covers.
What a crop breaks: text, captions and logos
An edit designed for a wide screen tends to place its text along the bottom, across the full width. That text dies first in a resize: part of it leaves the frame, the rest ends up under the caption and the buttons. Subtitles suffer the same fate, which matters more, since Meta's creative guidance recommends designing videos so they still make sense with the sound off. Our caption settings for Reels give the heights that hold.
The safety rule takes two moves. Group everything meant to be read inside the middle half of the height, well away from the top and the bottom. And rewrite the text rather than crop it: a headline written for a horizontal frame is too long for a vertical one, and shrinking it to fit makes it unreadable on a phone. Two short lines beat one stretched line every time.
Exporting without loss: six settings that decide the result
Without loss is a shorthand, since Instagram reencodes everything it receives. What you can aim for is a file the platform damages as little as possible. The video specifications published by Meta point to an MP4 encoded in H.264 with AAC audio, the safest combination because it is the one servers handle without an extra conversion.
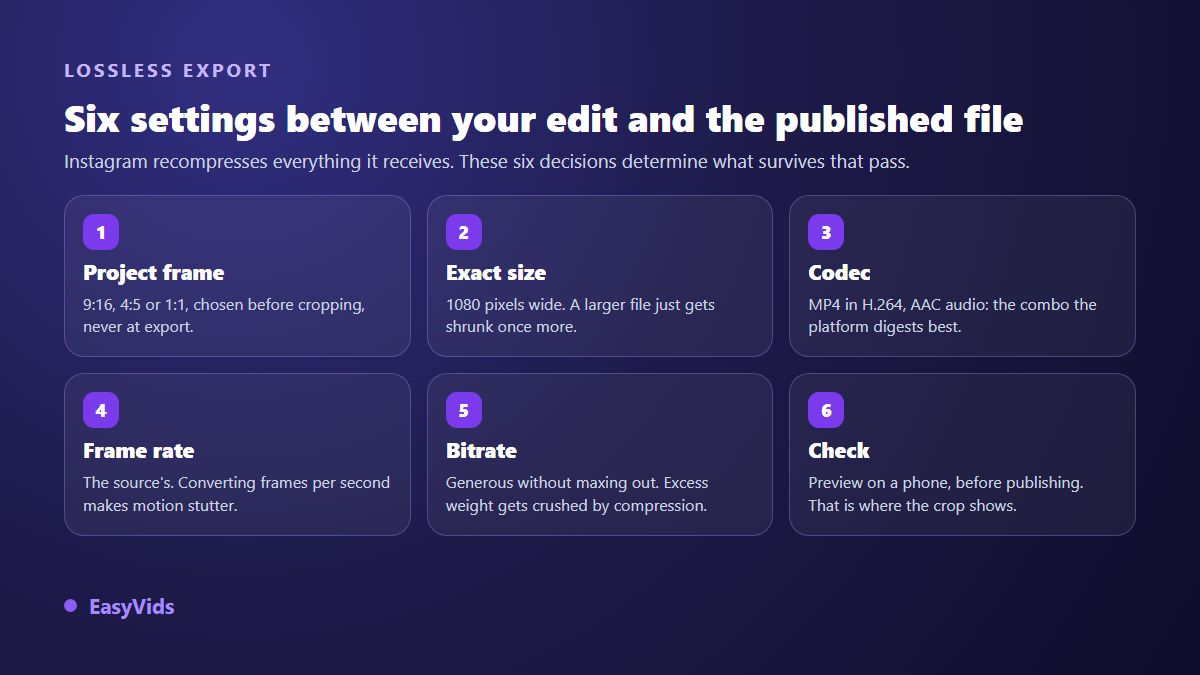
Three details prevent the classic mistakes. Export at exactly 1080 pixels wide: a larger file gets downscaled once more, and every resize shaves off sharpness. Keep the original frame rate rather than converting it, or camera moves will stutter. And aim for a generous bitrate without pushing it to the maximum, because the extra weight will be taken back by compression anyway.
Why the published video looks softer than your file
That is the most common complaint after a resize, and the cause is nearly always the same. Your vertical video was built by enlarging a slice of a horizontal file. You never had 1080 pixels of original width, you had 608 stretched up to 1080. Sharpness was lost before upload, and Instagram's recompression makes the flaw more visible in detailed areas.
The fix belongs to the shoot or the generation, not the edit. If you know a video will end up vertical, record at a higher resolution to leave room for the crop, or produce in the right frame from the start. Failing that, prefer the blurred background over an aggressive crop: a smaller sharp image beats a full frame soft one. Avoid dark gradients too, since they band visibly after compression.
Producing vertical from the start instead of resizing
Any resize is a repair. When the video does not exist yet, the question disappears: the frame is decided before the first image. On the EasyVids studio, a video is generated in 16:9, 9:16 or square, and that choice is held all the way through, from the visuals to the exported file. A shot composed for vertical puts the subject in the height and arranges the set around it, something no crop can rebuild afterwards.
Frequently asked questions
How do I resize a 16:9 video to a Reel without black bars?
Set the project frame to 1080 x 1920, import your video, then scale the clip until it fills the full height. Slide it sideways to keep the subject in shot. Black bars only appear when the clip is left at its original size without filling the remaining space.
Does cropping reduce quality?
Yes, as soon as you have to enlarge. Cropping a 1920 x 1080 file to vertical means stretching 608 pixels of width up to 1080. The loss is mild on a well exposed sharp shot and obvious on soft footage. Shooting or generating at a higher resolution gives you the margin you need.
What size should a resized Instagram video be?
1080 x 1920 for a Reel or a story, 1080 x 1350 for a portrait feed post, 1080 x 1080 if the same video has to serve elsewhere. In every case, export at those exact dimensions rather than at a higher resolution the platform will scale down itself.
Can I resize a video for Instagram from a phone?
Yes, with an editor that runs in the browser, since there is nothing to install. Fine repositioning is more comfortable on a large screen, but setting the frame, importing and exporting all work from a mobile without trouble.
Should I post the same video as a Reel and in the feed?
You can, as long as you prepare two exports instead of one. A Reel wants 9:16 and a fast pace, the feed accepts 4:5 and tolerates a wider shot. One reference edit can feed both, by changing the project frame and repositioning the clips.
A successful resize goes unnoticed: the viewer sees a video made for their screen, not an edit imported from somewhere else. Decide the frame first, recompose shot by shot, lift the text, export at the exact dimensions, and check the result on a phone before publishing. To crop, rebuild and export in one place, create your account and open the editor straight in your browser.