You have a 16:9 video, made for YouTube or for a web page, and now you need it vertical: a Short, a Reel, a TikTok post, a status. Cropping looks like a two click job. You drop the file into an editor, pick the portrait format, and look at the result. The top of the head is gone, the product is cut in half, and the on screen title has vanished off to the right.
None of that is the tool failing. It is geometry: a vertical frame is three times narrower than a horizontal one, so something has to go. The real question is not how to crop a video, but what to sacrifice and how to compensate. This guide gives the numbers, the three available methods and the exact moves to make in the editor. If browser editing is new to you, our guide to online video editing covers the basics first.
The short answer
To crop a video from 16:9 to 9:16: open the project, set the aspect ratio to 9:16, then handle each shot one by one. Scale the image up until it covers the full height of the frame, slide it sideways to centre the subject, and check that nothing important falls into the bands the platform interface covers. When a shot cannot survive that treatment, keep the whole image centred and fill the empty bands with a blurred background, a colour or a title. Platform by platform sizes are gathered in our video format reference.
Why going vertical cuts so much
Take a 16:9 image at 1920 by 1080 pixels. The 9:16 corridor you can carve out of it at full height is 1080 times 9 divided by 16, which is 607 pixels wide. Against the original 1920 pixels, those 607 pixels are roughly 32 % of the width. You keep barely a third of the scene and throw away the other two thirds. That single calculation, which nobody runs before clicking, explains almost every failed crop.
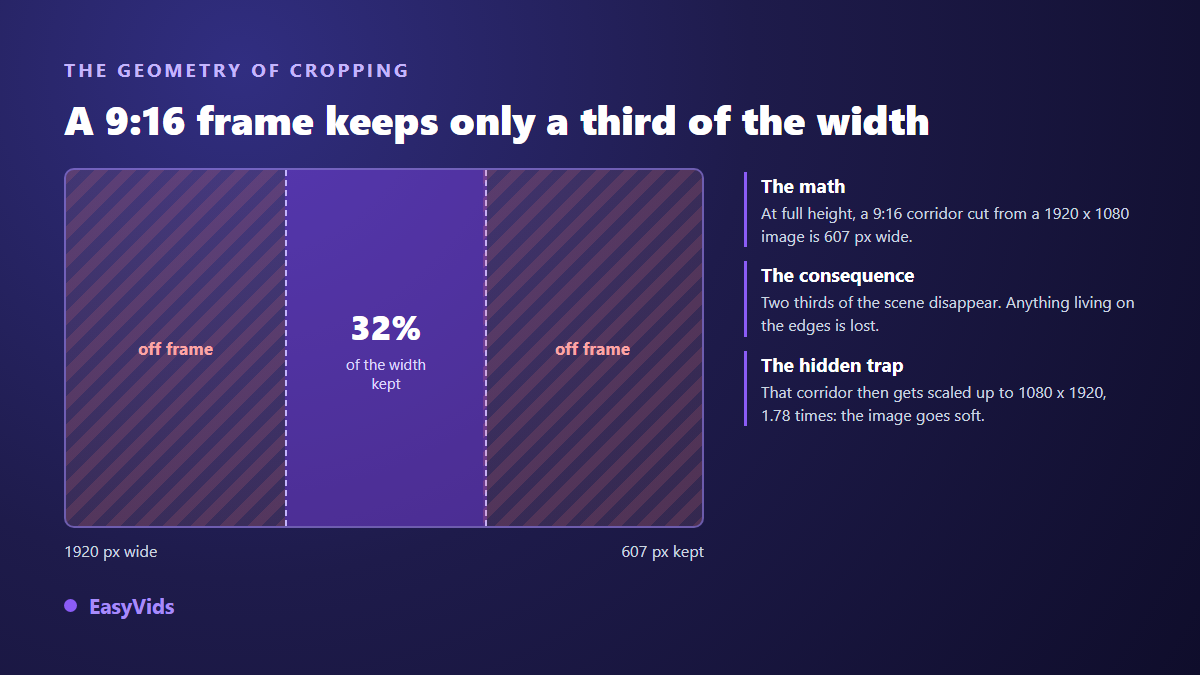
A second effect is less visible and just as costly: resolution. That 607 by 1080 corridor then has to fill a 1080 by 1920 vertical file, an enlargement of 1.78 times. Sharpness suffers, and grain turns to mush on flat areas. According to the recommended upload encoding settings published in YouTube Help, a horizontal video is uploaded at 1920 by 1080, so a cropped vertical version starts from a far narrower base than the platform expects. That is why a good crop always begins with the sharpest source you have.
Three ways to crop, and when to pick each
No method is right in the abstract. Each trades fidelity, time and phone screen impact differently. Here they are, in the order worth considering.
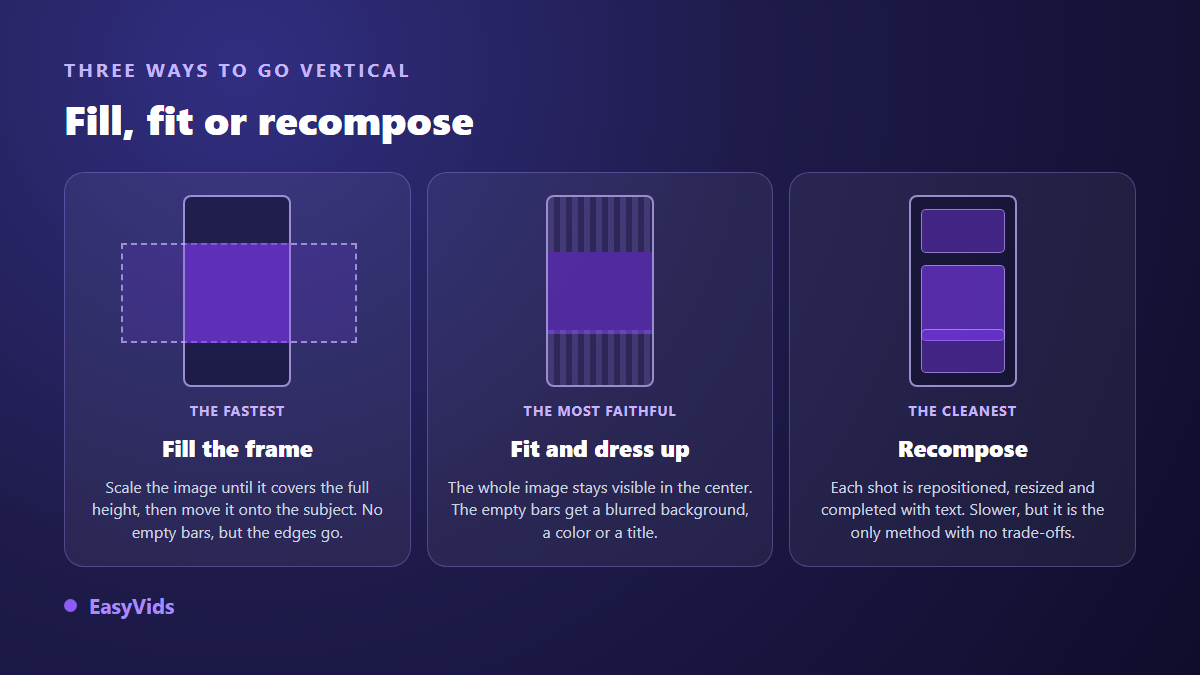
- Fill the frame. Scale the shot until it covers the full height, then slide it onto the subject. Full screen result, no empty bands, but the edges are gone for good. The right call when a single subject sits in the centre: a face, a product, a hand at work.
- Fit and dress the gap. The whole image stays visible in the middle of the vertical frame, and the two free bands take a blurred background, a solid colour, a title or a hook. Nothing is cut, readability is perfect, but the useful image only fills a third of the height. Keep it for wide shots you cannot amputate: a chart, a table, a group scene.
- Recompose shot by shot. You reposition, resize and complete every shot on its own, adding text where the image no longer carries the meaning. The slowest method, and the only one with no compromise. It becomes the default as soon as vertical is your main format rather than a by product.
In practice one video mixes all three: fill on the tight shots, fit on the two or three wide ones, recompose the opening and the ending. TikTok's own help centre states that the full screen format it expects is 9:16, and our TikTok video format sheet lists the settings to target on export.
Deciding what the frame has to keep
Before touching a single slider, watch the whole video once and ask one question per shot: what is the subject? A shot has one subject, rarely two. Vertical cropping gets easy the moment you accept that rule: subject centred, everything else sacrificed without regret. The videos that survive the switch best are the ones filmed tight, because that sorting was already done on set.
Two situations need a conscious call. The two person shot where both speak: a centred crop cuts both, so either pick whoever is talking and animate the frame, or stack them one above the other by recomposing. And the shot with text burned into one side: that text is lost, so remove it and rewrite it inside the vertical frame instead of trying to rescue it.
The areas the interface covers
A vertical video is never fully visible. The platform lays its interface on top: account name and buttons at the top, a column of icons on the right, caption and music at the bottom. TikTok, in the advertiser resources of its Creative Center, and Meta, in its full screen ad specifications, both publish safe area guidance that asks you to keep important elements away from those edges. A perfectly cropped subject sitting low in the frame ends up half hidden behind the caption.
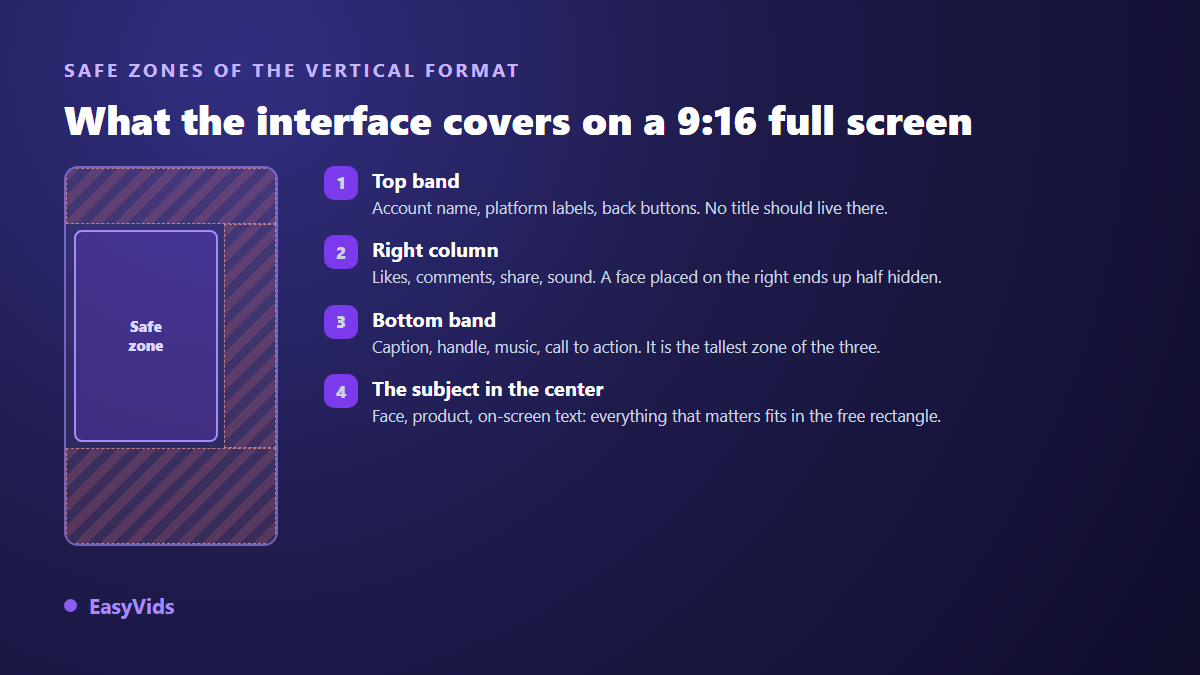
The useful habit is to crop slightly above the geometric centre, and to shift the subject left when the icon column threatens it. Exact Instagram dimensions and the spots to avoid are covered in our piece on story dimensions and the zones not to cover, and the same logic applies to Reels.
Cropping a video in the studio, step by step
The browser editor you reach from the EasyVids studio needs no installation. Turning a horizontal video vertical comes down to six moves, always the same ones.
- Import the video into a project, or start from a project you have already edited.
- Open the aspect ratio setting and pick 9:16. The preview frame turns vertical, the shots stay where they are.
- Select the first shot and raise its scale until the image covers the full height of the frame.
- Slide the shot horizontally to bring the subject to the centre, slightly above the middle.
- Move to the next shot and repeat. Every shot gets its own framing, and that is normal.
- Set the project background, solid colour or blur, for the shots you choose not to enlarge, then export.
By default the preview fits the whole video inside the frame, which shrinks it and leaves two empty bands. That is deliberate: nothing is lost until you decide to cut. The project background accepts a solid colour or a blur whose intensity you set, which handles those bands cleanly. The 1:1, 4:3 and 3:4 ratios sit next to 9:16, and a custom size remains available when a platform asks for something else.
Following a moving subject with an animated crop
A still subject is cropped once and for all. A subject walking across the shot leaves the vertical corridor within two seconds. The fix is to animate position: set a marker at the start of the shot with the opening framing, a second one at the end with the closing framing, and the editor works out the travel between them. Position, scale and rotation all accept that kind of marker, which is enough to follow a walk, a gesture or a pan.
Two cautions are worth repeating. A slow move goes unnoticed, a fast one makes viewers queasy, so keep it under the threshold the eye picks up. And when the subject genuinely crosses the whole field, splitting the shot in two and cropping each half separately is usually more honest than forcing one long artificial sweep.
Text and captions get rebuilt, never cropped
This is the most common and the most avoidable mistake. A name bar sitting at the bottom left of a 16:9 image falls outside the vertical frame, and a caption line sized for horizontal width either overflows or turns tiny once scaled down. Delete those elements before cropping, then lay them out again inside the vertical frame with a suitable size and line width. Settings that actually hold up on a phone screen are covered in our article on readable captions in vertical format.
Mistakes that ruin a crop
Some come from the source file, others from the edit. A clip filmed with the phone held one way and displayed the other, for instance, is not a cropping problem at all: it is an orientation problem, and rotating the video takes half a minute. The other traps come back with real regularity.
- Cropping first and editing after: every cut changes the shot, so it changes the framing. Edit, then crop.
- Scaling a shot up by more than double, past which edges go visibly soft on a large phone screen.
- Skipping a real world check of the export, platform interface included, before publishing.
- Leaving a logo in a corner that was just cut away, and publishing an unbranded video.
- Cropping a dense wide shot instead of recomposing it: nobody reads a table squeezed into a third of the width.
- Exporting below the frame resolution, which stacks a second loss on top of the crop.
Better to produce in the right format than to crop
The best crop is the one you never make. When the video is generated rather than filmed, the format is chosen before the first frame exists: you ask for 9:16, and every shot is composed vertically, framed tight, with the subject where it belongs. No width lost, no upscaling, no text to move. On EasyVids the format picked at the start is carried through the whole chain, from writing to editing, precisely so that no rescue crop is needed at the end.
One nuance is worth knowing: not every video model accepts every ratio, and some only output horizontal. A serious studio tells you at the moment you choose, not at export. And if you target both YouTube and short form, produce two versions rather than one you will crop later. The second version costs less work than a shot by shot rescue session.
Frequently asked questions
Can you crop a video without losing quality?
Not entirely. Cropping means keeping only some of the pixels, then enlarging them to fill the new frame. The loss is mechanical. It becomes invisible when your source is far sharper than the target, for example a 4K file cropped to a 1080 wide vertical. Always start from the sharpest file you have, never from a version already compressed for sending.
How do you crop a video with no software to install?
A browser editor is enough: import the file, change the project aspect ratio, adjust the scale and position of each shot, then export. Nothing to install, and the work runs just as well on a modest machine, since most of it happens on screen rather than in heavy processing.
Should you crop to 9:16 or to 1:1?
9:16 fills a phone screen and remains the short form standard. Square is a useful compromise when one version has to serve several placements, feed posts in particular. As a reference point, the central square of a 16:9 image keeps around 56 % of its width against 32 % for a vertical corridor, so you give up noticeably less picture.
How do you know what the interface will hide?
The safest check is to publish the video privately or as a draft on the target platform and watch it on a phone, interface included. Failing that, keep a comfortable margin at the top, at the bottom and on the right, and never place a decisive element in the lower quarter of the frame.
Does cropping change the length or the sound?
No. Cropping only touches the image frame. Duration, audio track and sync stay identical. What changes duration is trimming, a different operation best done before cropping so you never frame shots that end up deleted.
Cropping a video well is decided upstream: know what the vertical frame will take from you, pick the subject shot by shot, protect the areas the interface covers, and rebuild text instead of dragging it along. The move inside the editor only takes a few minutes. To try it on your own footage, or to produce vertically from the start and skip cropping altogether, create your account and open a project in the studio.